
Modern Browser Architecture
Before diving into the rendering pipeline, let’s establish some foundational knowledge about Chromium’s browser architecture and process model.
Two Formulas
Formula 1: Browser = Browser Engine + Services
- Safari = WebKit + other components, libraries, services
- Chrome = Chromium + Google service integrations
- Microsoft Edge (Chromium) = Chromium + Microsoft service integrations
- Yandex Browser = Chromium + Yandex service integrations
- 360 Safe Browser = Trident + Chromium + 360 service integrations
- Chromium = Blink + V8 + other components, libraries, services
Formula 2: Engine = Rendering Engine + JavaScript Engine + Other
| Browser | Rendering Engine | JavaScript Engine |
|---|---|---|
| Internet Explorer | Trident (MSHTML) | JScript/Chakra |
| Microsoft Edge | EdgeHTML → Blink | Chakra → V8 |
| Firefox | Gecko | SpiderMonkey |
| Safari | KHTML → WebKit | JavaScriptCore |
| Chrome | WebKit → Blink | V8 |
| Opera | Presto → WebKit → Blink | Carakan → V8 |
Notably: aside from Firefox and the long-dead IE, most browsers on the market have converged on either Blink + V8 or WebKit + JavaScriptCore.
Rendering Engine
The rendering engine parses HTML, CSS, and JavaScript, then renders the page.
Firefox’s rendering engine includes components for:
- Document parser (HTML and XML)
- Layout engine with content model
- Style system (CSS, etc.)
- JavaScript runtime (SpiderMonkey)
- Image library
- Networking library (Necko)
- Platform-specific graphics and widget sets for Win32, X, and Mac
- User preferences library
- Mozilla Plug-in API (NPAPI)
- Open Java Interface (OJI) with Sun Java 1.2 JVM
- RDF back end
- Font library
- Security library (NSS)
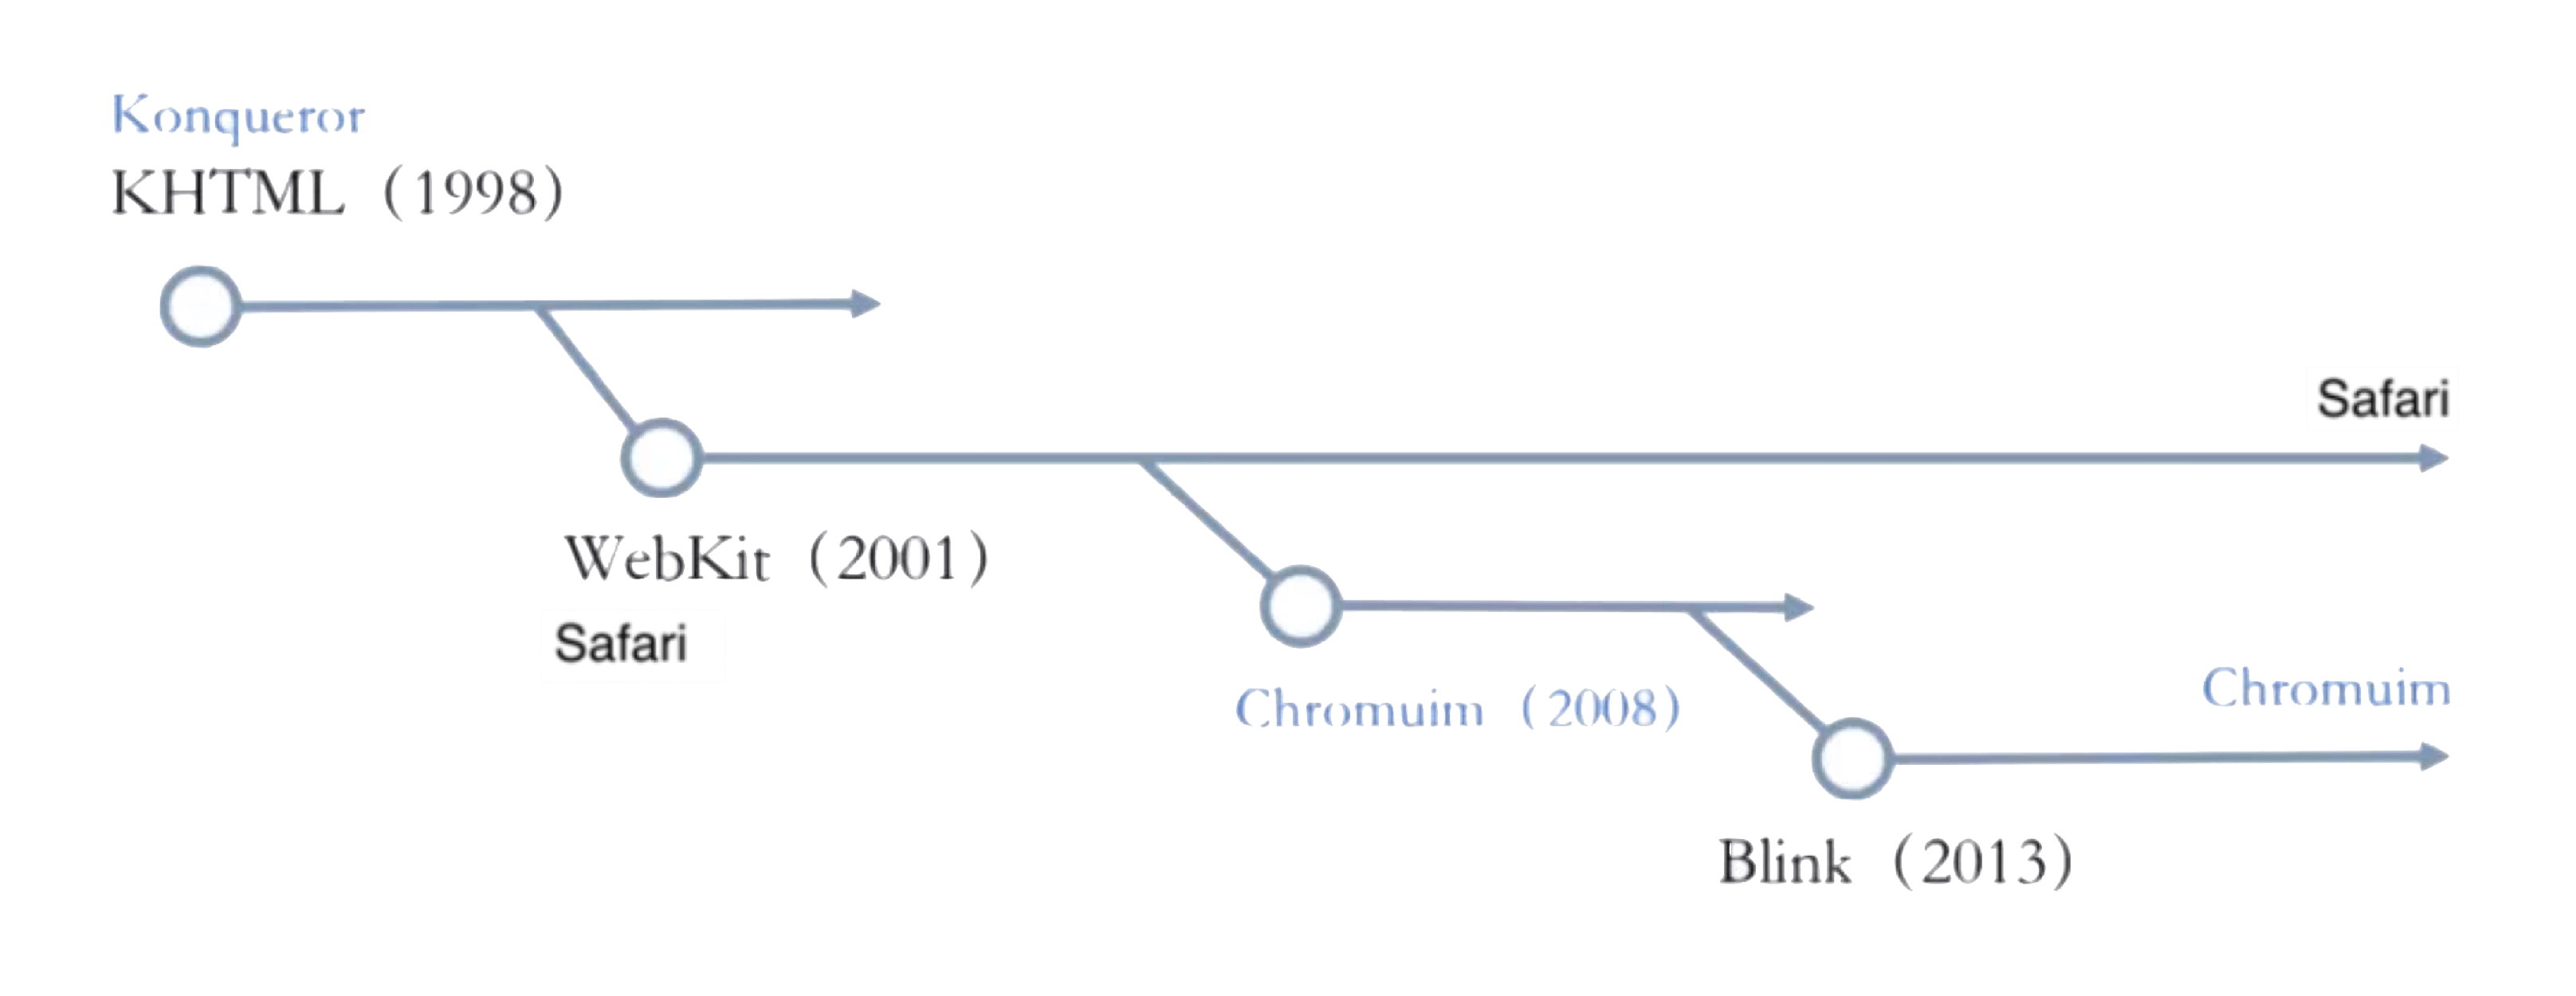
Now for WebKit’s history: Apple built WebKit in 2001, based on KHTML, as Safari’s rendering engine. Google then based Chromium on WebKit in 2008 — at that point Chrome used WebKit too. In 2010, Apple revamped WebKit into what’s now known as WebKit2 (used in WKWebView and Safari). In 2013, Google forked WebKit and created Blink as Chromium’s rendering engine. Because of the shared open-source lineage, you’ll still see plenty of Apple and WebKit fingerprints in Blink’s source today.
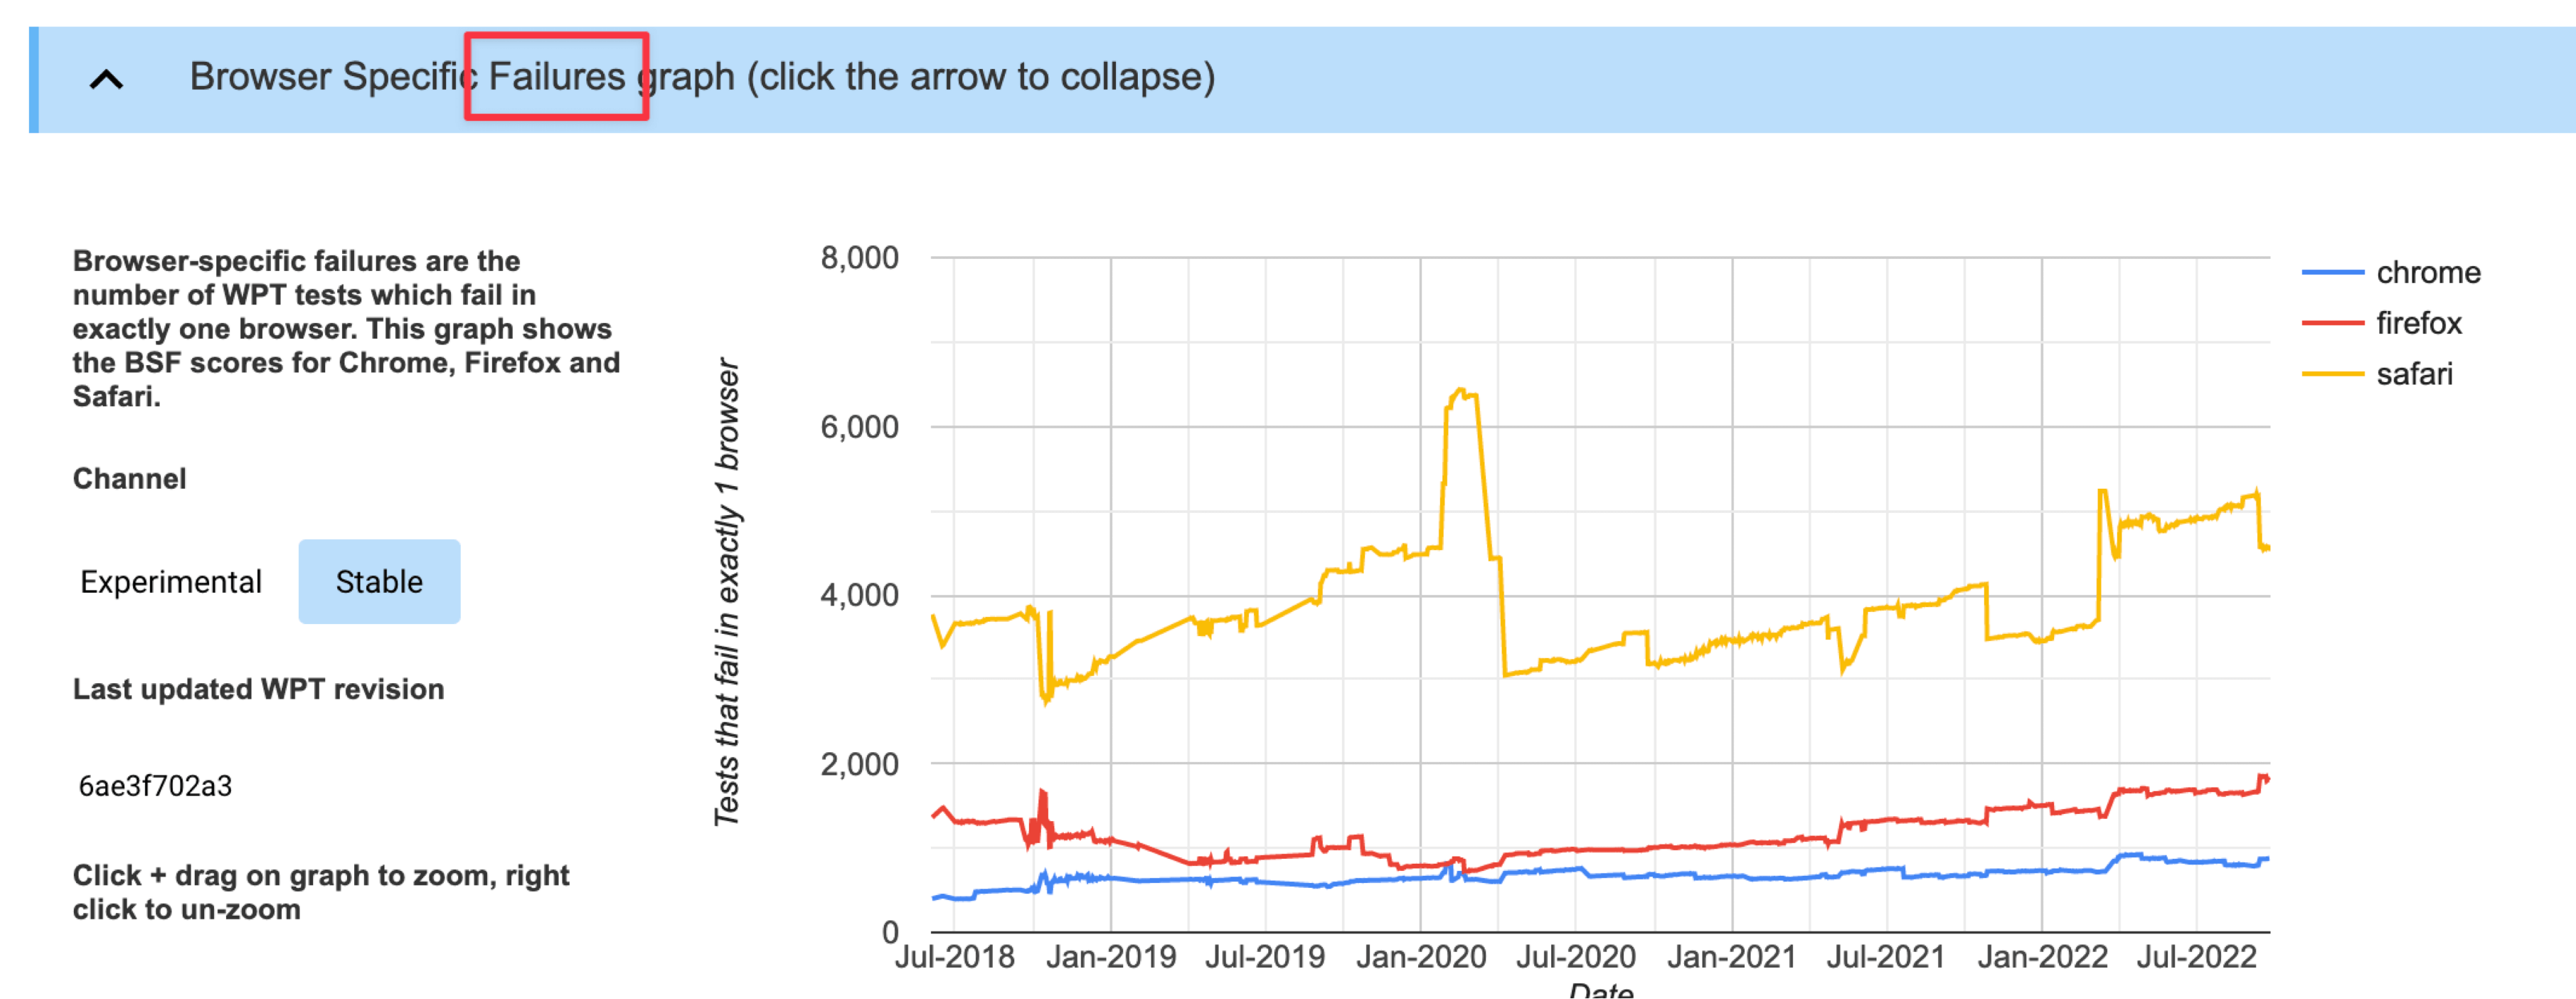
Web Platform Tests scores show just how good Chromium’s compatibility is:
JavaScript Engine
JavaScript engines are typically embedded modules within a rendering engine, but they’re also highly self-contained and can be used standalone.
Notable JS engines:
- SpiderMonkey: Mozilla’s engine, written in C/C++, powers Firefox.
- Rhino: Mozilla’s open-source engine, written in Java.
- Nashorn: Bundled with JDK 8+, written in Java.
- JavaScriptCore: WebKit’s built-in engine, provided as a system library on iOS. Mobile apps can use it without any size overhead — but JIT can’t be enabled in that context.
- ChakraCore: Microsoft’s open-source engine. Now that Edge uses Chromium, ChakraCore is only used for Edge on iOS (which uses JavaScriptCore) — all other platforms use V8.
- V8: Google’s open-source engine, written in C++. Blink’s built-in JS engine, also the engine powering Android WebView. Outstanding performance with JIT enabled, strong ECMAScript compatibility.
- JerryScript: Samsung’s open-source engine, used in IoT.js.
- Hermes: Meta’s open-source engine, designed for Hybrid UI systems like React Native. Supports loading bytecode directly, shortening JS load time and improving TTI. Optimized bytecode with incremental loading — friendly to mid/low-end devices. Intentionally no JIT — mobile JIT adds warmup latency, increases binary size and memory, and doesn’t work on iOS.
- QuickJS: By FFmpeg author Fabrice Bellard. Extremely small (210 KB), good compatibility. Directly emits bytecode, supports native C module imports, strong performance. Startup time of ~300 μs on single-core machines, minimal memory footprint, uses reference counting. Excellent for Hybrid architectures, game scripting systems, and embedded use.
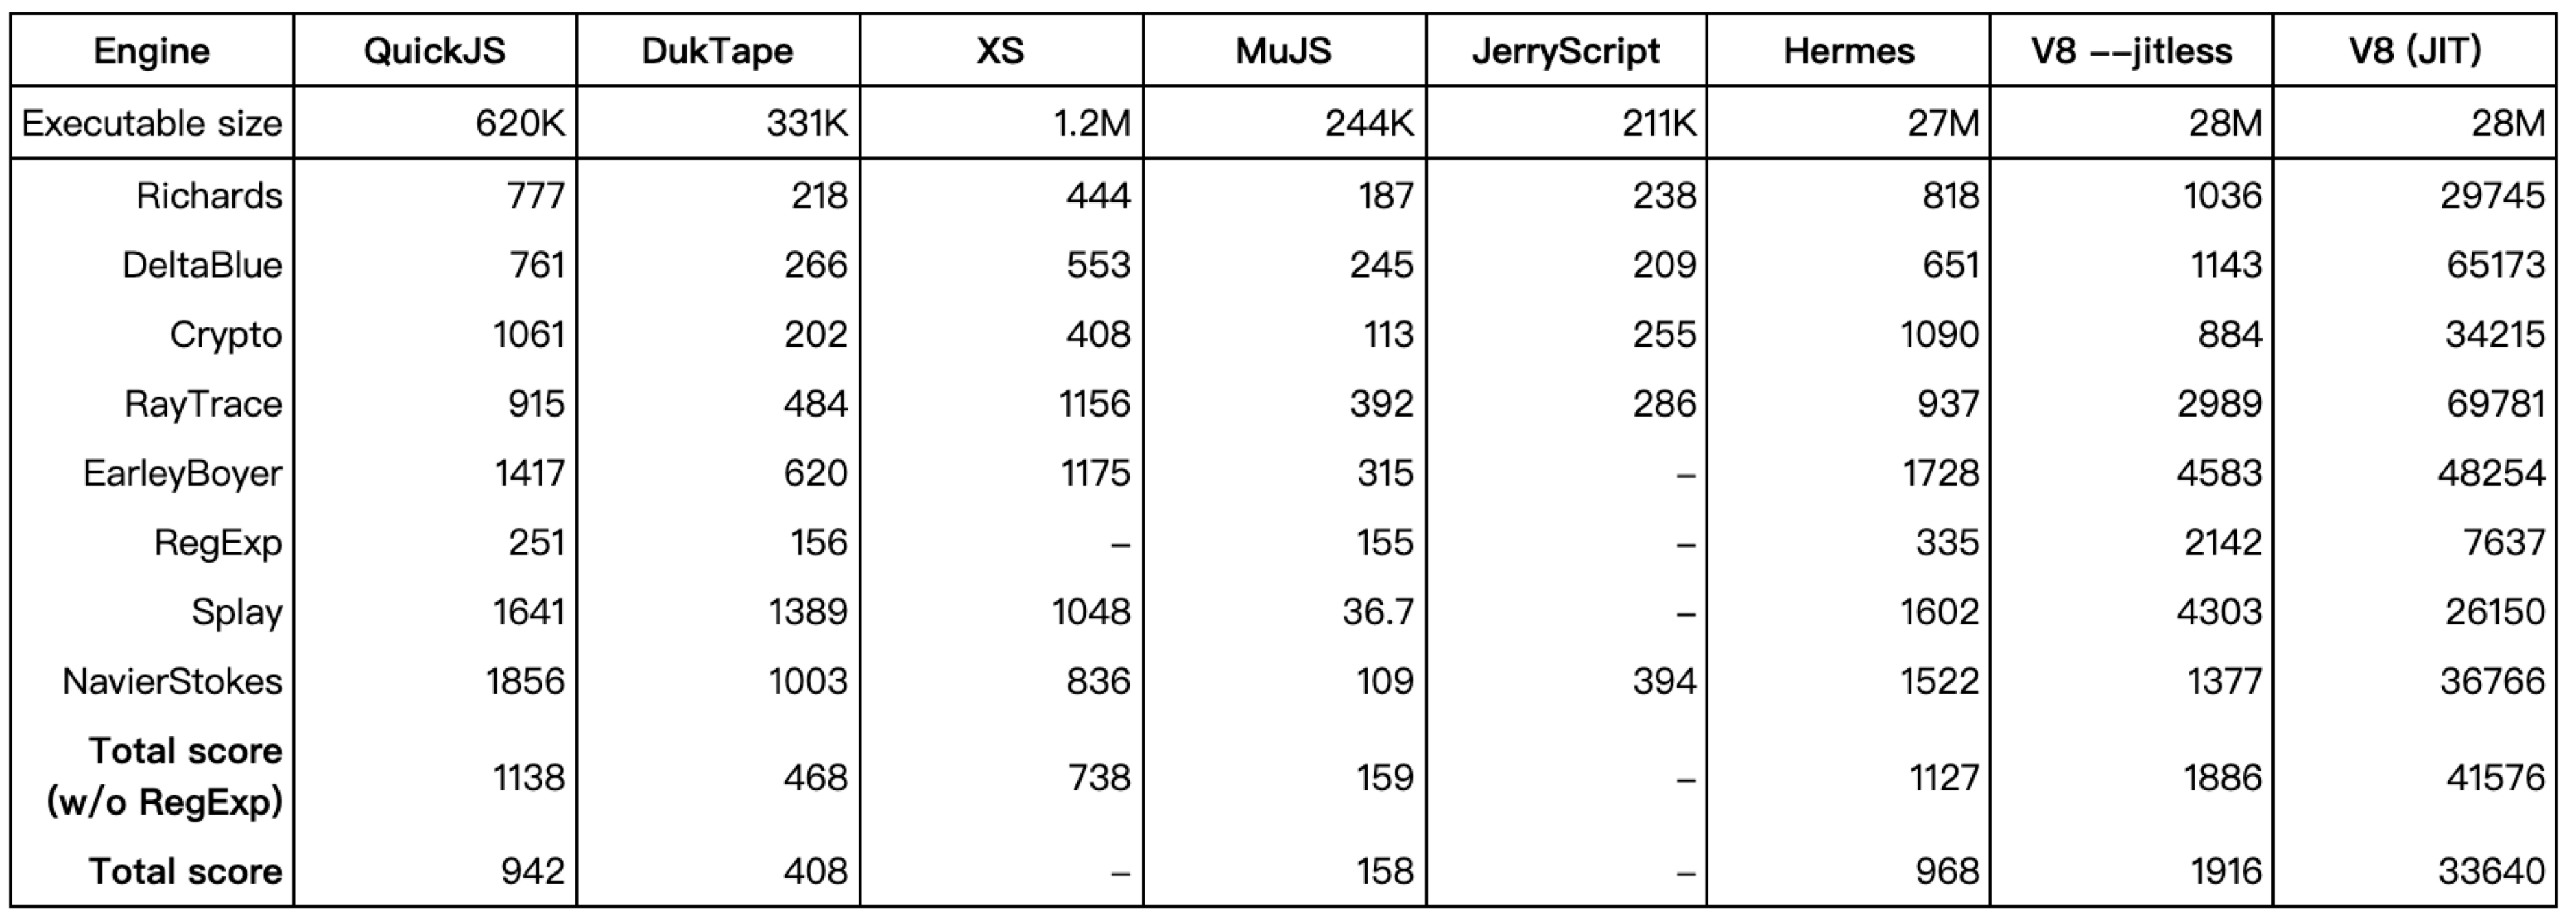
Engine performance comparison:
ECMAScript standard support:

Chromium Process Model
Chromium has five process types:
- Browser Process: 1 instance
- Utility Process: 1 instance
- Viz Process: 1 instance
- Plugin Process: multiple
- Render Process: multiple
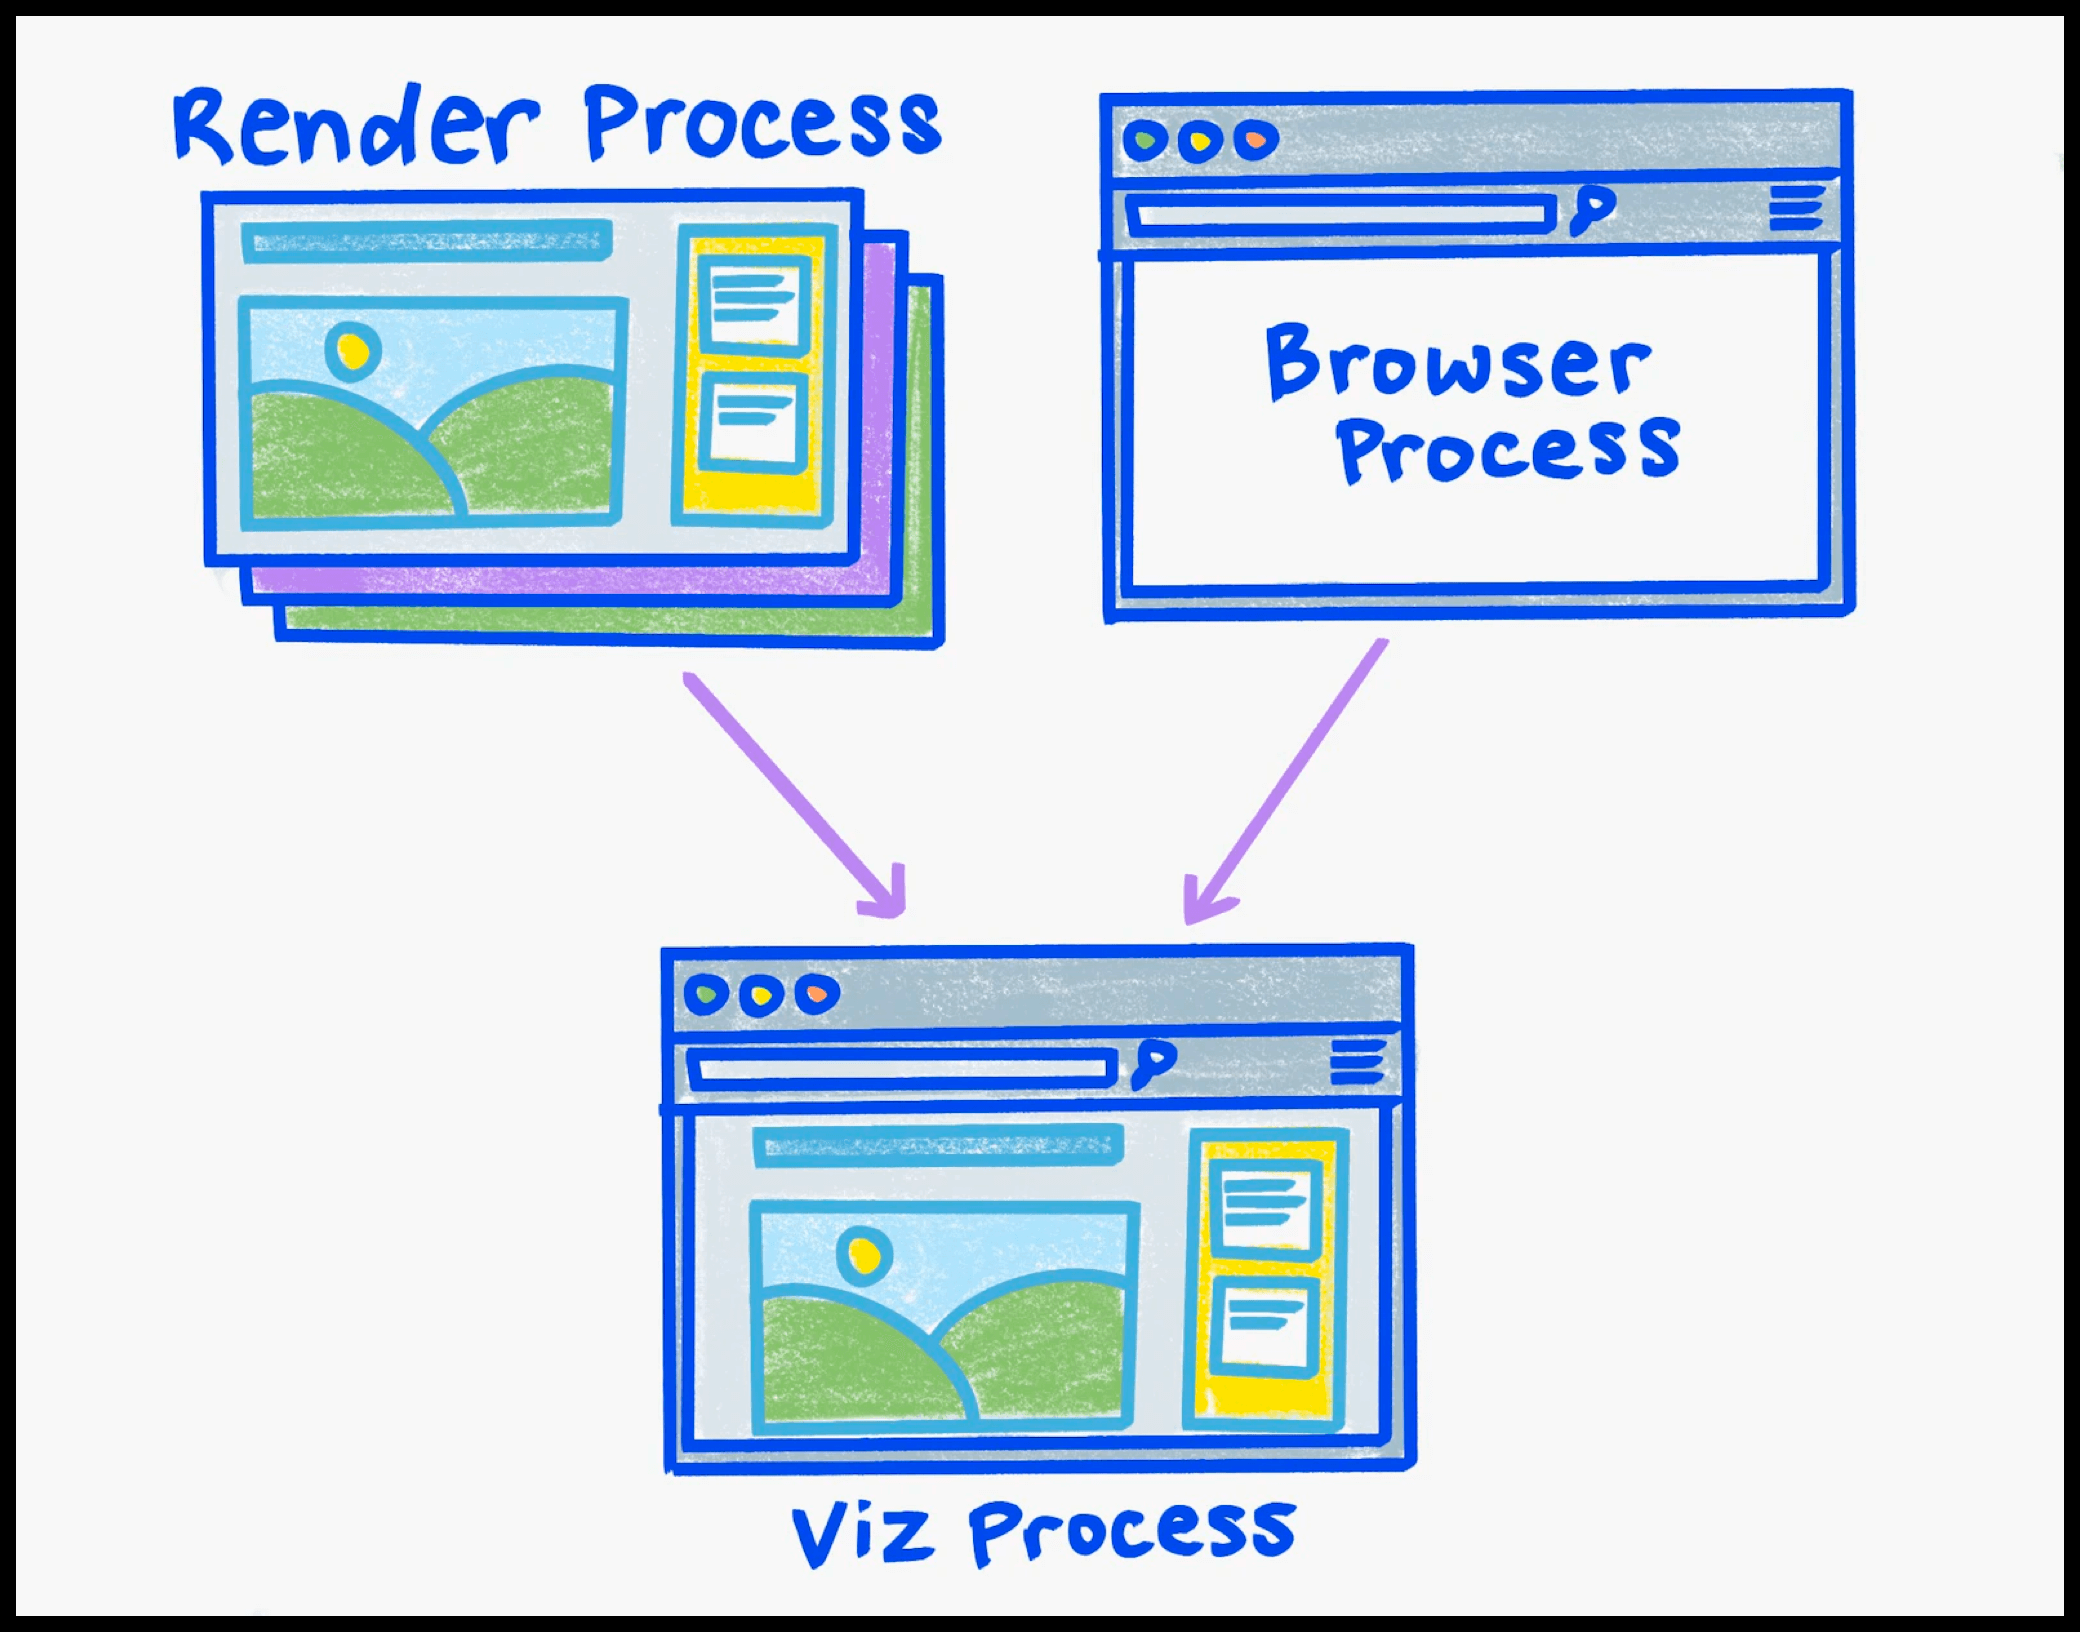
Setting aside Plugin Processes (for Chrome extensions), the three most relevant to rendering are Browser Process, Render Process, and Viz Process.
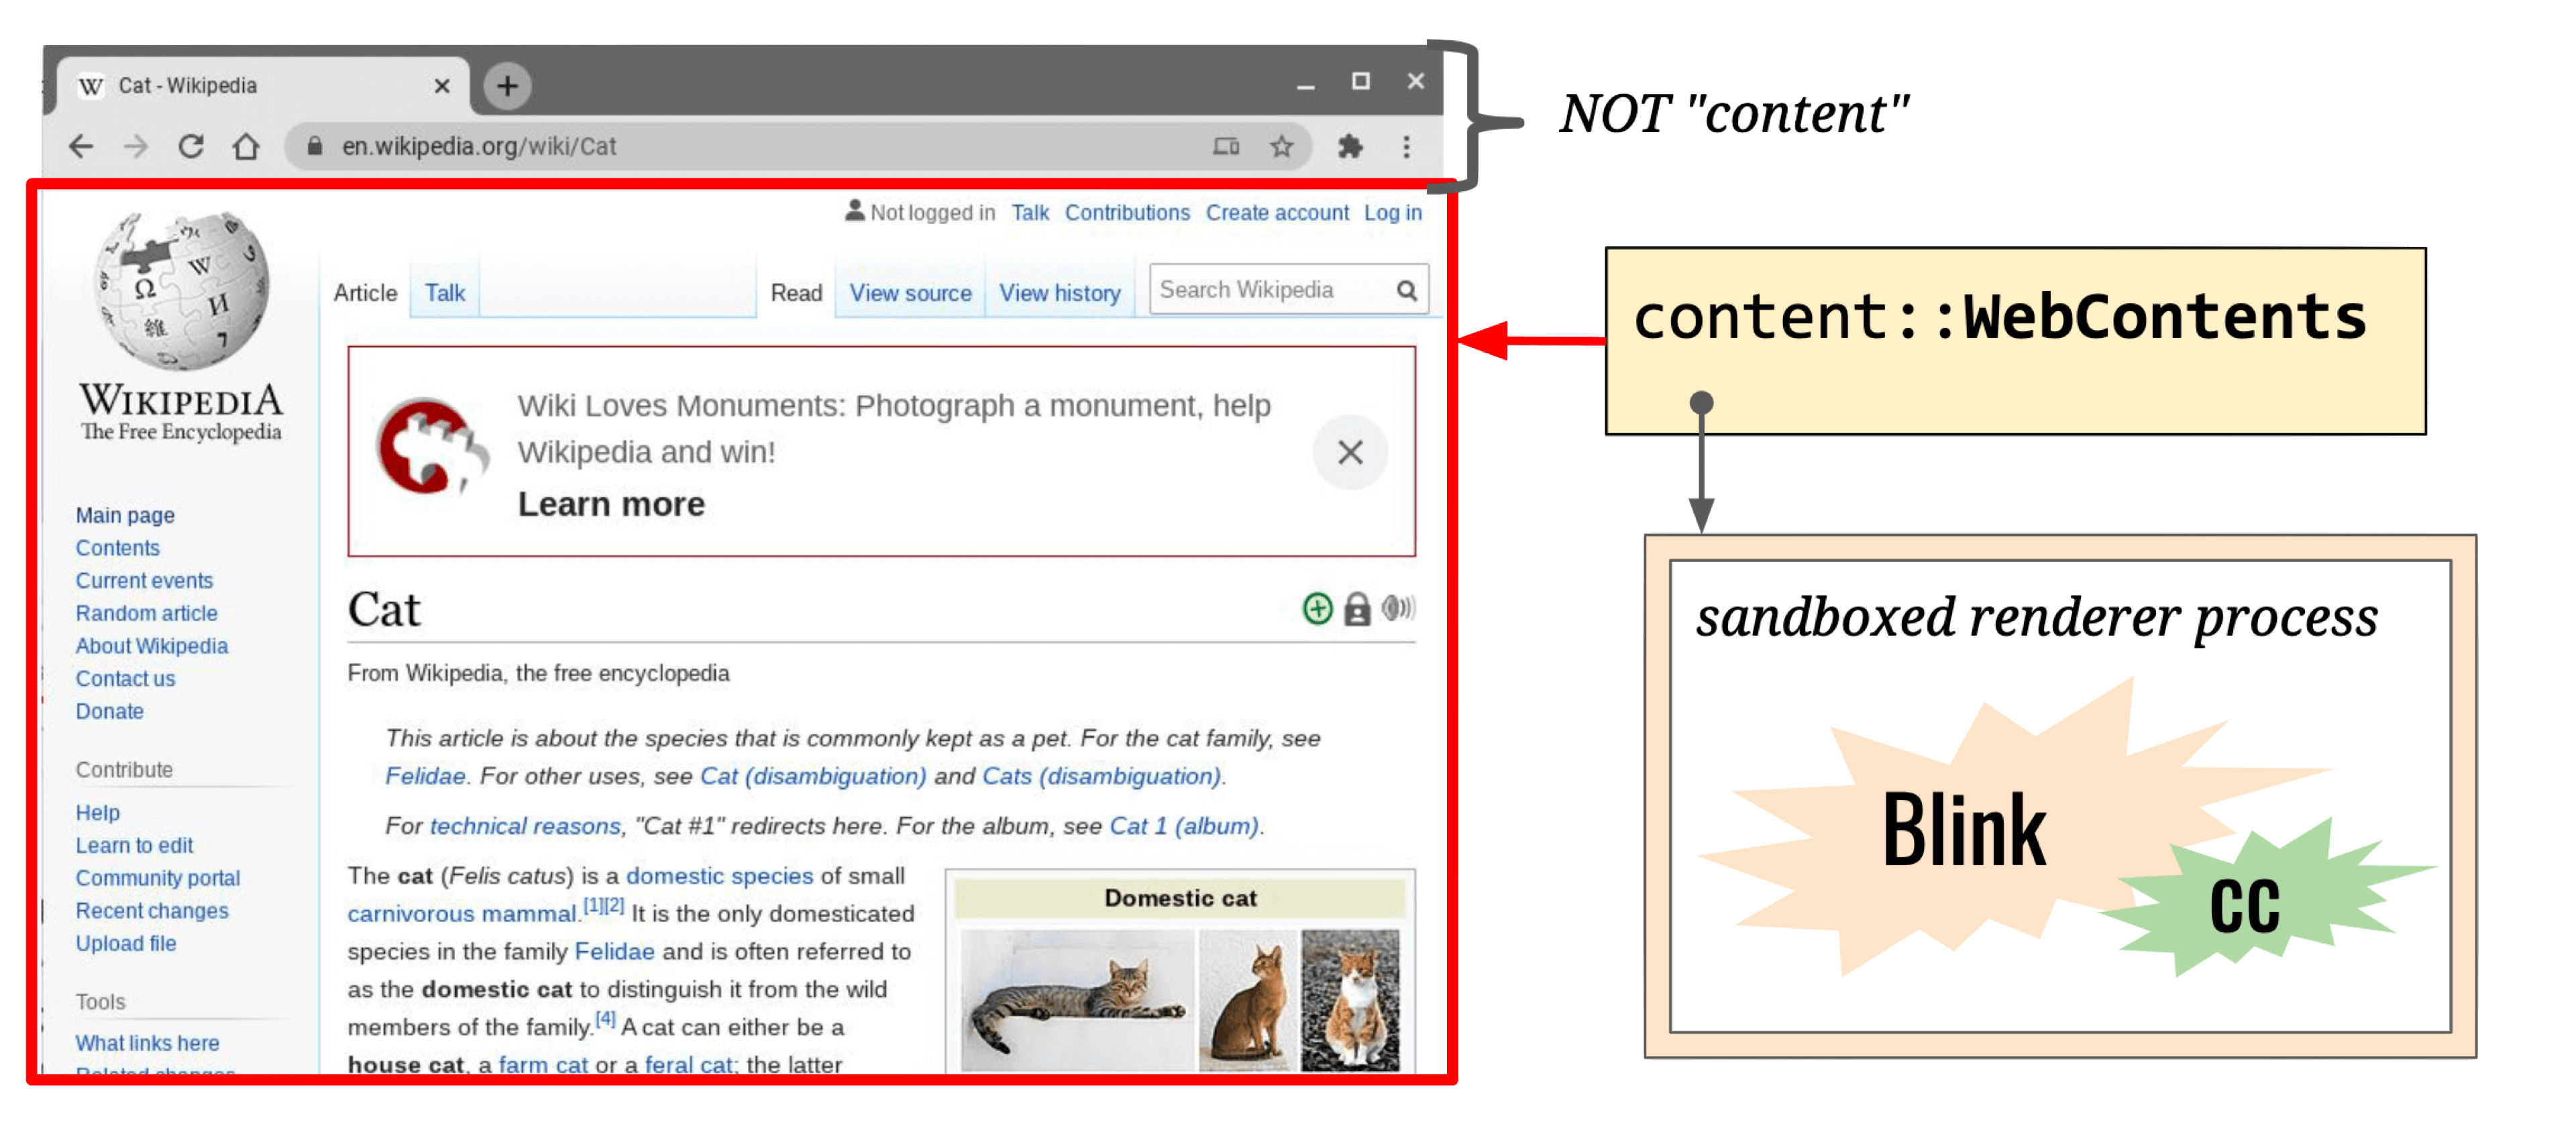
Render Process
- Count: multiple
- Responsibilities: Handles rendering, animation, scrolling, and input events for a single site within a single tab (note: cross-site iframes get their own Render Process).
- Threads:
- Main thread × 1
- Compositor thread × 1
- Raster thread × 1
- Worker thread × N
The Render Process covers the WebContent area:
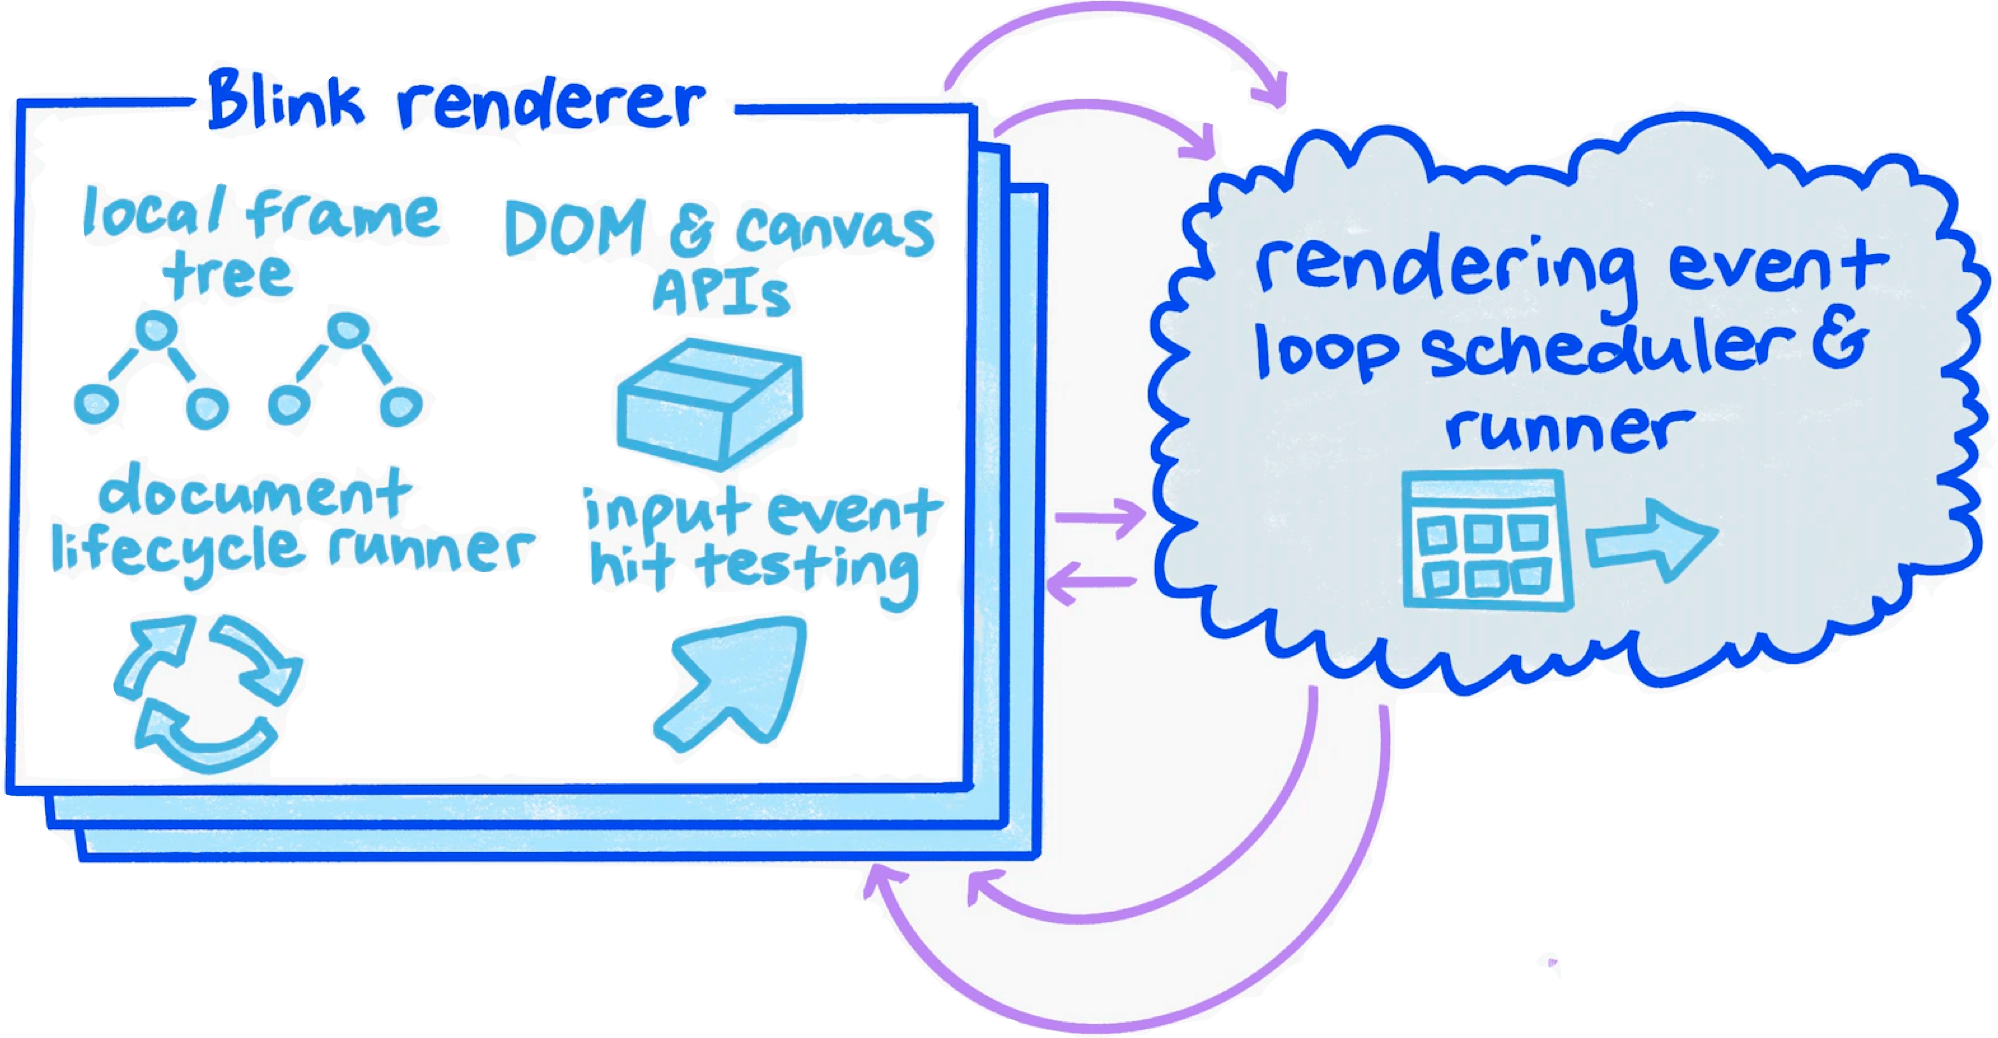
Main thread responsibilities:
- Execute JavaScript
- Event Loop
- Document lifecycle
- Hit-testing
- Event dispatch
- Parsing HTML, CSS, and other data formats
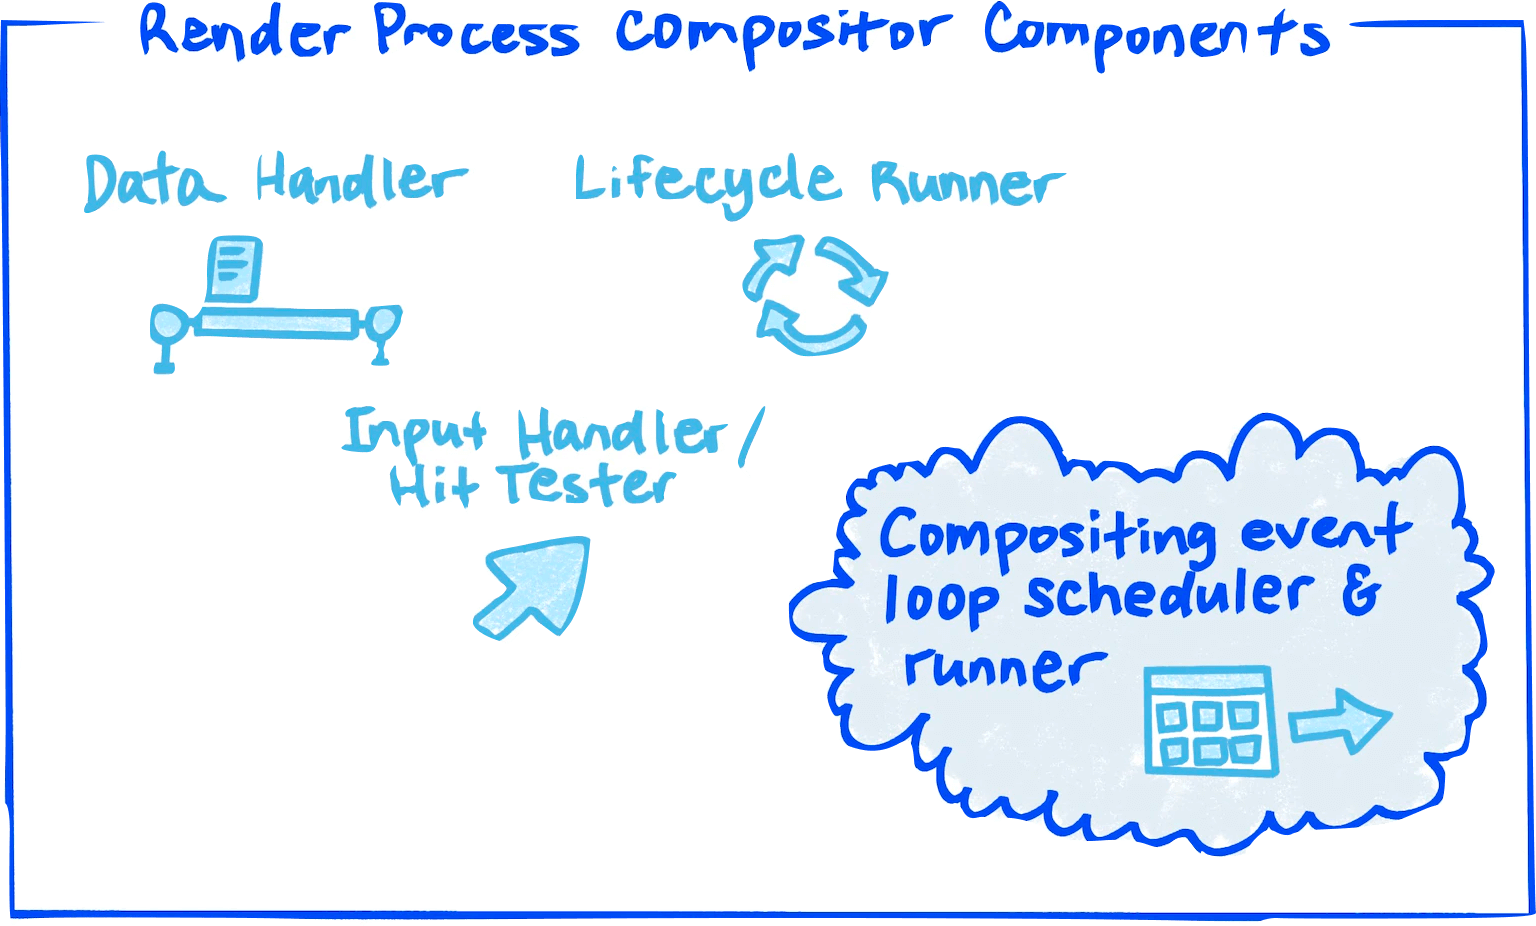
Compositor Thread responsibilities:
- Input Handler & Hit Tester
- Scroll and animation within WebContent
- Compute optimal layer decomposition
- Coordinate image decoding, drawing, and rasterization tasks (via helpers)
The number of Compositor thread helpers scales with CPU core count.
Browser Process
- Count: 1
- Responsibilities: Full ownership of Browser UI (everything outside WebContent) — rendering, animation, routing, input events, etc.
- Threads:
- Render & Compositing Thread
- Render & Compositing Thread Helpers
Viz Process
- Count: 1
- Responsibilities: Receives viz::CompositorFrame from Render Process and Browser Process, composites (Aggregates) them, and uses the GPU to display (Display) the result on screen.
- Threads:
- GPU main thread
- Display Compositor Thread
Chromium Process Modes
- Process-per-site-instance (old default): Tabs that open from each other and belong to the same site (same root domain + protocol) share a Render Process.
- Process-per-site
- Process-per-tab (current default): Each tab gets its own Render Process. Cross-site iframes within a tab also get a separate Render Process.
- Single Process: Single-process mode, enabled via startup flags for debugging.
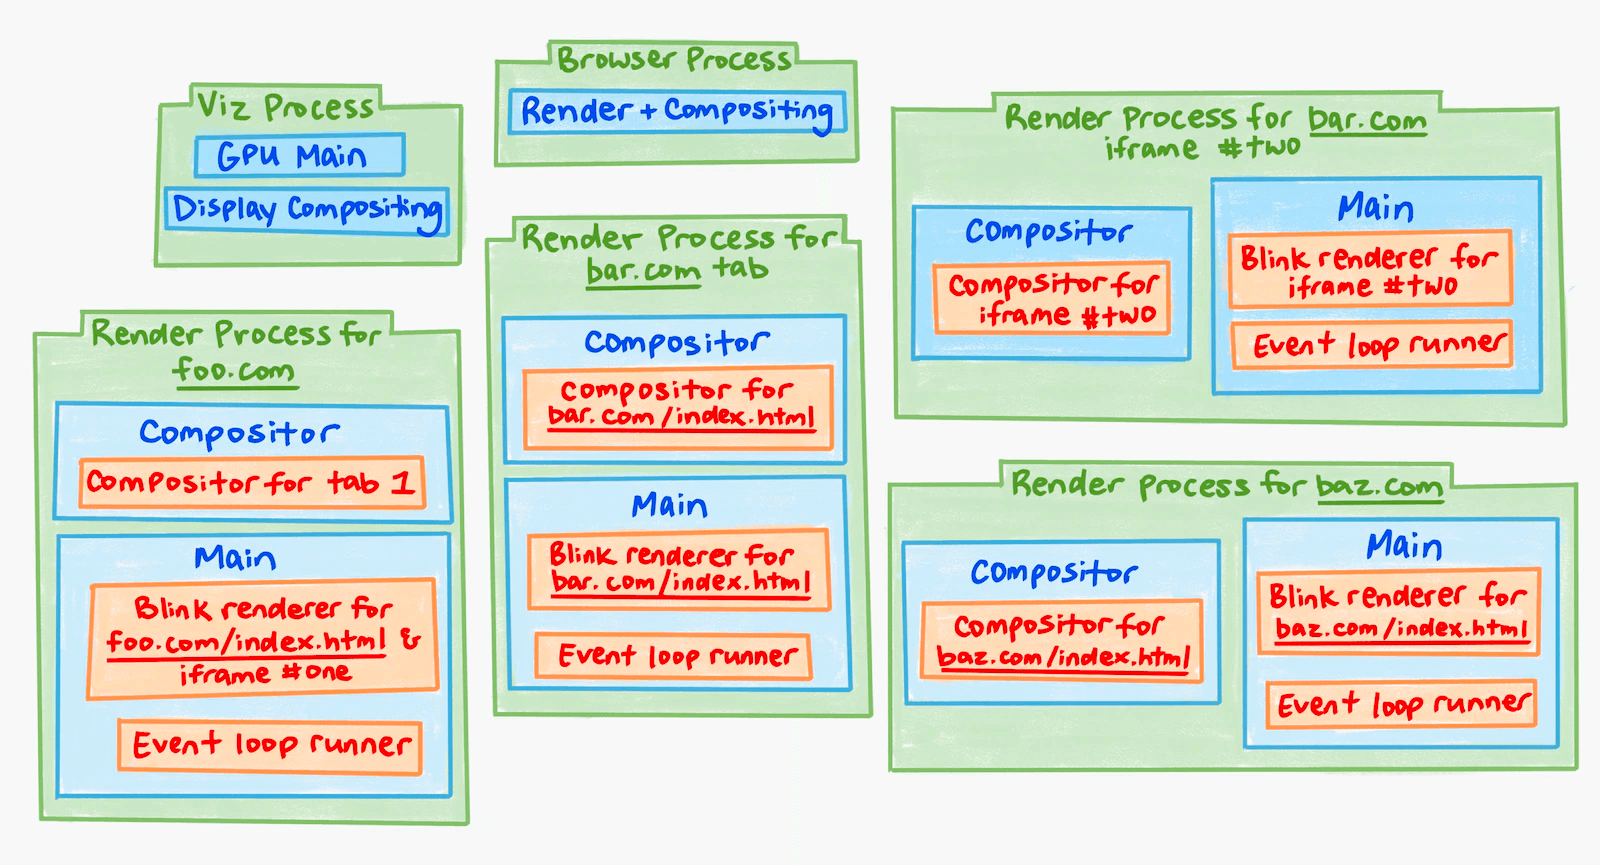
Example:
Three tabs open foo.com, bar.com, and baz.com. bar.com and baz.com have no iframes; foo.com’s HTML is:
<html>
  <iframe id=one src="foo.com/other-url"></iframe>
  <iframe id=two src="bar.com"></iframe>
</html>
With Process-per-tab, the process model looks like this:
The Chromium Rendering Pipeline
Now for the core subject — the Chromium Rendering Pipeline.
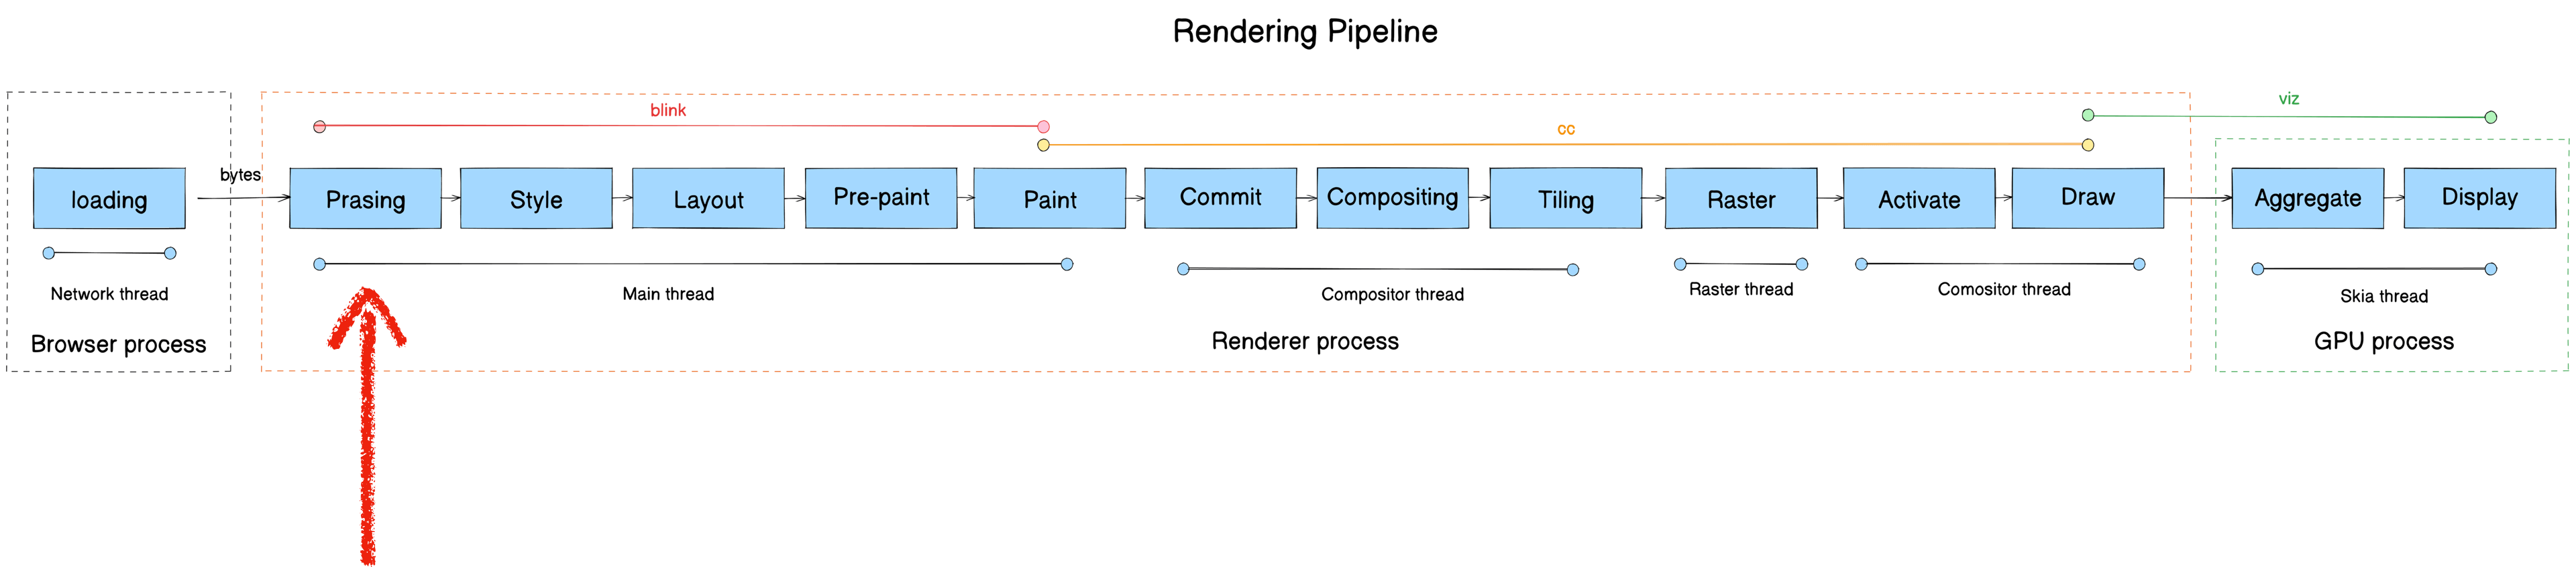
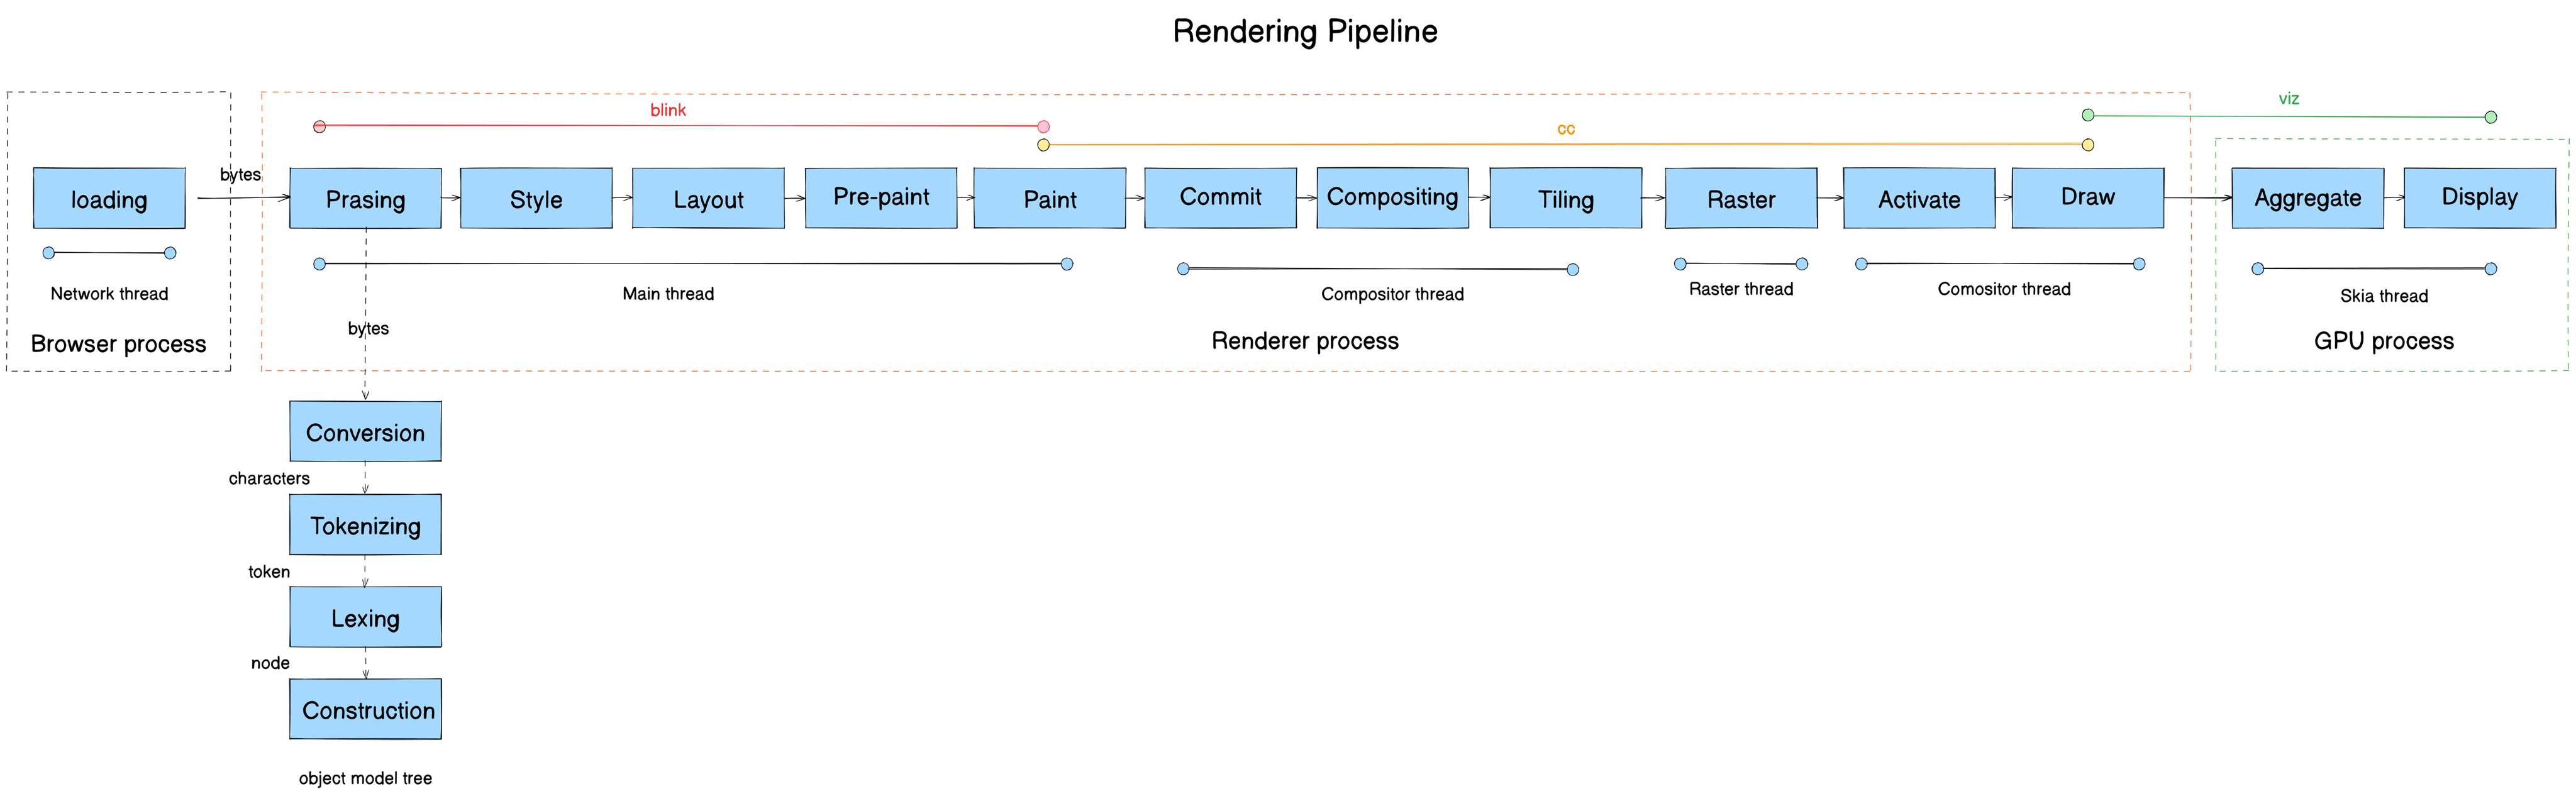
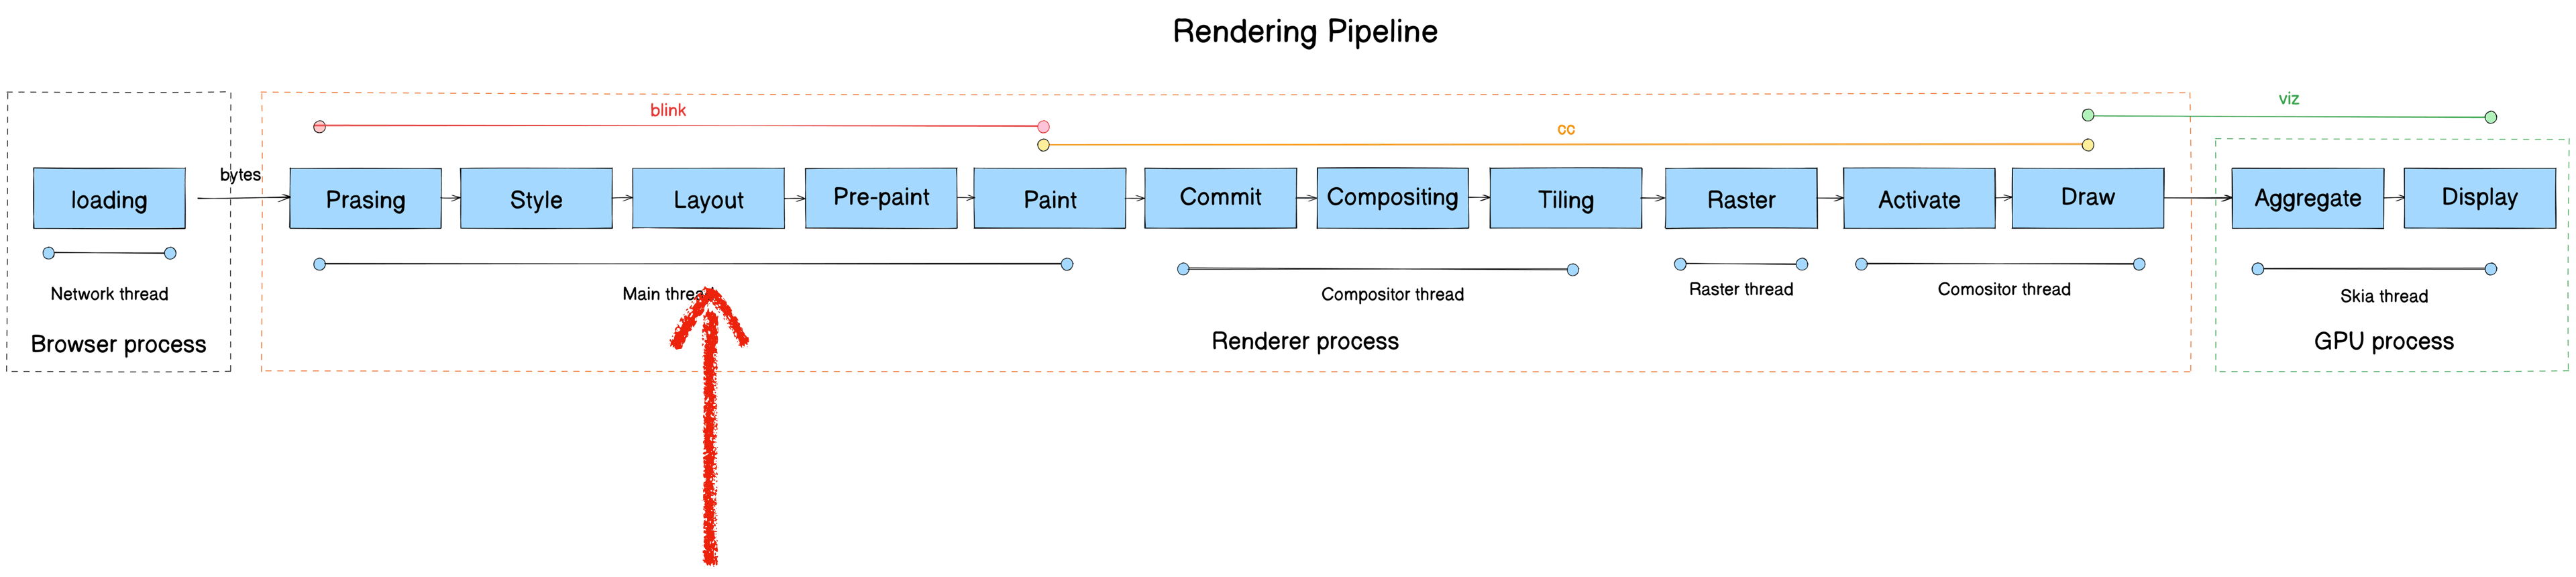
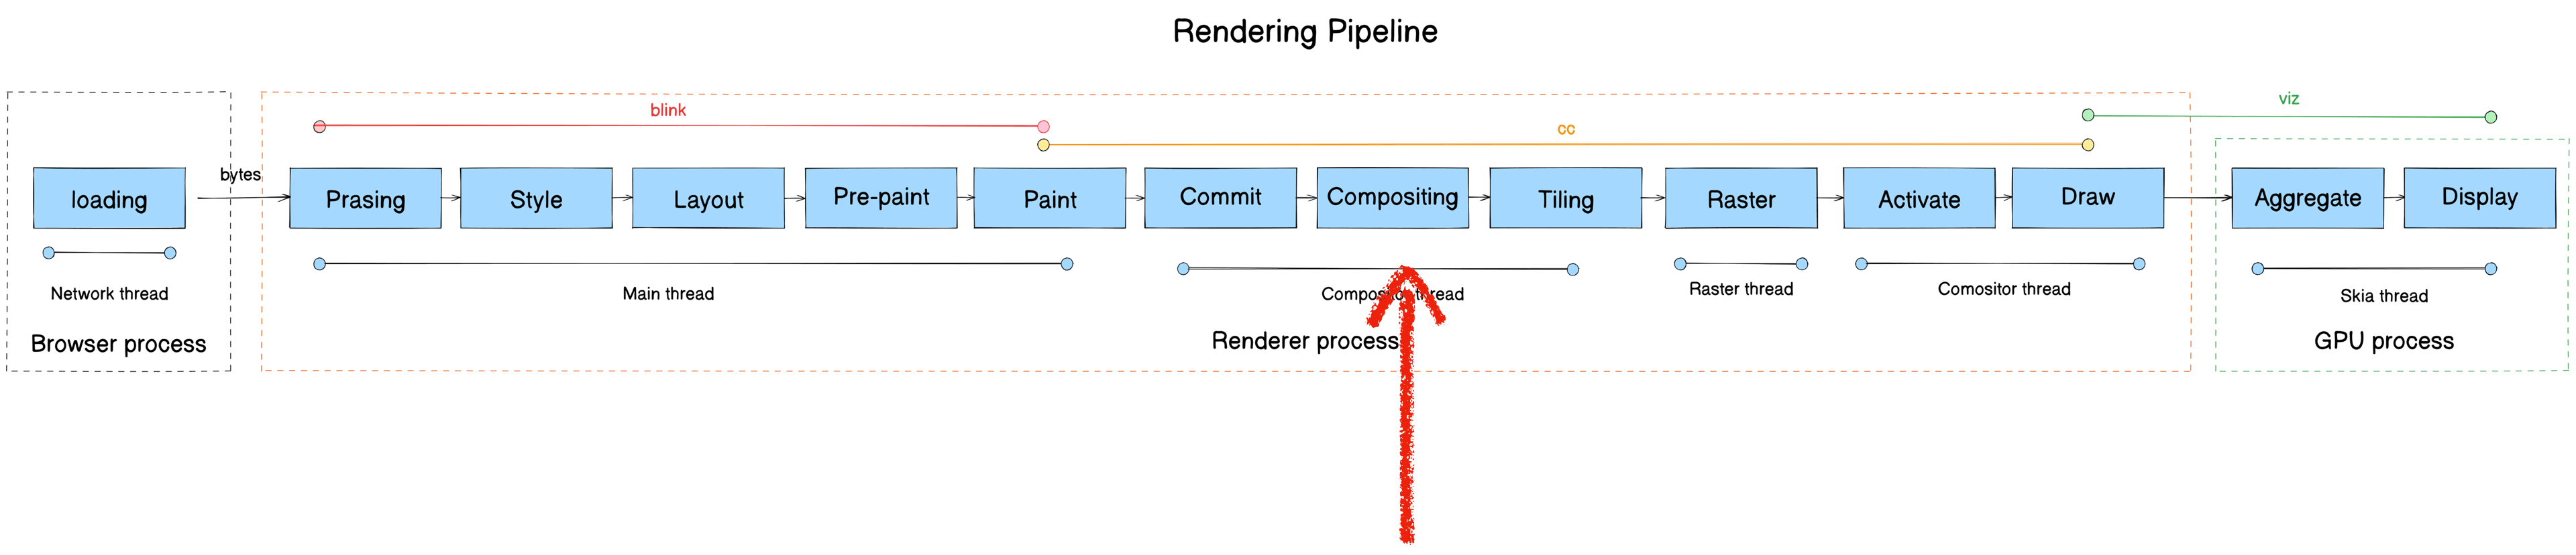
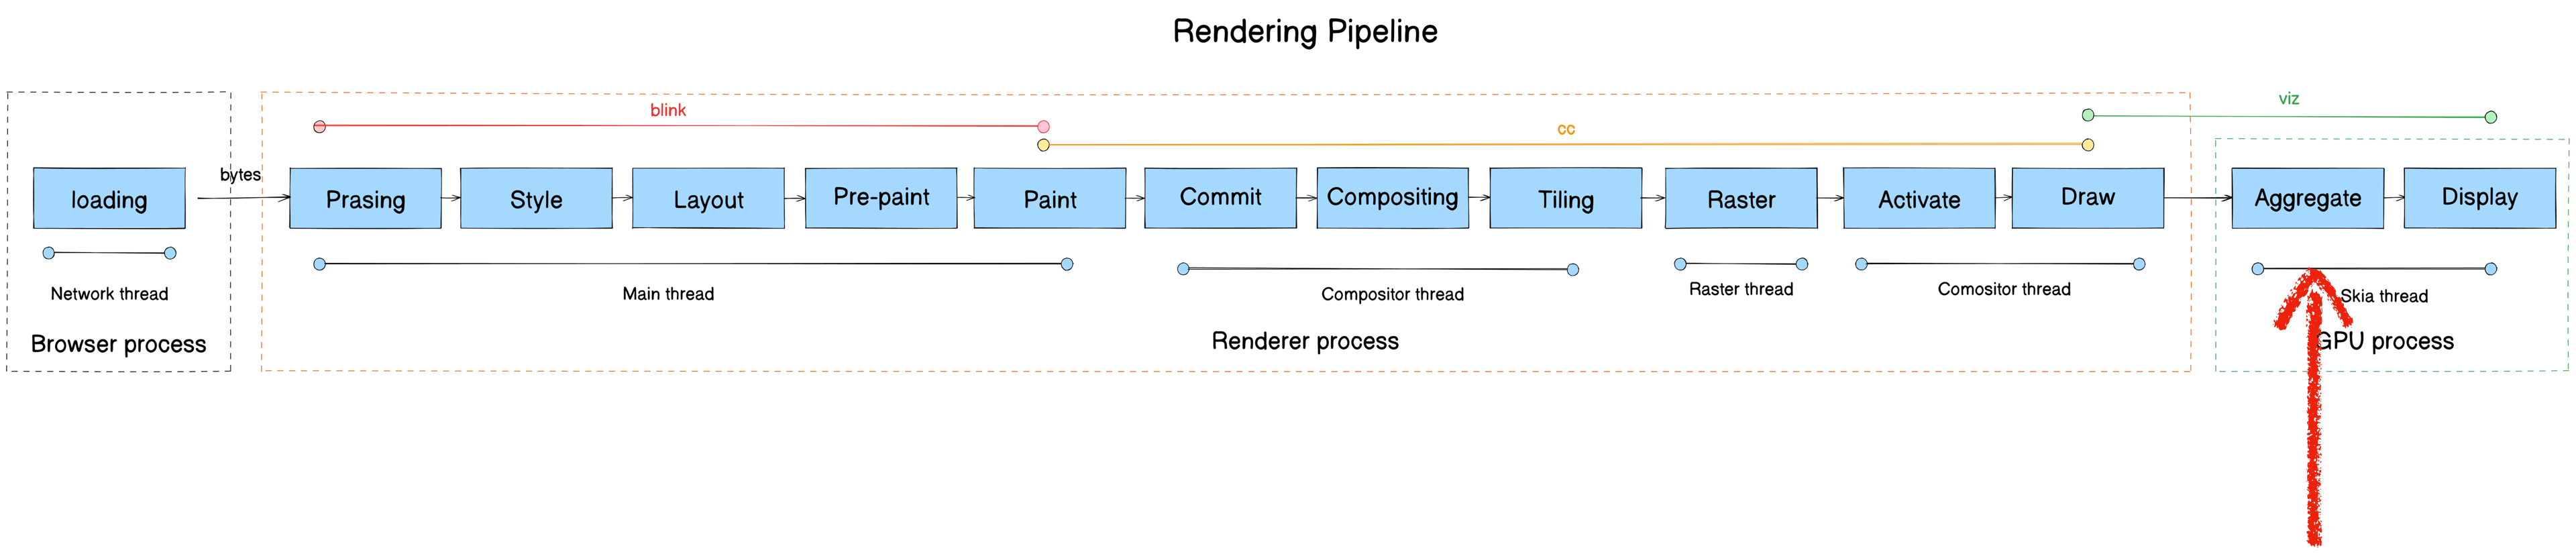
The rendering pipeline transforms raw bytes from the network into pixels on screen. It consists of 13 stages:
- Parsing
- Style
- Layout
- Pre-paint
- Paint
- Commit
- Compositing
- Tiling
- Raster
- Activate
- Draw
- Aggregate
- Display
Here’s the full pipeline mapped to module, process, and thread:

Note: This post is an overview — concise, no source code dumps, but with links to the relevant source for each section. Some stages have more detailed companion posts, linked at the top of the relevant section.
Parsing
Recommended: Chromium Rendering Pipeline - Parsing for an in-depth treatment.
- Module: blink
- Process: Render Process
- Thread: Main thread
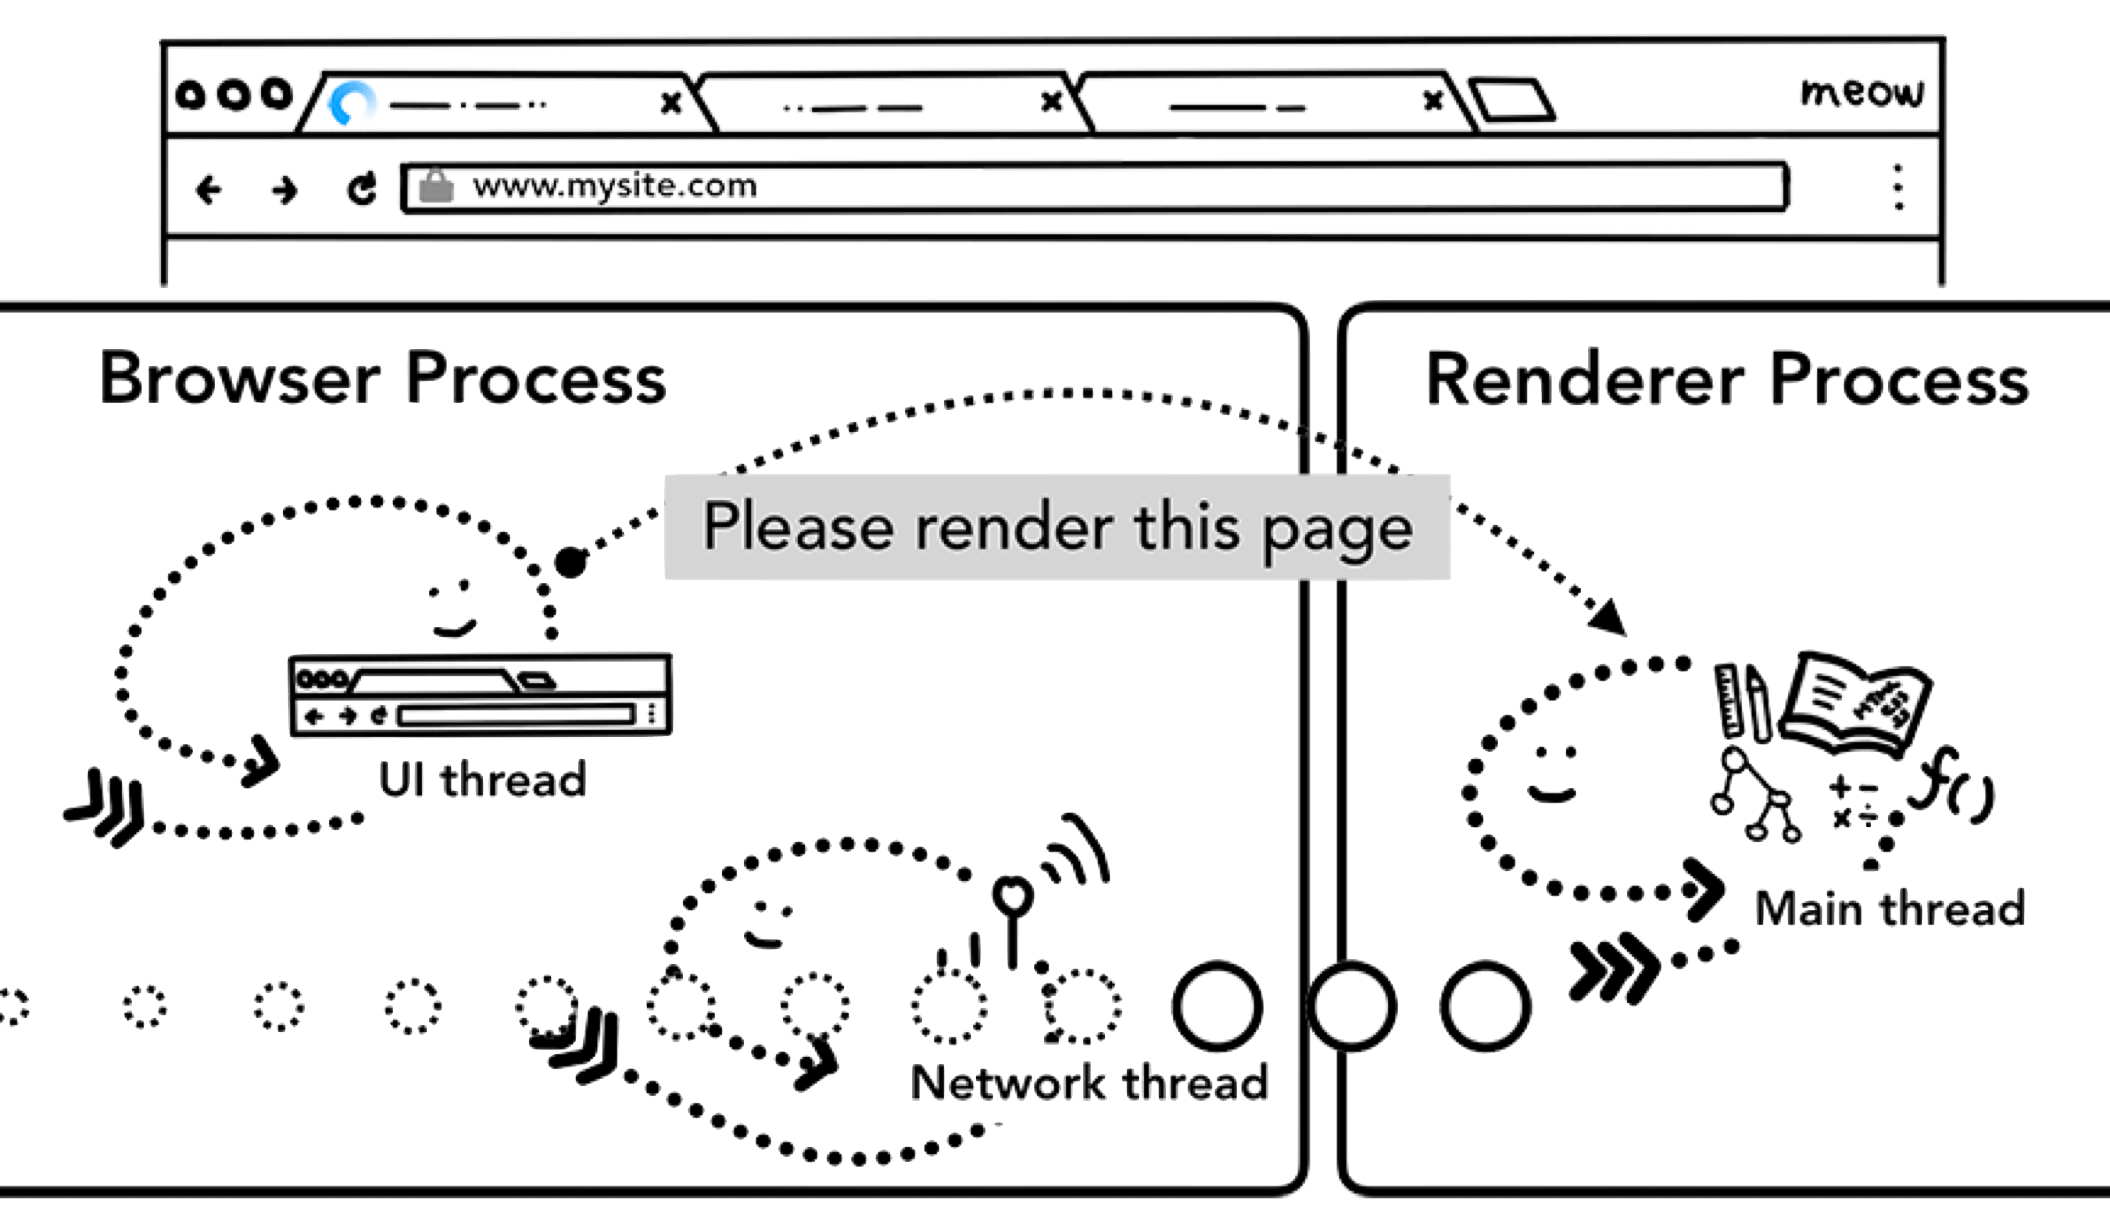
- Responsibility: Parse the bytes received from the Browser Process’s network thread and construct a DOM Tree
- Input: bytes
- Output: DOM Tree
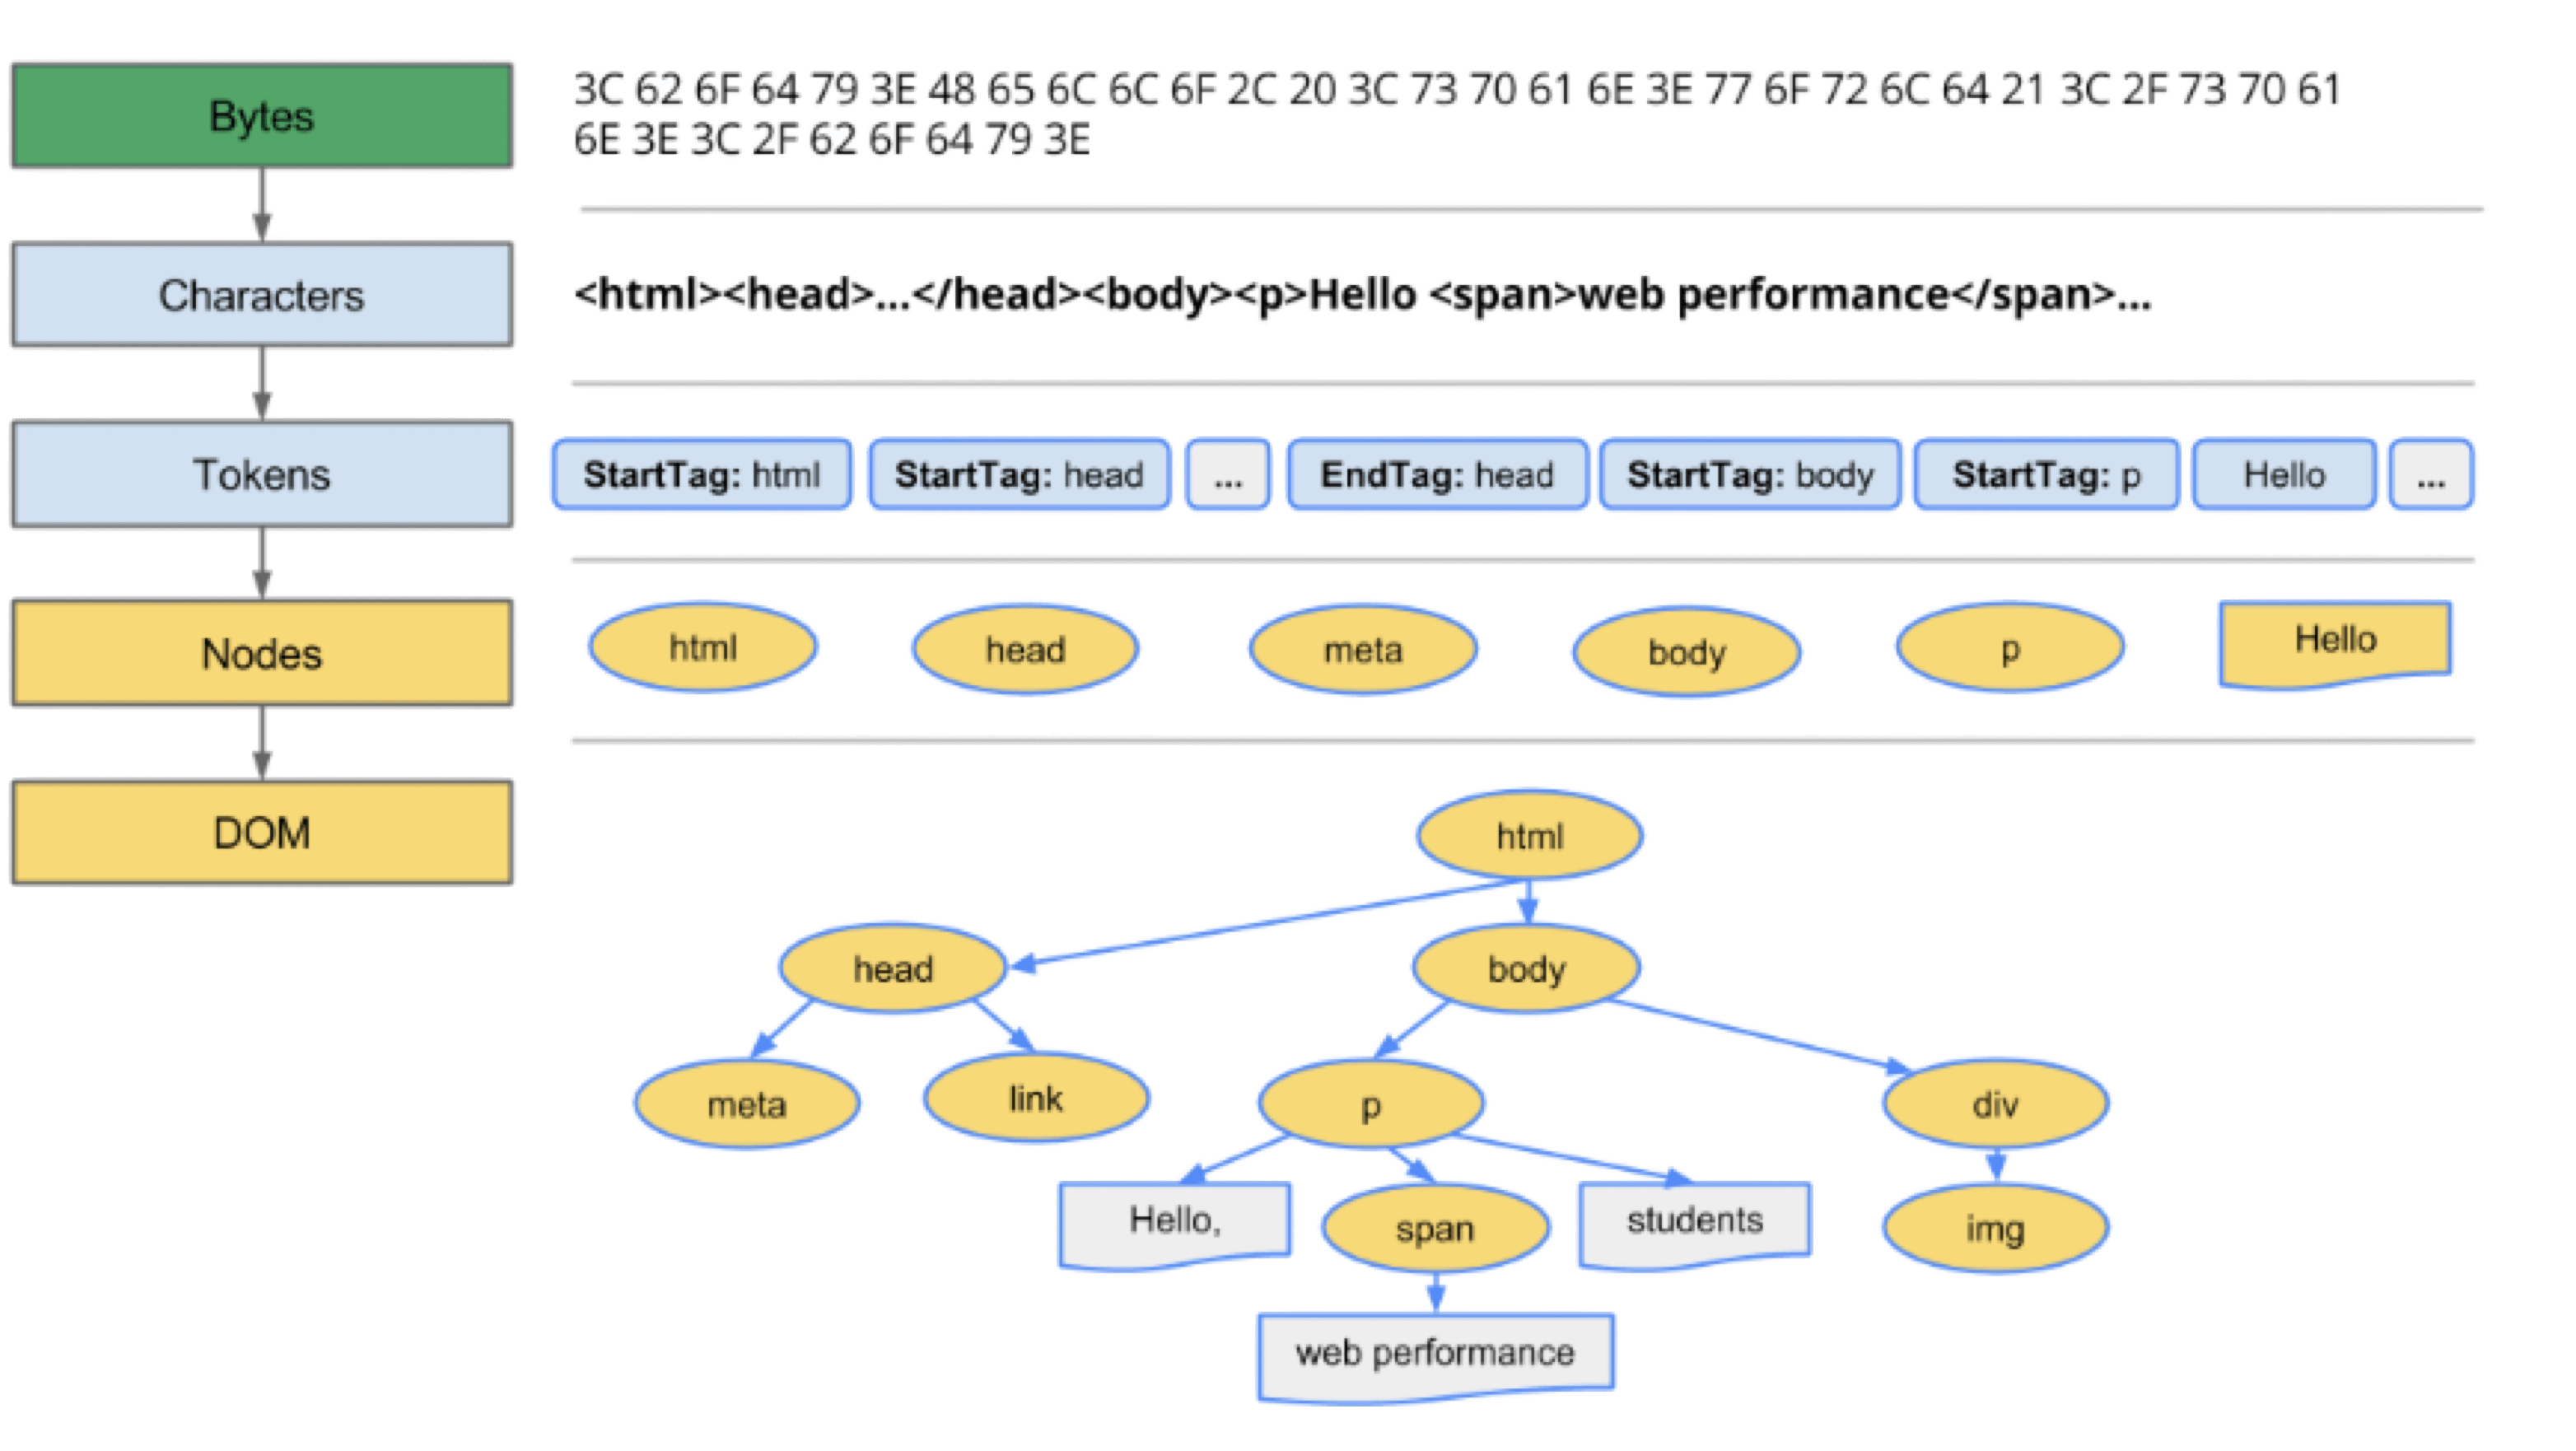
Data flow: bytes → characters → tokens → nodes → DOM Tree
Five steps:
- Loading: Blink receives bytes from the network thread
- Conversion: HTMLParser converts bytes to characters
- Tokenizing: Characters are converted to W3C-spec tokens
- Lexing: Tokens are lexed into Element objects
- DOM construction: Elements are assembled into the DOM Tree
Loading: Browser process downloads page content → passes to Render Process Content module → blink::DocumentLoader → blink::HTMLDocumentParser
Conversion core stack:
#0 blink::HTMLDocumentParser::Append(WTF::String const&)
#1 blink::DecodedDataDocumentParser::UpdateDocument(WTF::String&)
#2 blink::DecodedDataDocumentParser::AppendBytes(char const*, unsigned long)
#3 blink::HTMLDocumentParser::AppendBytes(char const*, unsigned long)
Tokenizing core functions:
HTMLDocumentParser::Append- HTMLTokenizer::NextToken
Important: when the parser encounters link, script, or img tags, it fires additional network requests. When it hits <script>, it must finish executing the JavaScript before continuing to parse HTML — JS could modify the DOM (e.g., via document.write()).
Lexing core function: HTMLConstructionSite::CreateElement
Nodes are managed with a stack structure: StartTag tokens push; EndTag tokens pop.
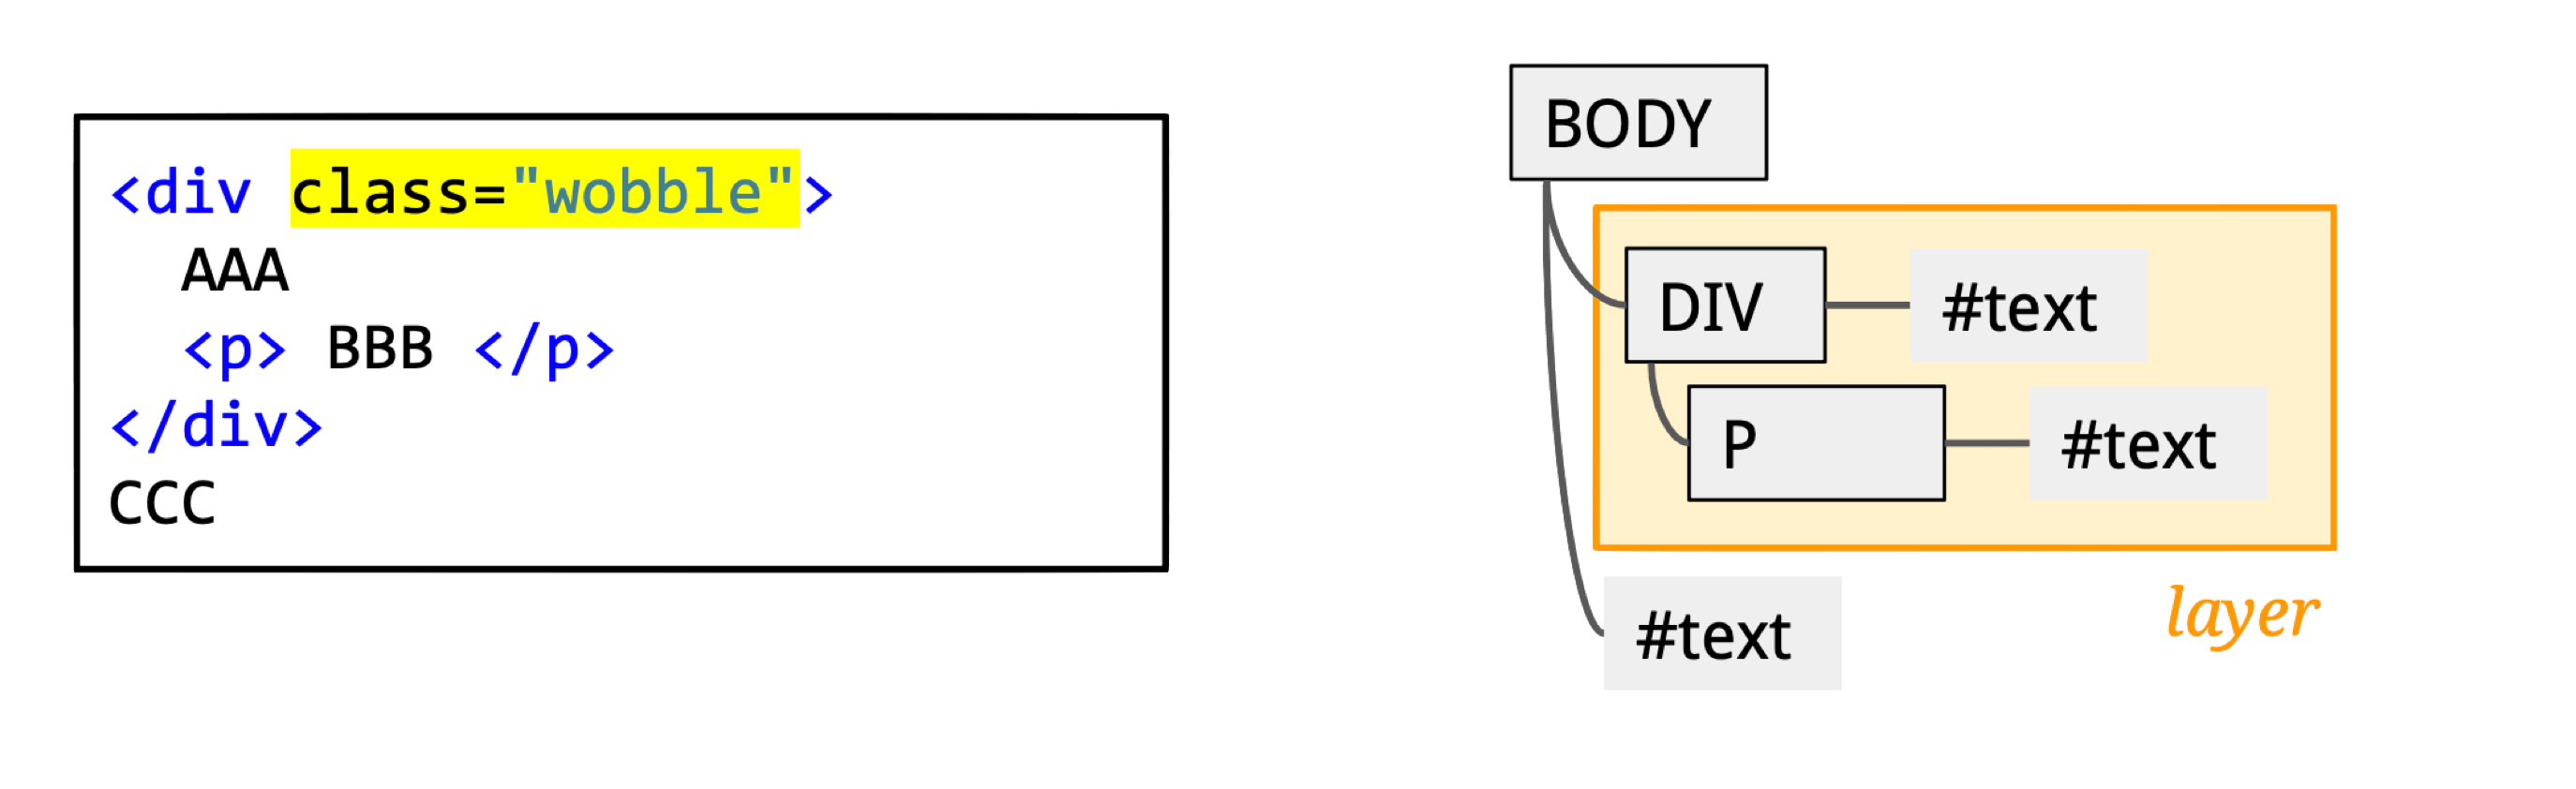
For this DOM tree:
<div>
  <p>
    <div></div>
  </p>
  <span></span>
</div>
The push/pop sequence looks like:

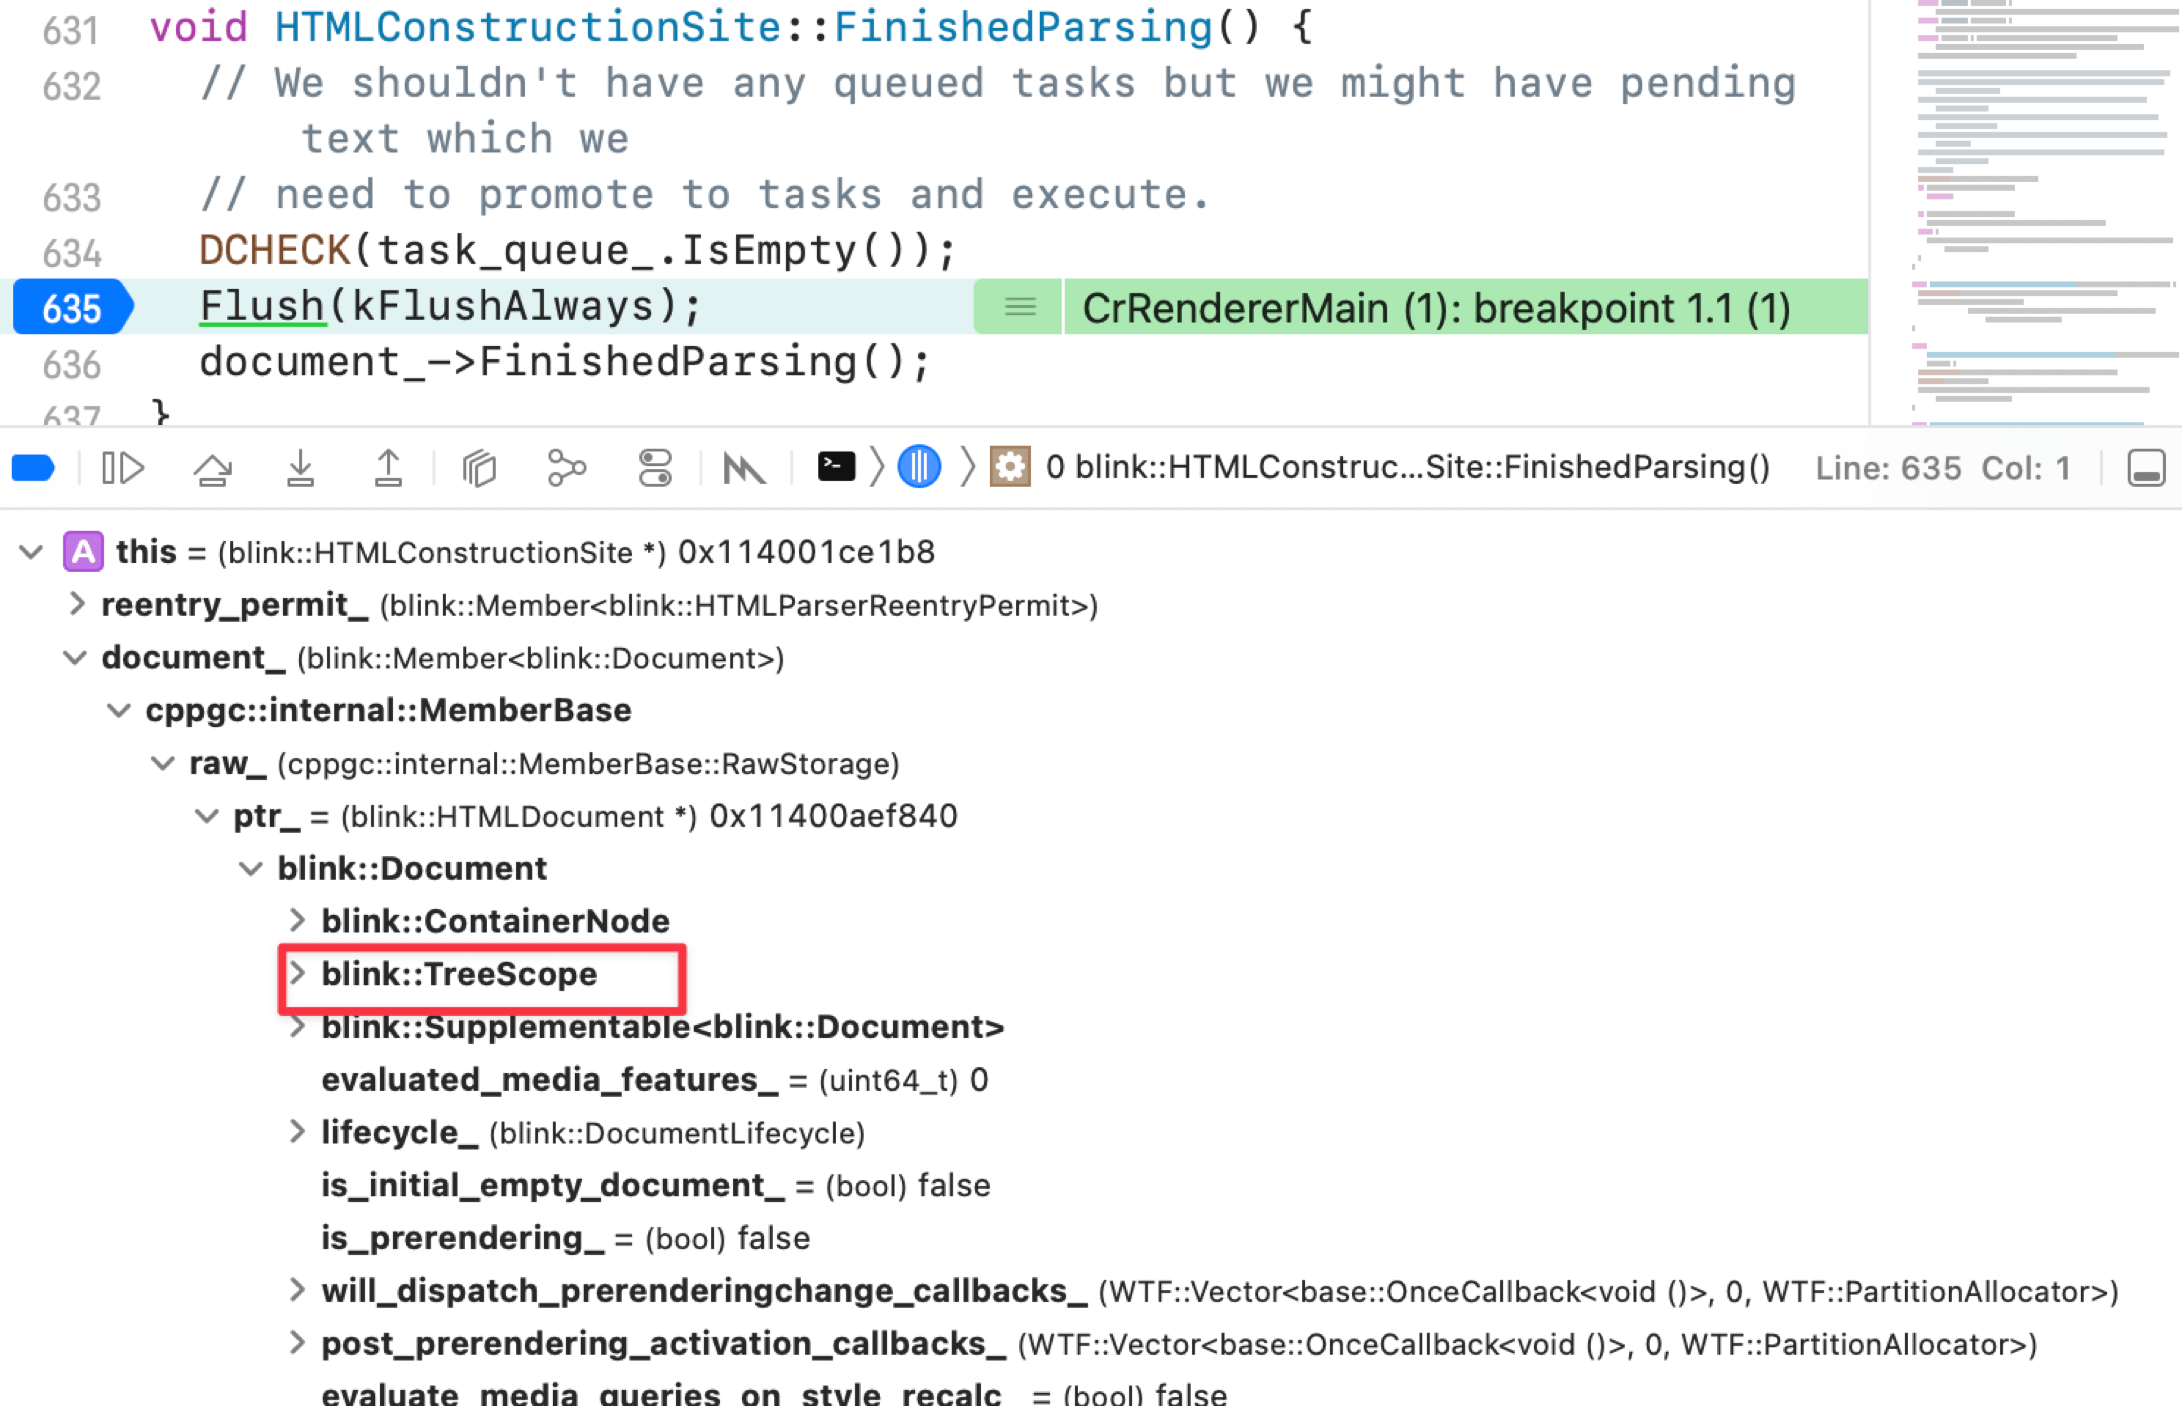
DOM construction: Elements are instantiated into the DOM Tree.
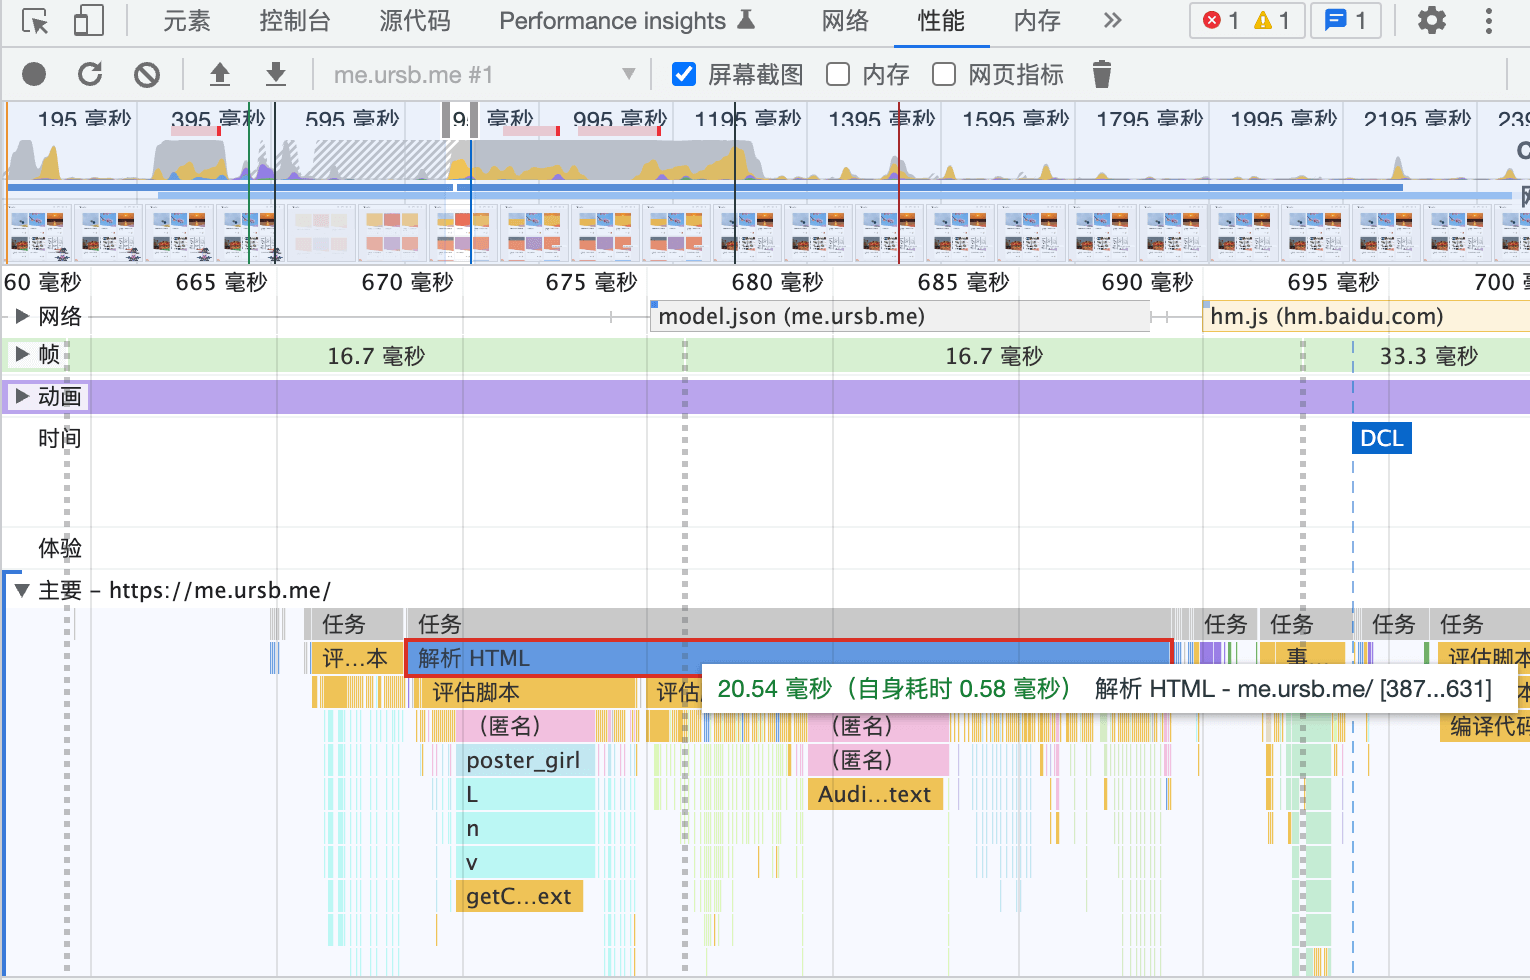
Use DevTools to see the Parsing timeline:
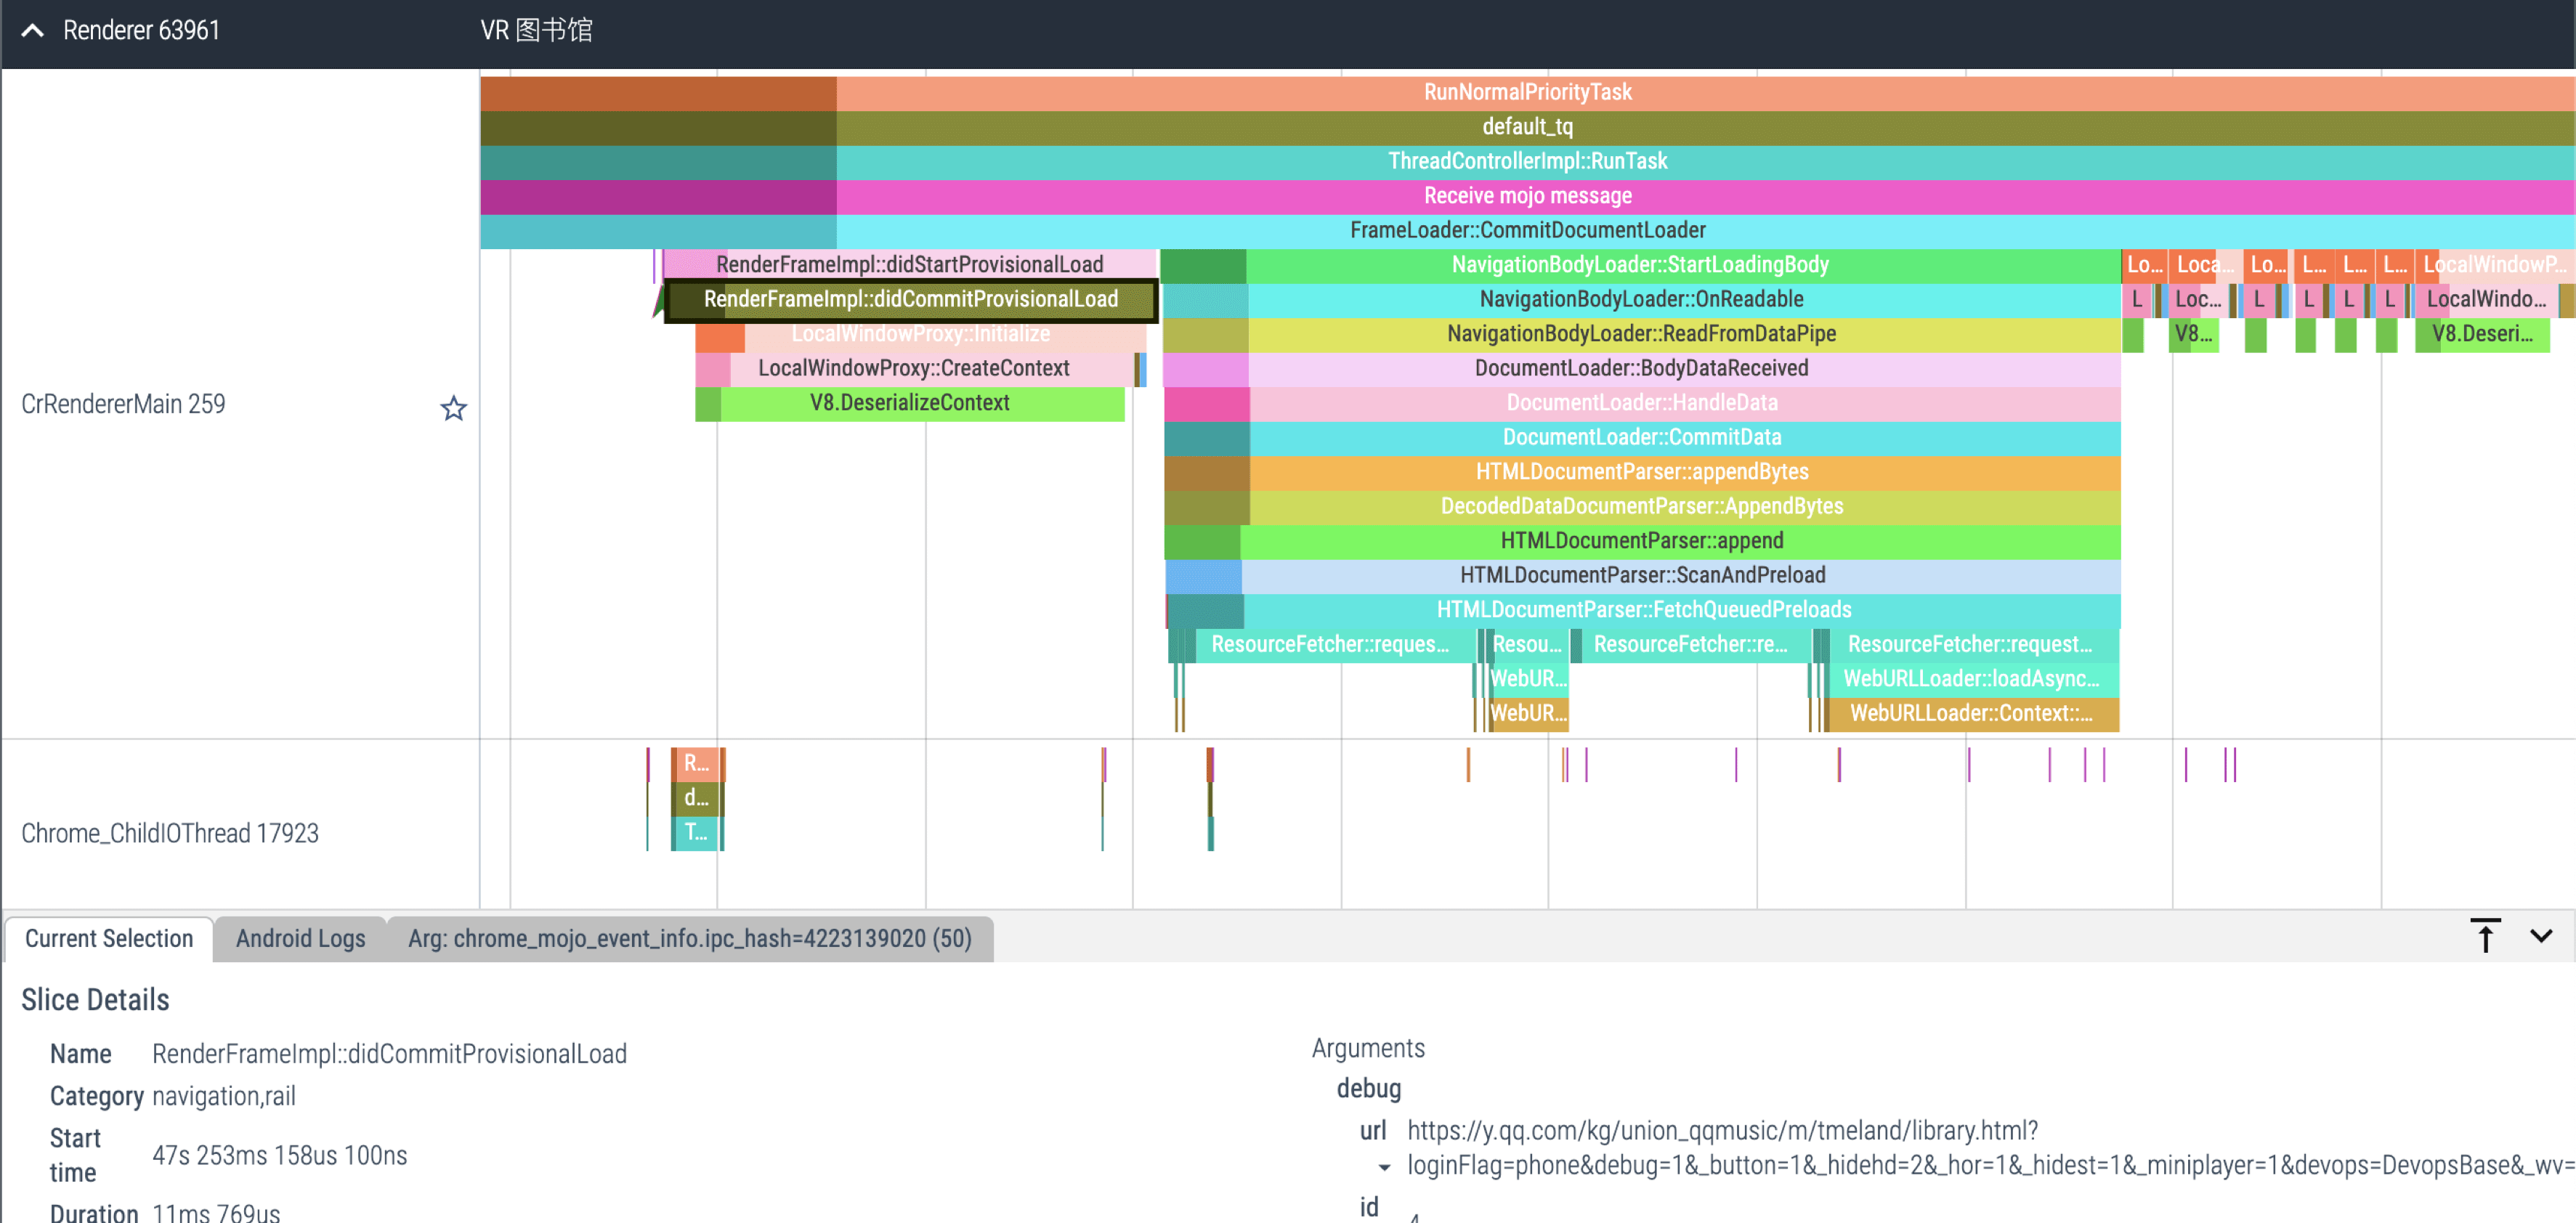
For C++-level call stacks, use Perfetto — it shows per-thread call stacks and cross-process communication.
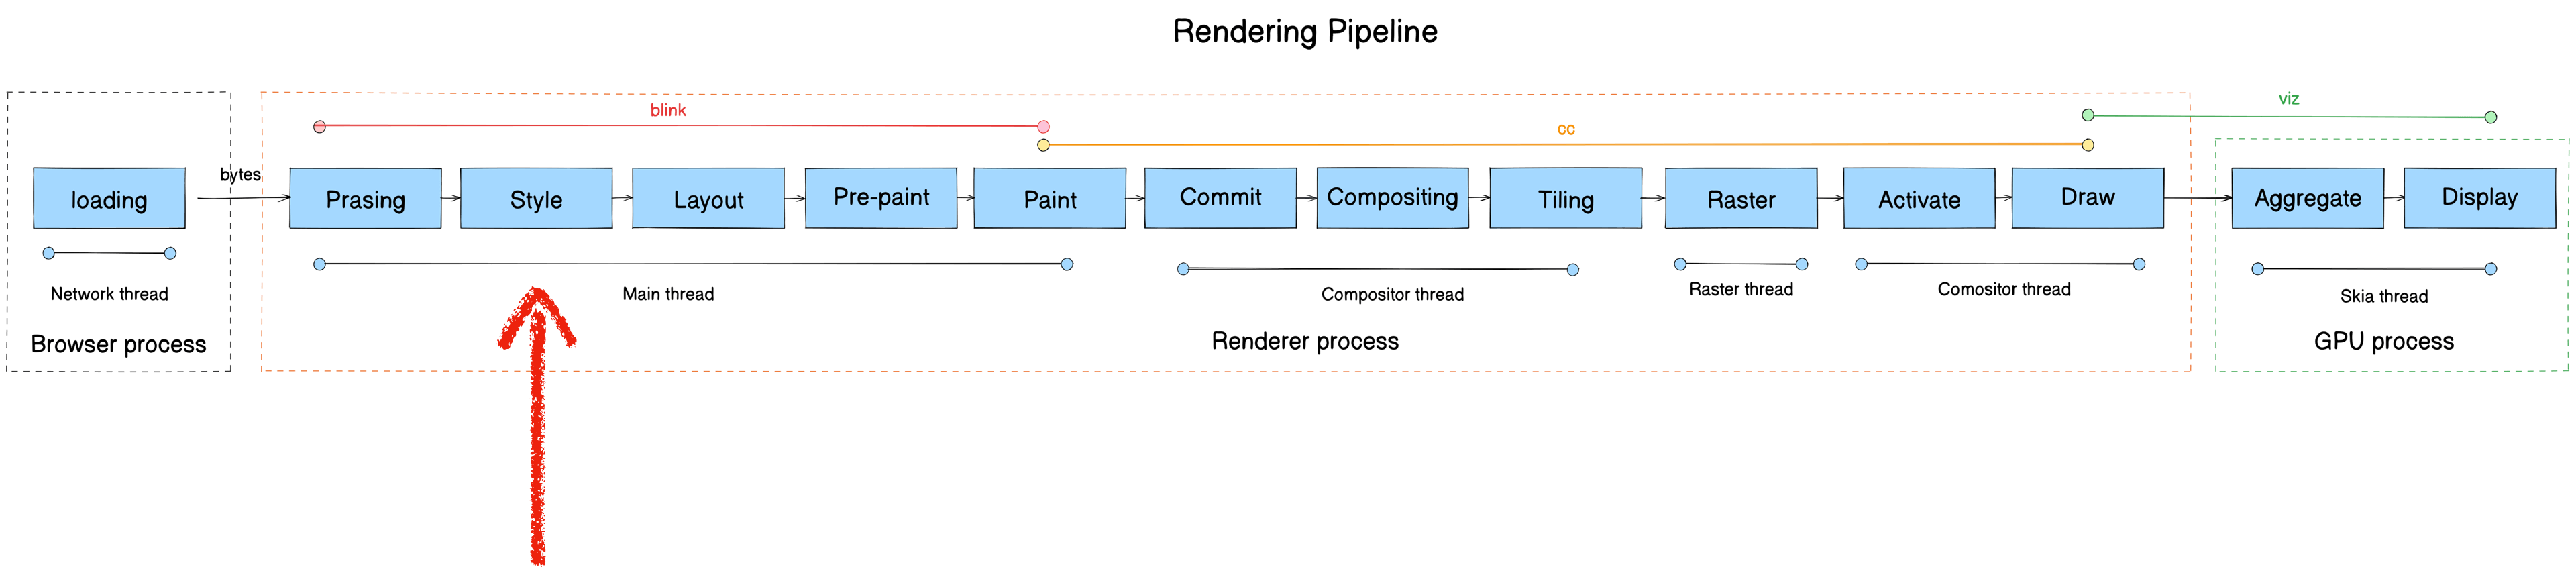
Updated pipeline after Parsing:
Style
- Module: blink
- Process: Render Process
- Thread: Main thread
- Responsibility: Style Engine traverses the DOM, matches CSSOM rules, computes styles (style recalc), and builds the Render Tree
- Input: DOM Tree
- Output: Render Tree
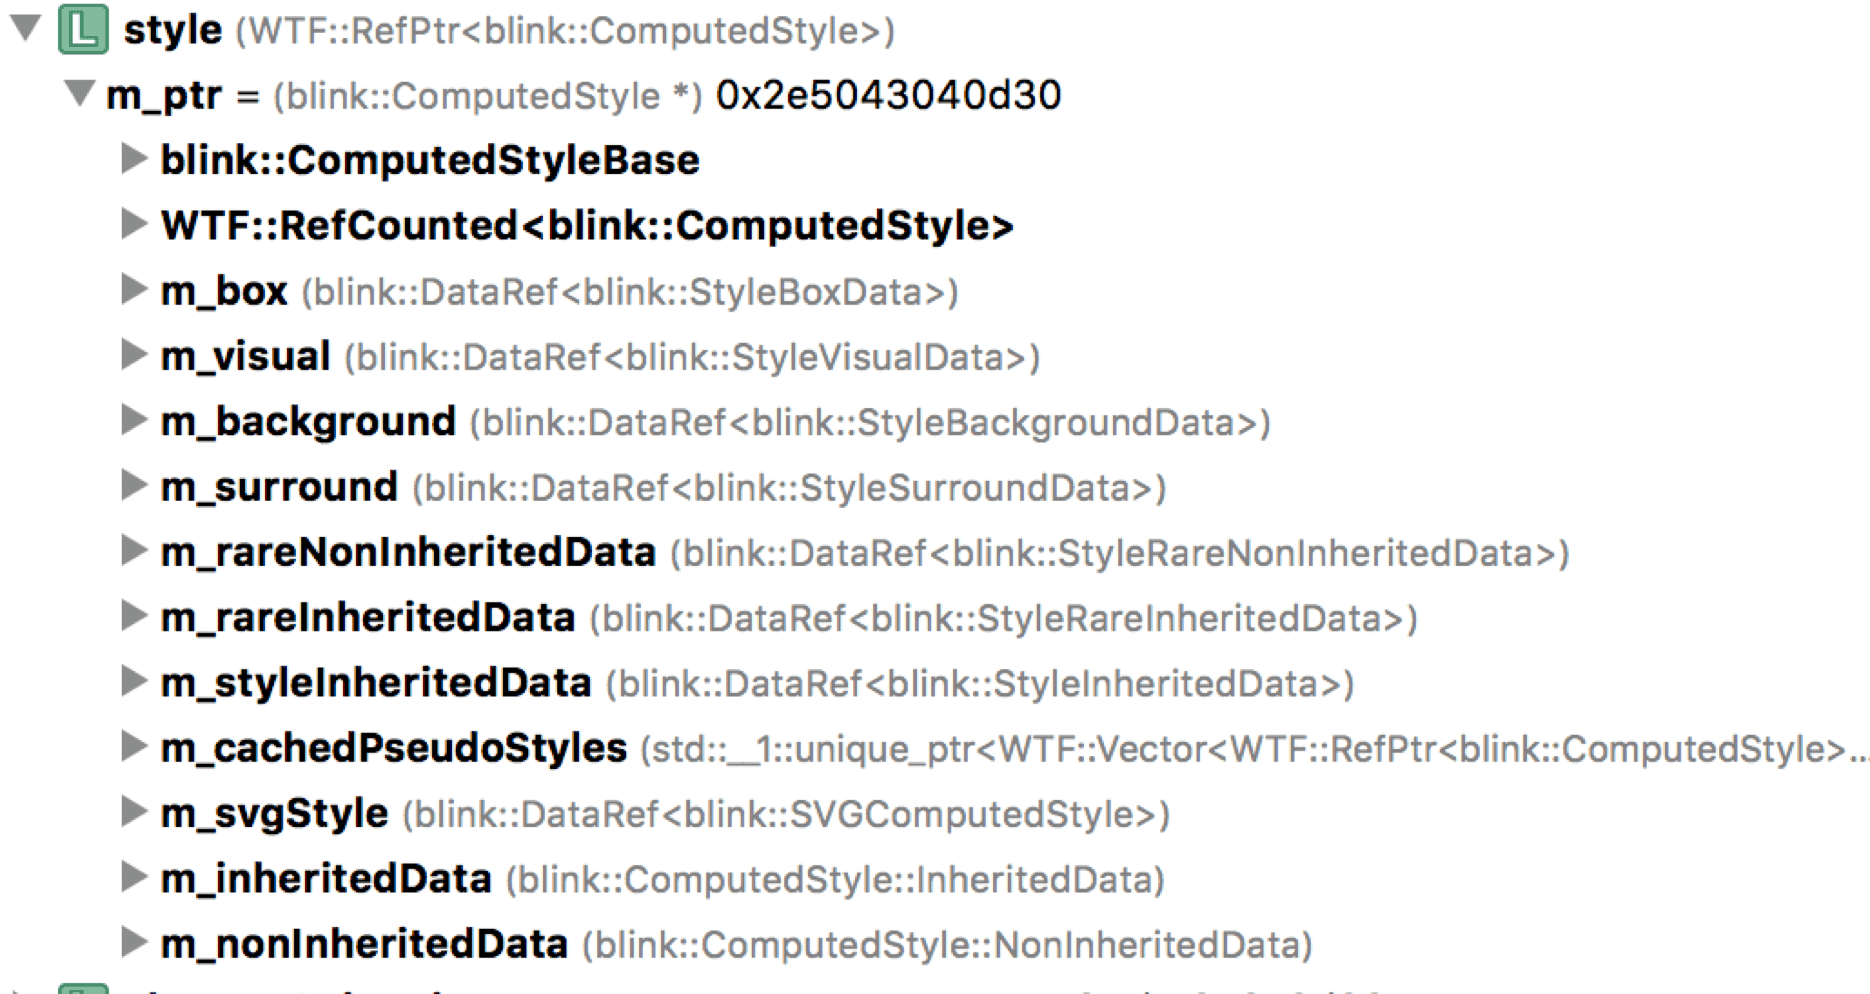
The Render Tree is composed of RenderObjects, each corresponding to a DOM node with attached ComputedStyle.
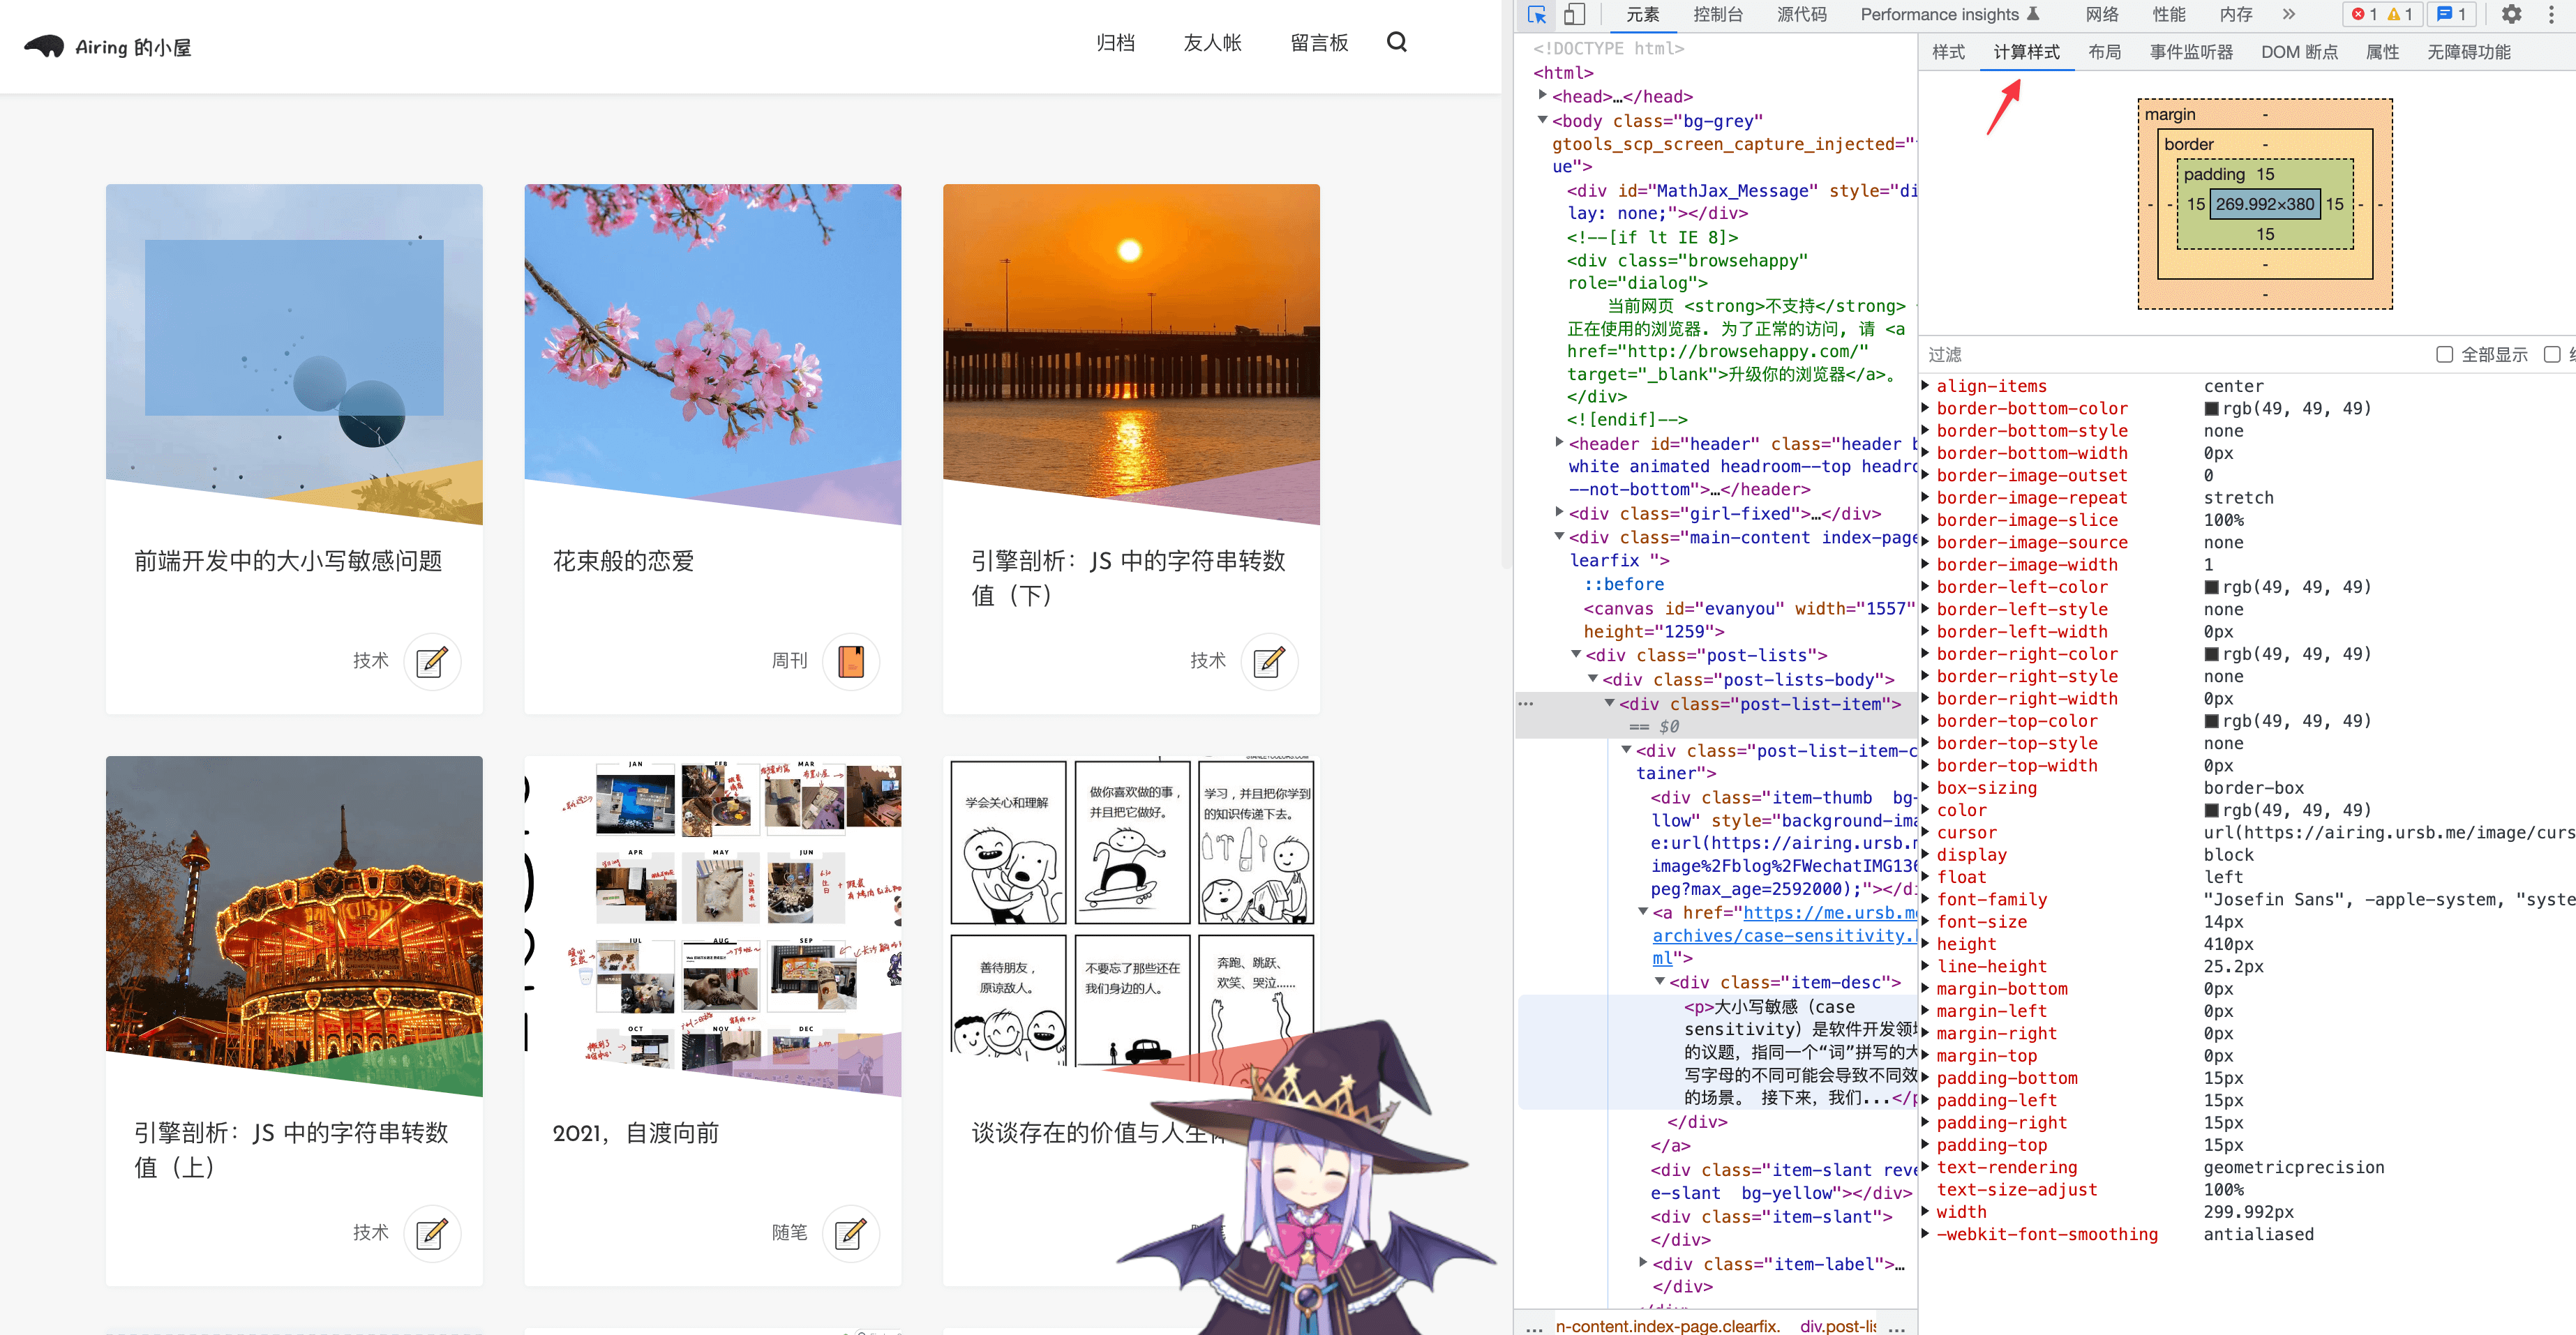
ComputedStyle is visible in DevTools’ Styles panel:
Core function: Document::UpdateStyleAndLayout
The style computation pipeline:
Three sub-stages:
CSS Loading: Note that the browser blocks rendering until both DOM and CSSOM are ready — rendering a DOM without styles would be meaningless.
“The browser blocks rendering until it has both the DOM and the CSSOM.” — Render blocking CSS
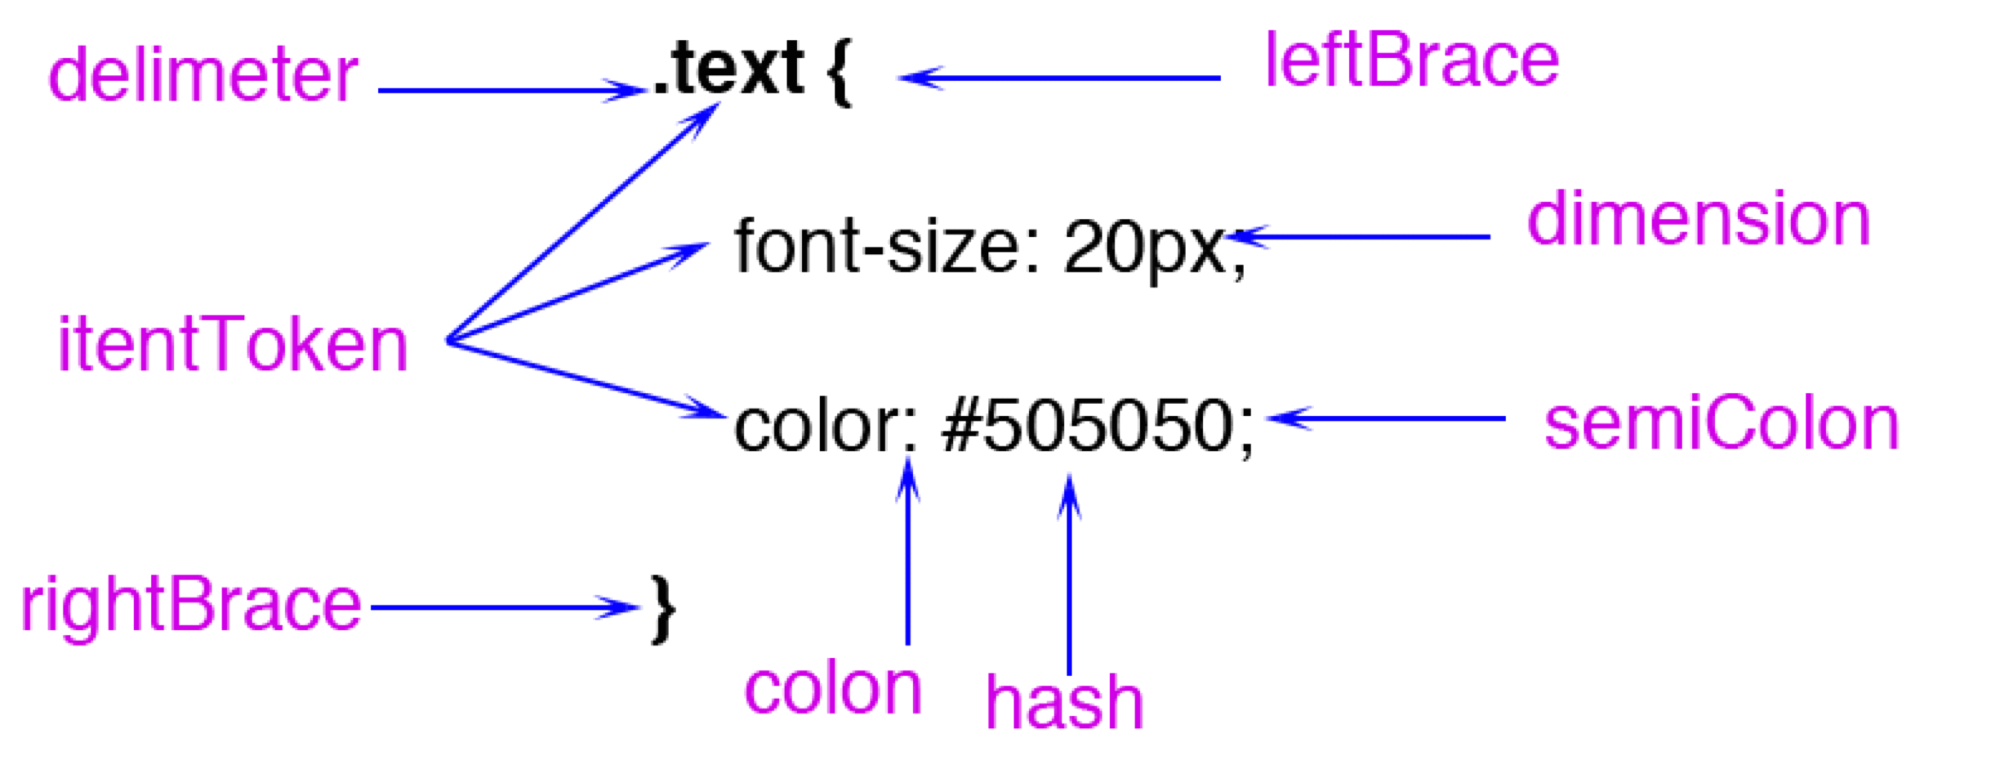
CSS Parsing: Data flow is bytes → characters → tokens → StyleRules → RuleMap.
CSS tokens include types like:
Worth noting: FunctionToken requires extra computation. Blink stores colors as RGBA32 internally (CSSColor::Create). In my micro-benchmarks, hex color parsing is about 15% faster than rgb().
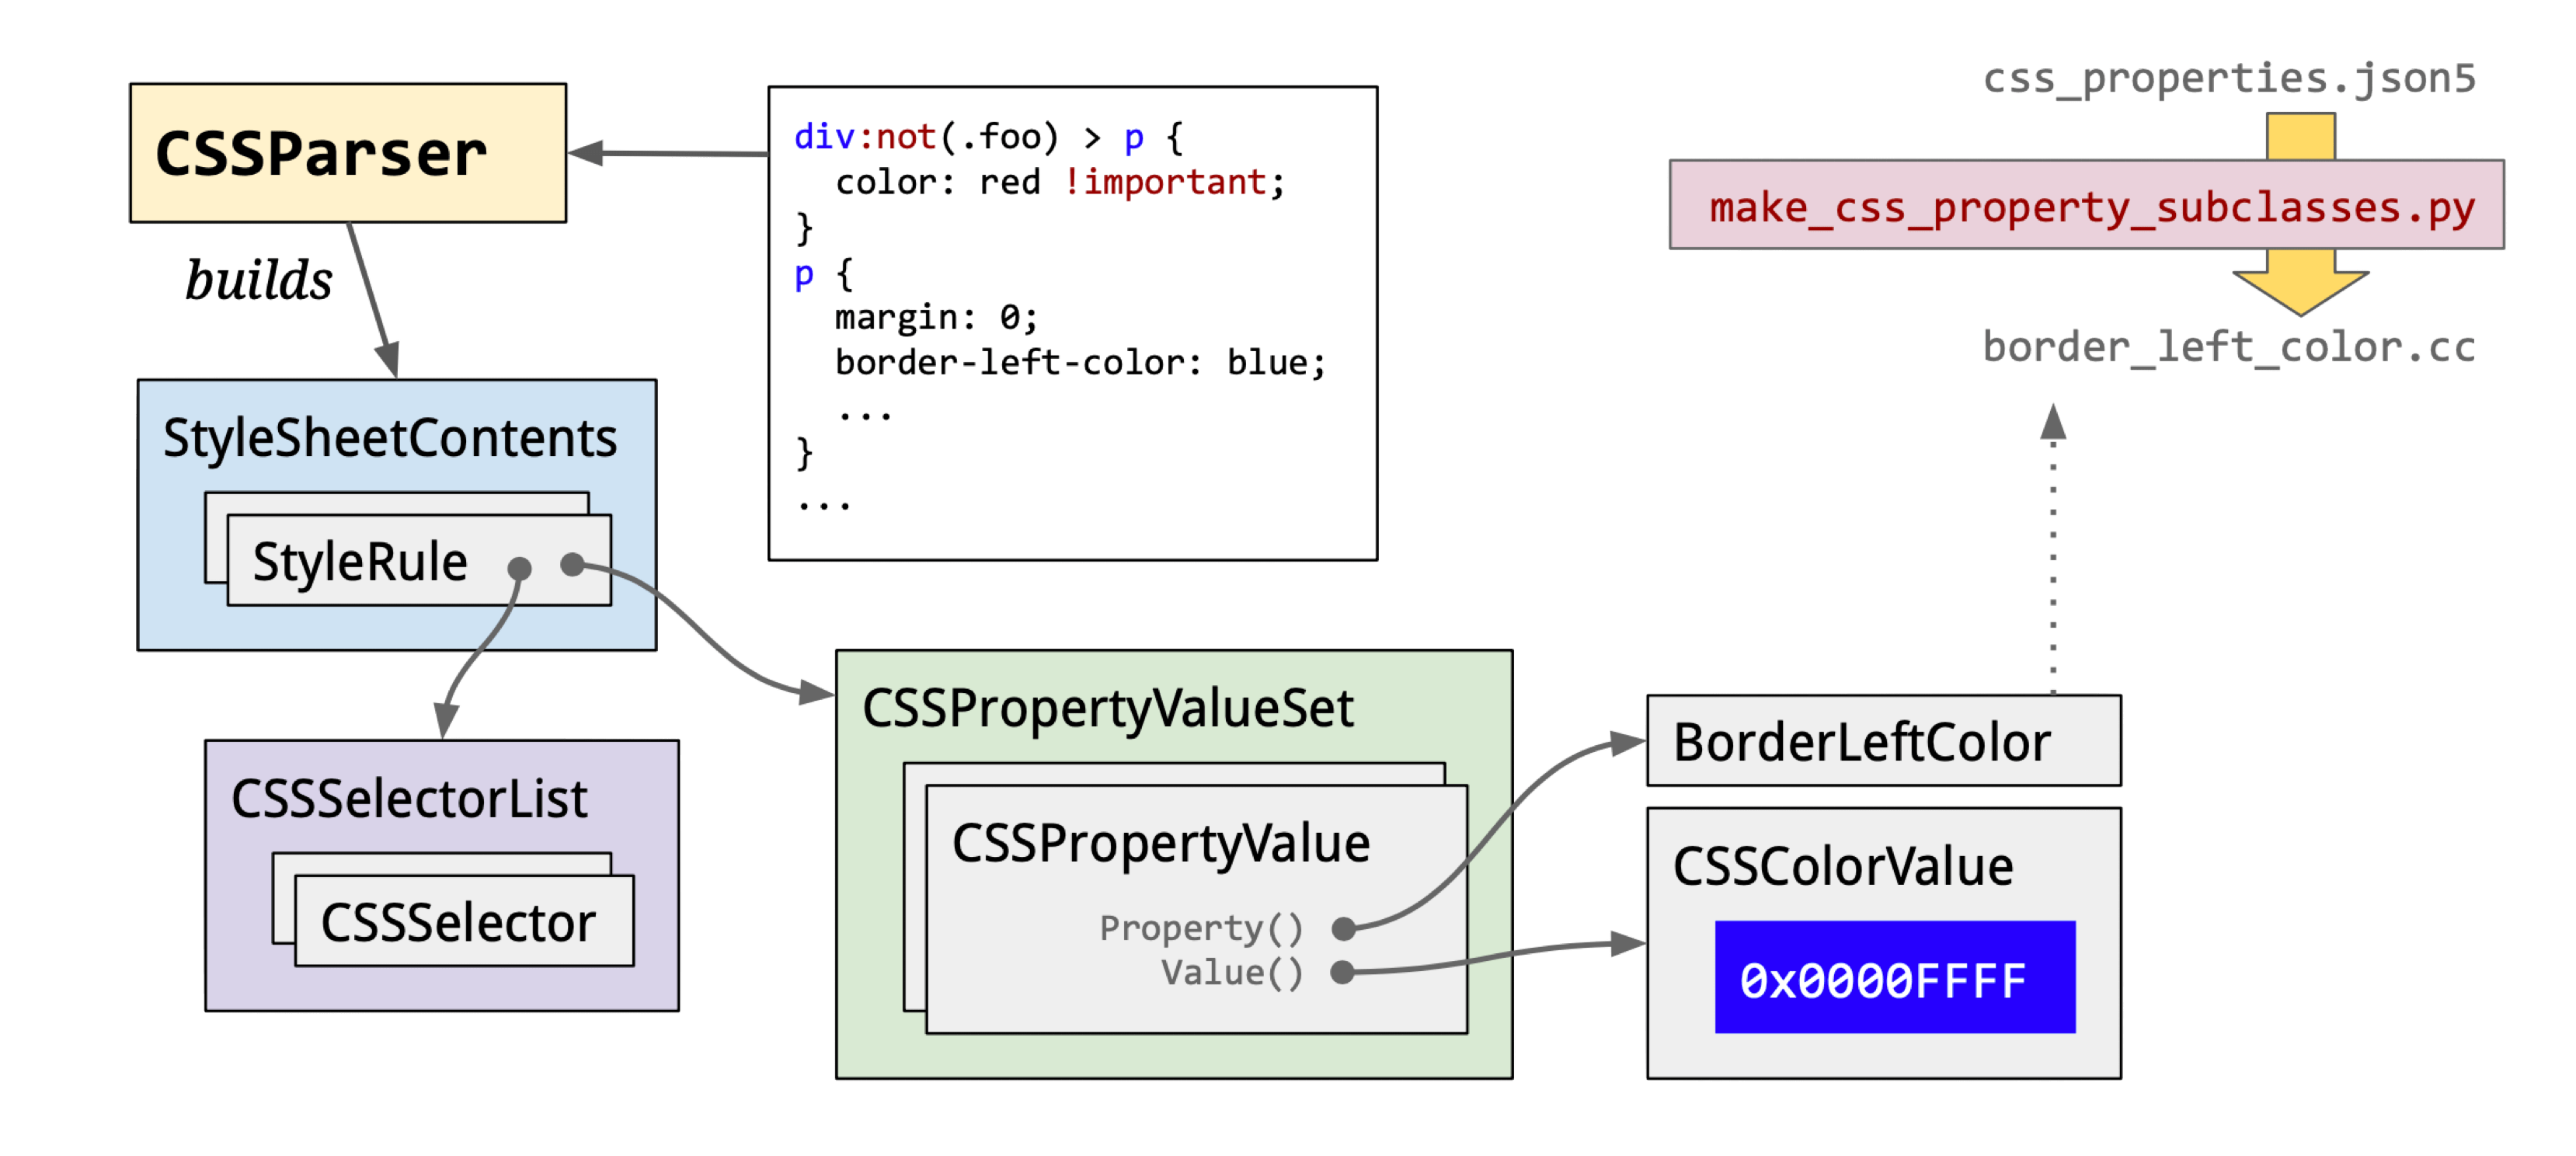
tokens → StyleRule: StyleRules = selectors + property sets. CSS selectors are parsed right-to-left.
For this CSS:
.text .hello {
    color: rgb(200, 200, 200);
    width: calc(100% - 20px);
}
#world {
    margin: 20px;
}
The parse result:
selector text = ".text .hello"
value = "hello" matchType = "Class" relation = "Descendant"
tag history selector text = ".text"
value = "text" matchType = "Class" relation = "SubSelector"
selector text = "#world"
value = "world" matchType = "Id" relation = "SubSelector"
Blink’s default style loading order: html.css → quirk.css → platform CSS (android/linux/mac.css) → page styles.
StyleRules → RuleMap: All StyleRules are grouped by selector type into separate Maps for efficient matching. The Maps:
id_rules_: ID selector rulesclass_rules_: Class selector rulesattr_rules_: Attribute selector rulestag_rules_: Tag selector rulesua_shadow_pseudo_element_rules_: Pseudo-class selector rules
Recommended reading:
blink/renderer/core/css/rule_set.h
CSS Computation: Produces ComputedStyle.
Why compute? Multiple selectors may match a DOM node; inherited and UA-provided properties also apply. Style priority order:
- Cascade layers order
- Selector specificity
- Proximity ordering
- Declaration order
Many people know that specificity is additive — but that’s just priority level 2. When the first three levels are tied, the rule declared later in the source wins.
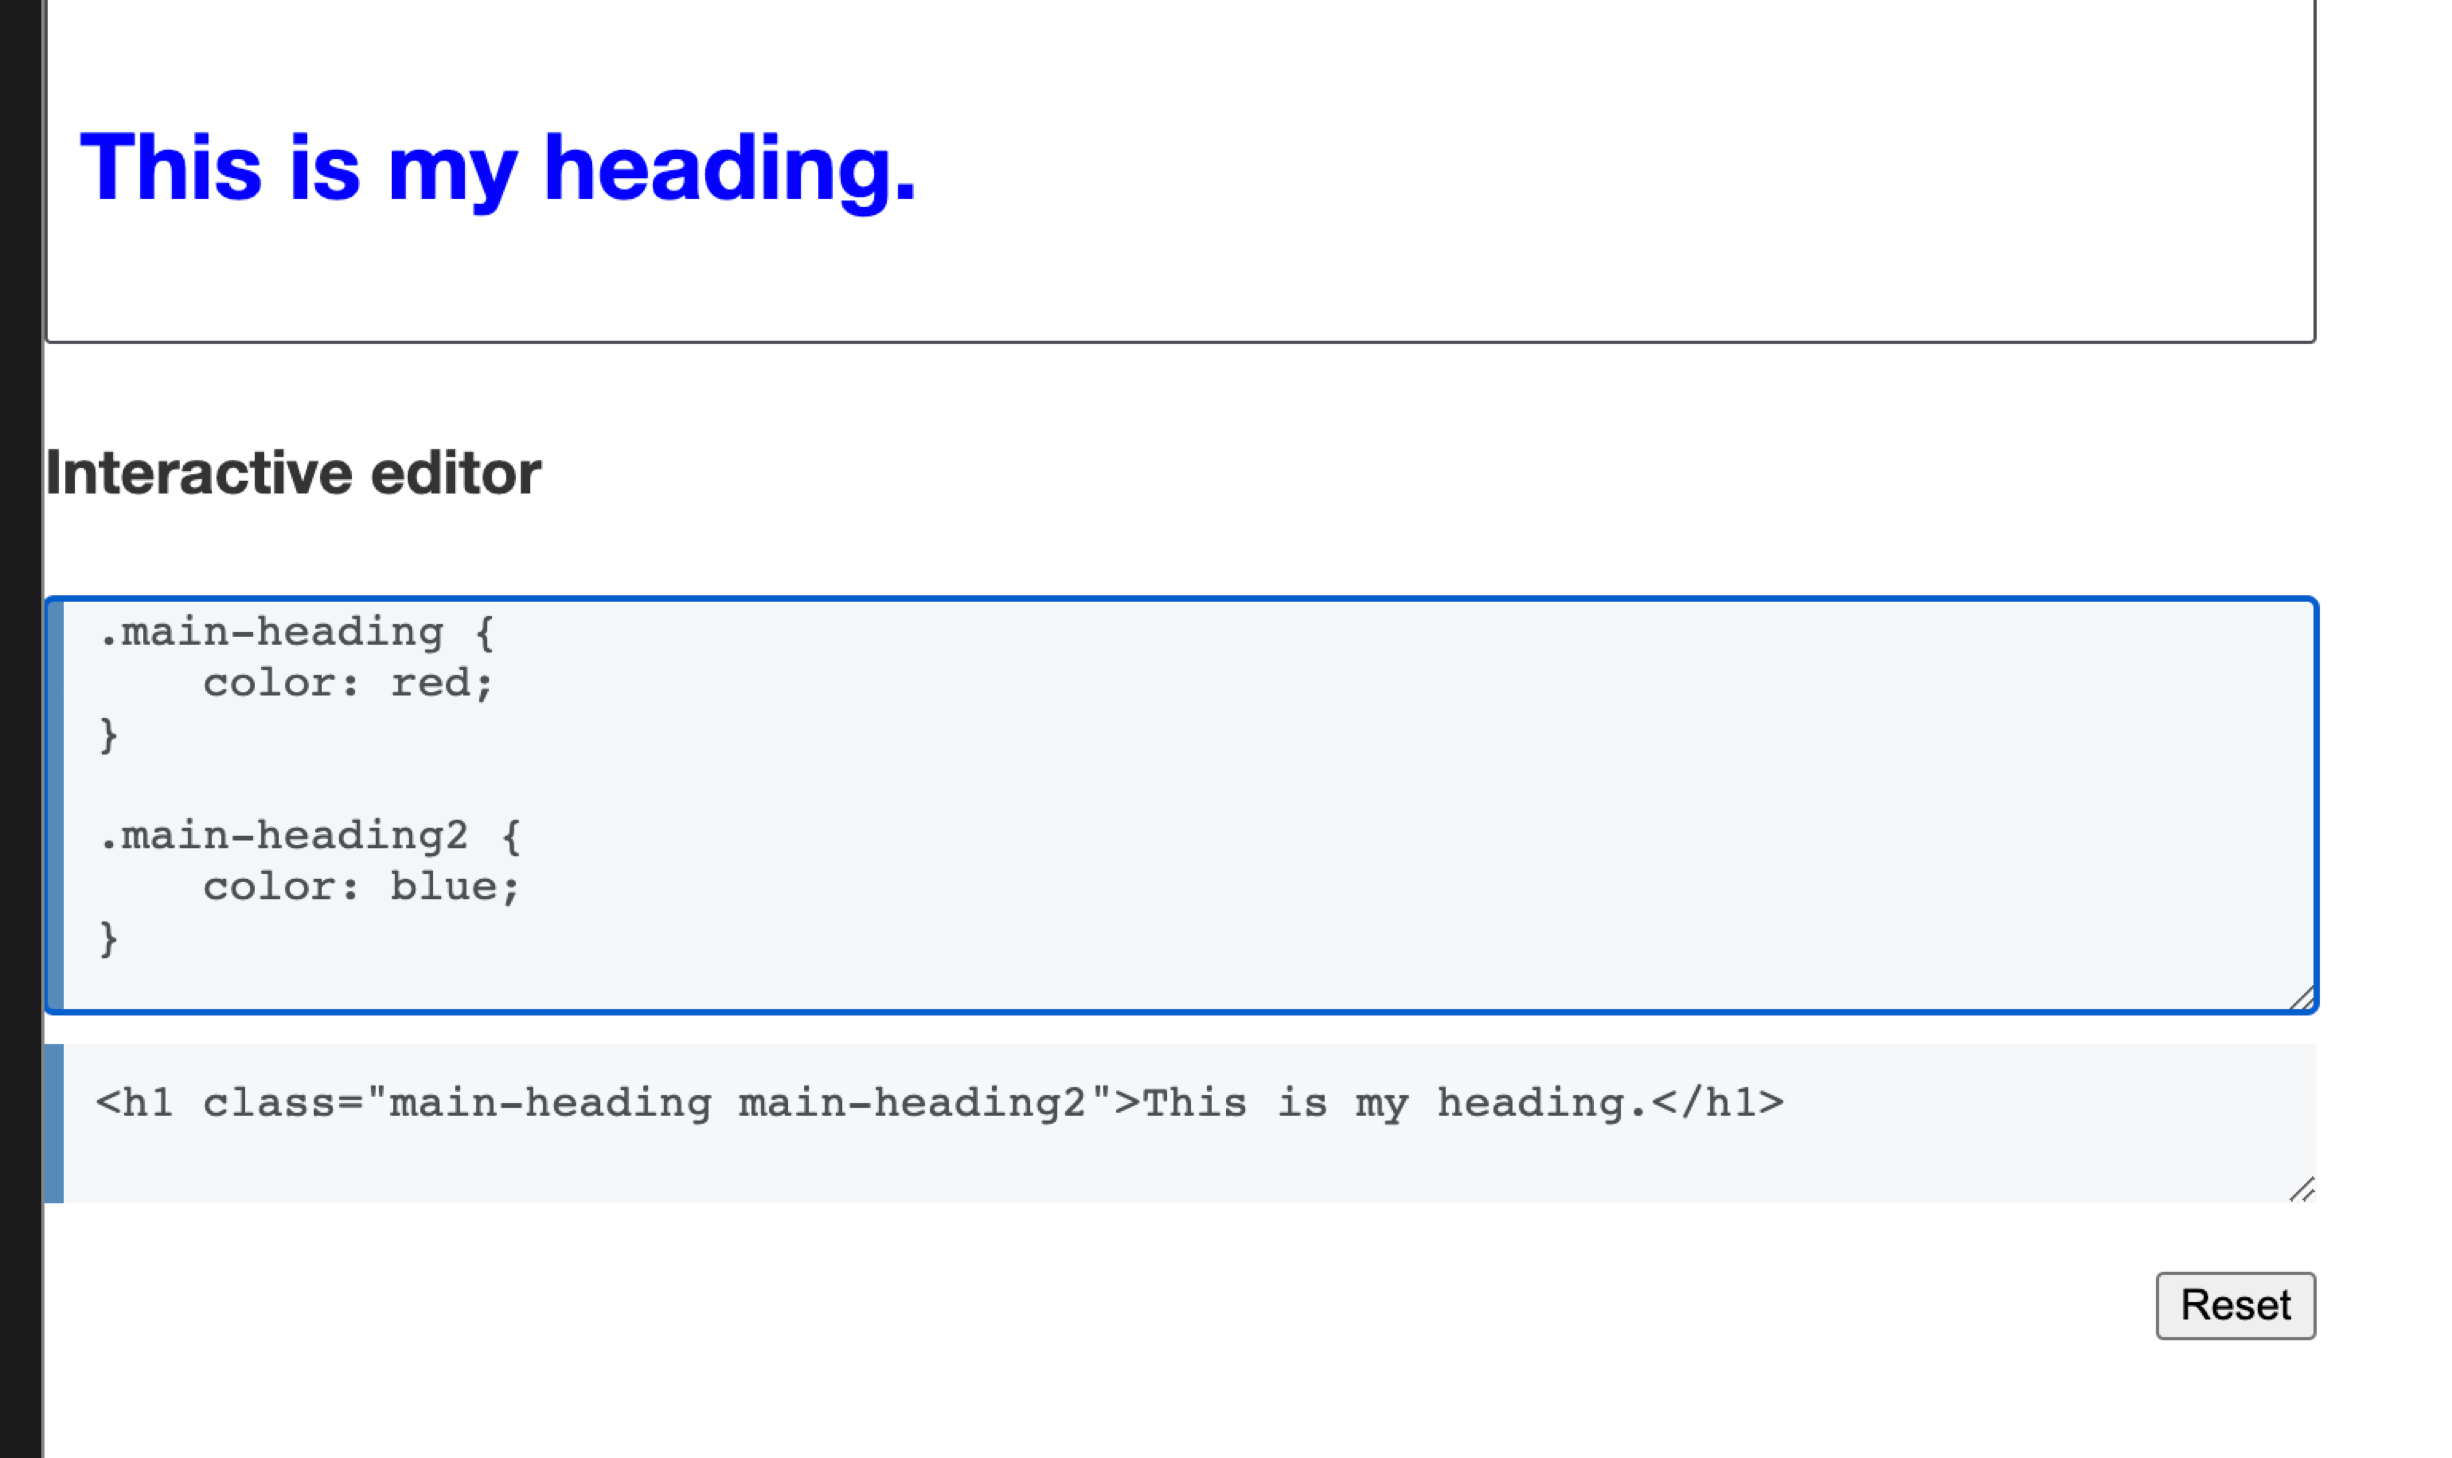
The h1 here is blue regardless of the class order (main-heading 2 main-heading or reversed) — because .main-heading2 is declared later and wins on declaration order.
Layout
- Module: blink
- Process: Render Process
- Thread: Main thread
- Responsibility: Compute geometric properties (position and size) for elements
- Input: Render Tree
- Output: Layout Tree
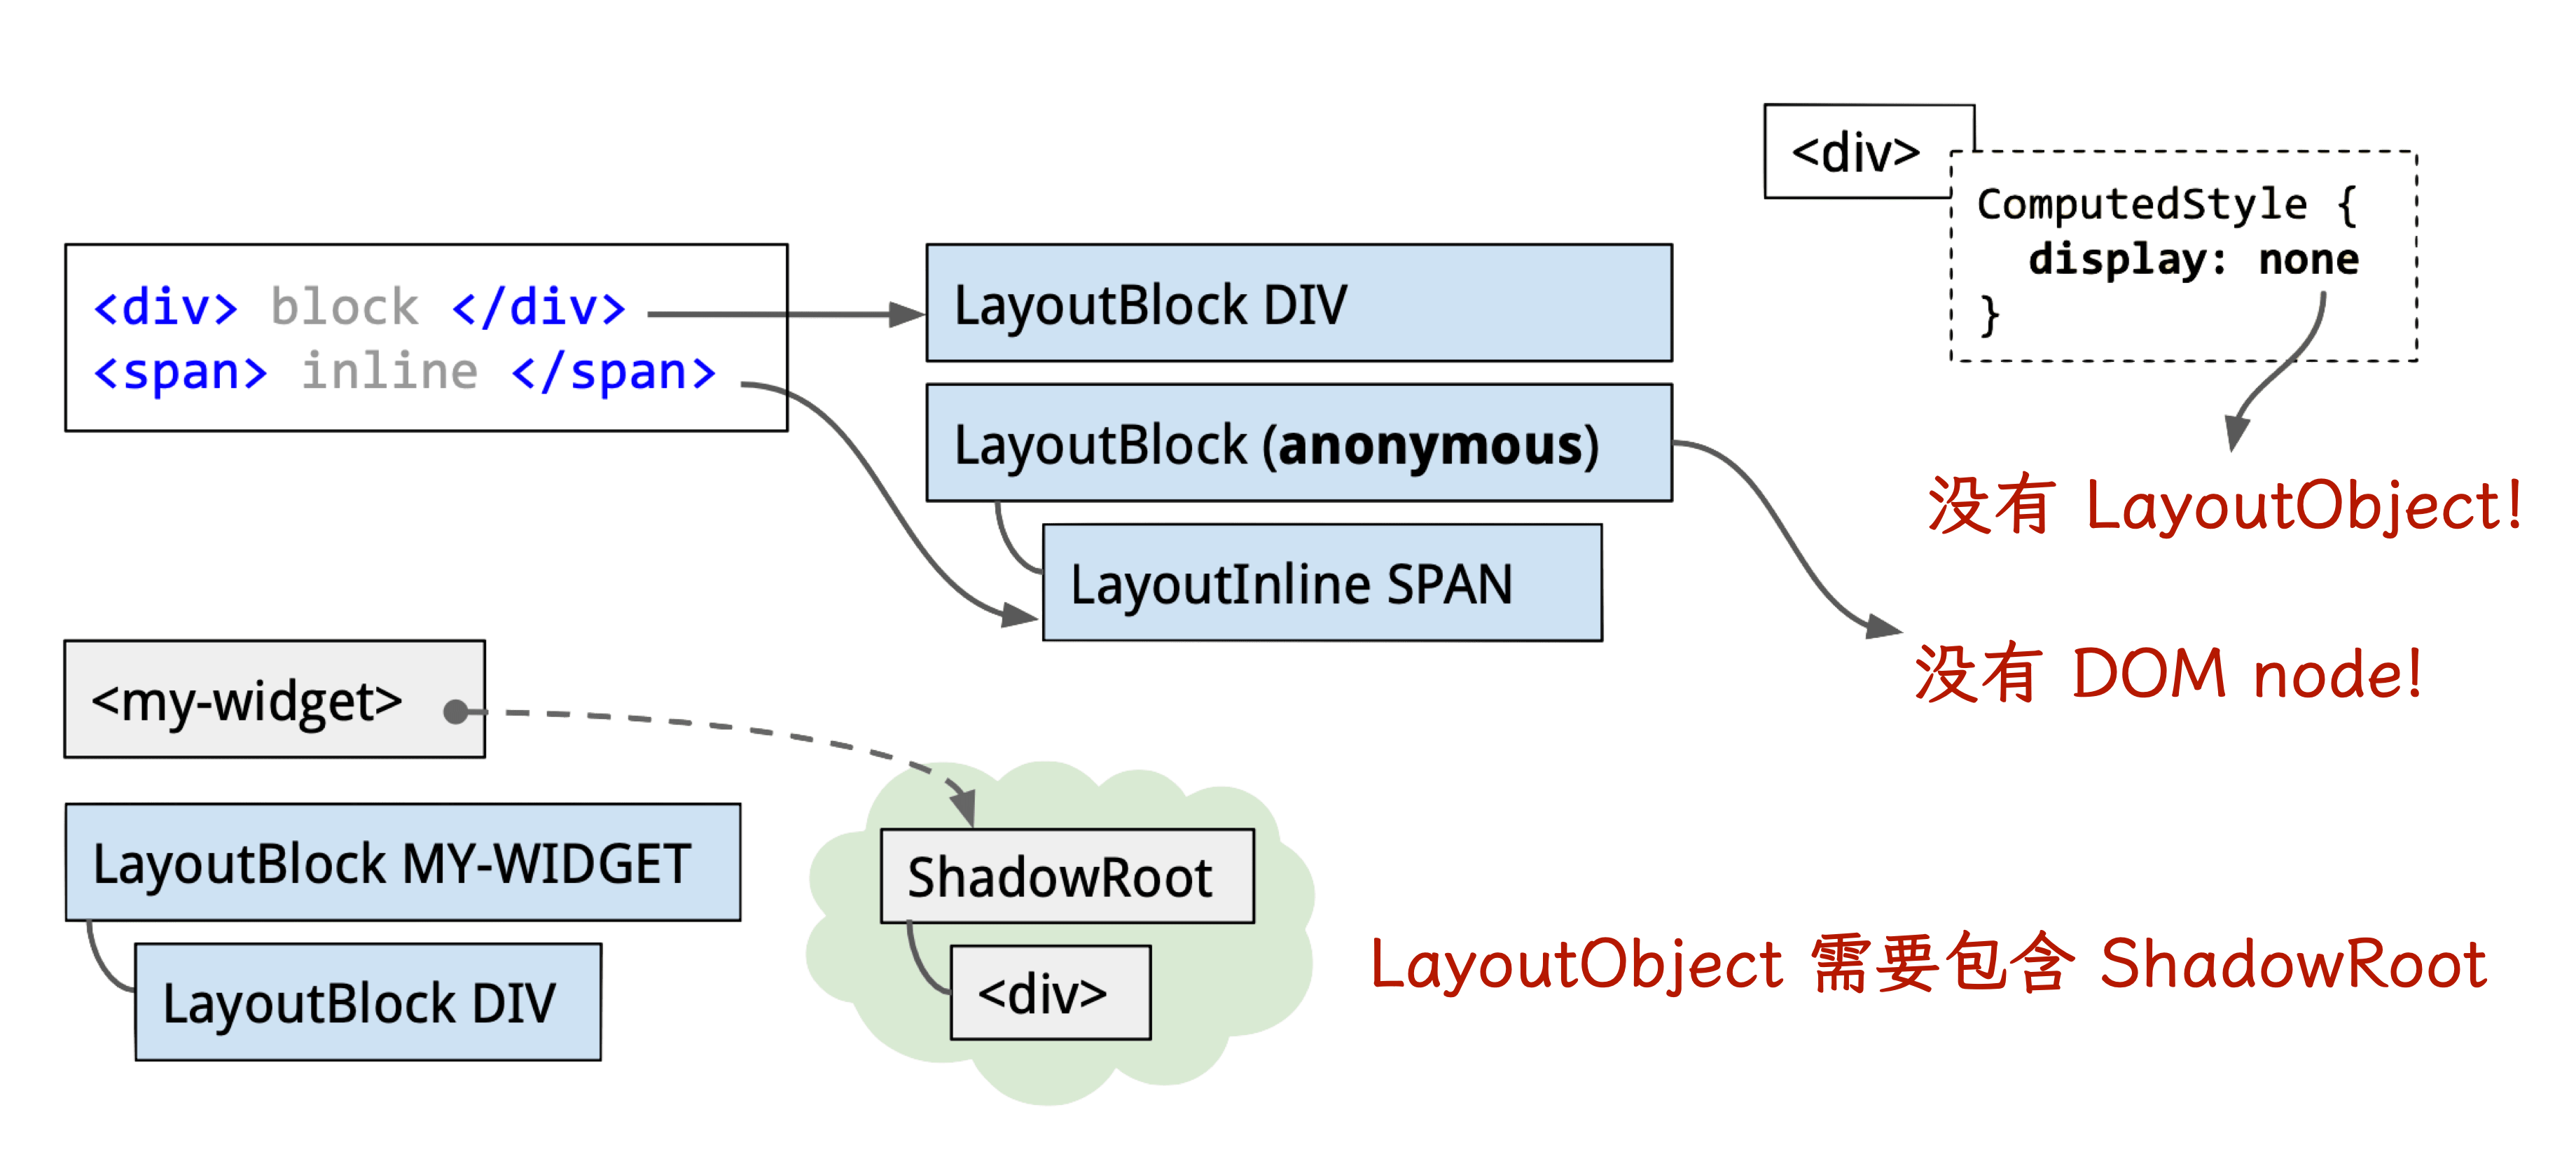
Each LayoutObject records position and size for its corresponding RenderObject. A LayoutObject has a LayoutRect with x, y, width, height.
Note: LayoutObject and DOM Node are not in 1:1 correspondence.
Core function: Document::UpdateStyleAndLayout
To minimize layout (reflow), key strategies:
- Change
classNameinstead of inlinestyle— avoids CSSOM regeneration and compositing - Take frequently reflowing elements “offline”
- Replace properties that trigger reflow with equivalents that don’t
- Isolate reflow to specific layers
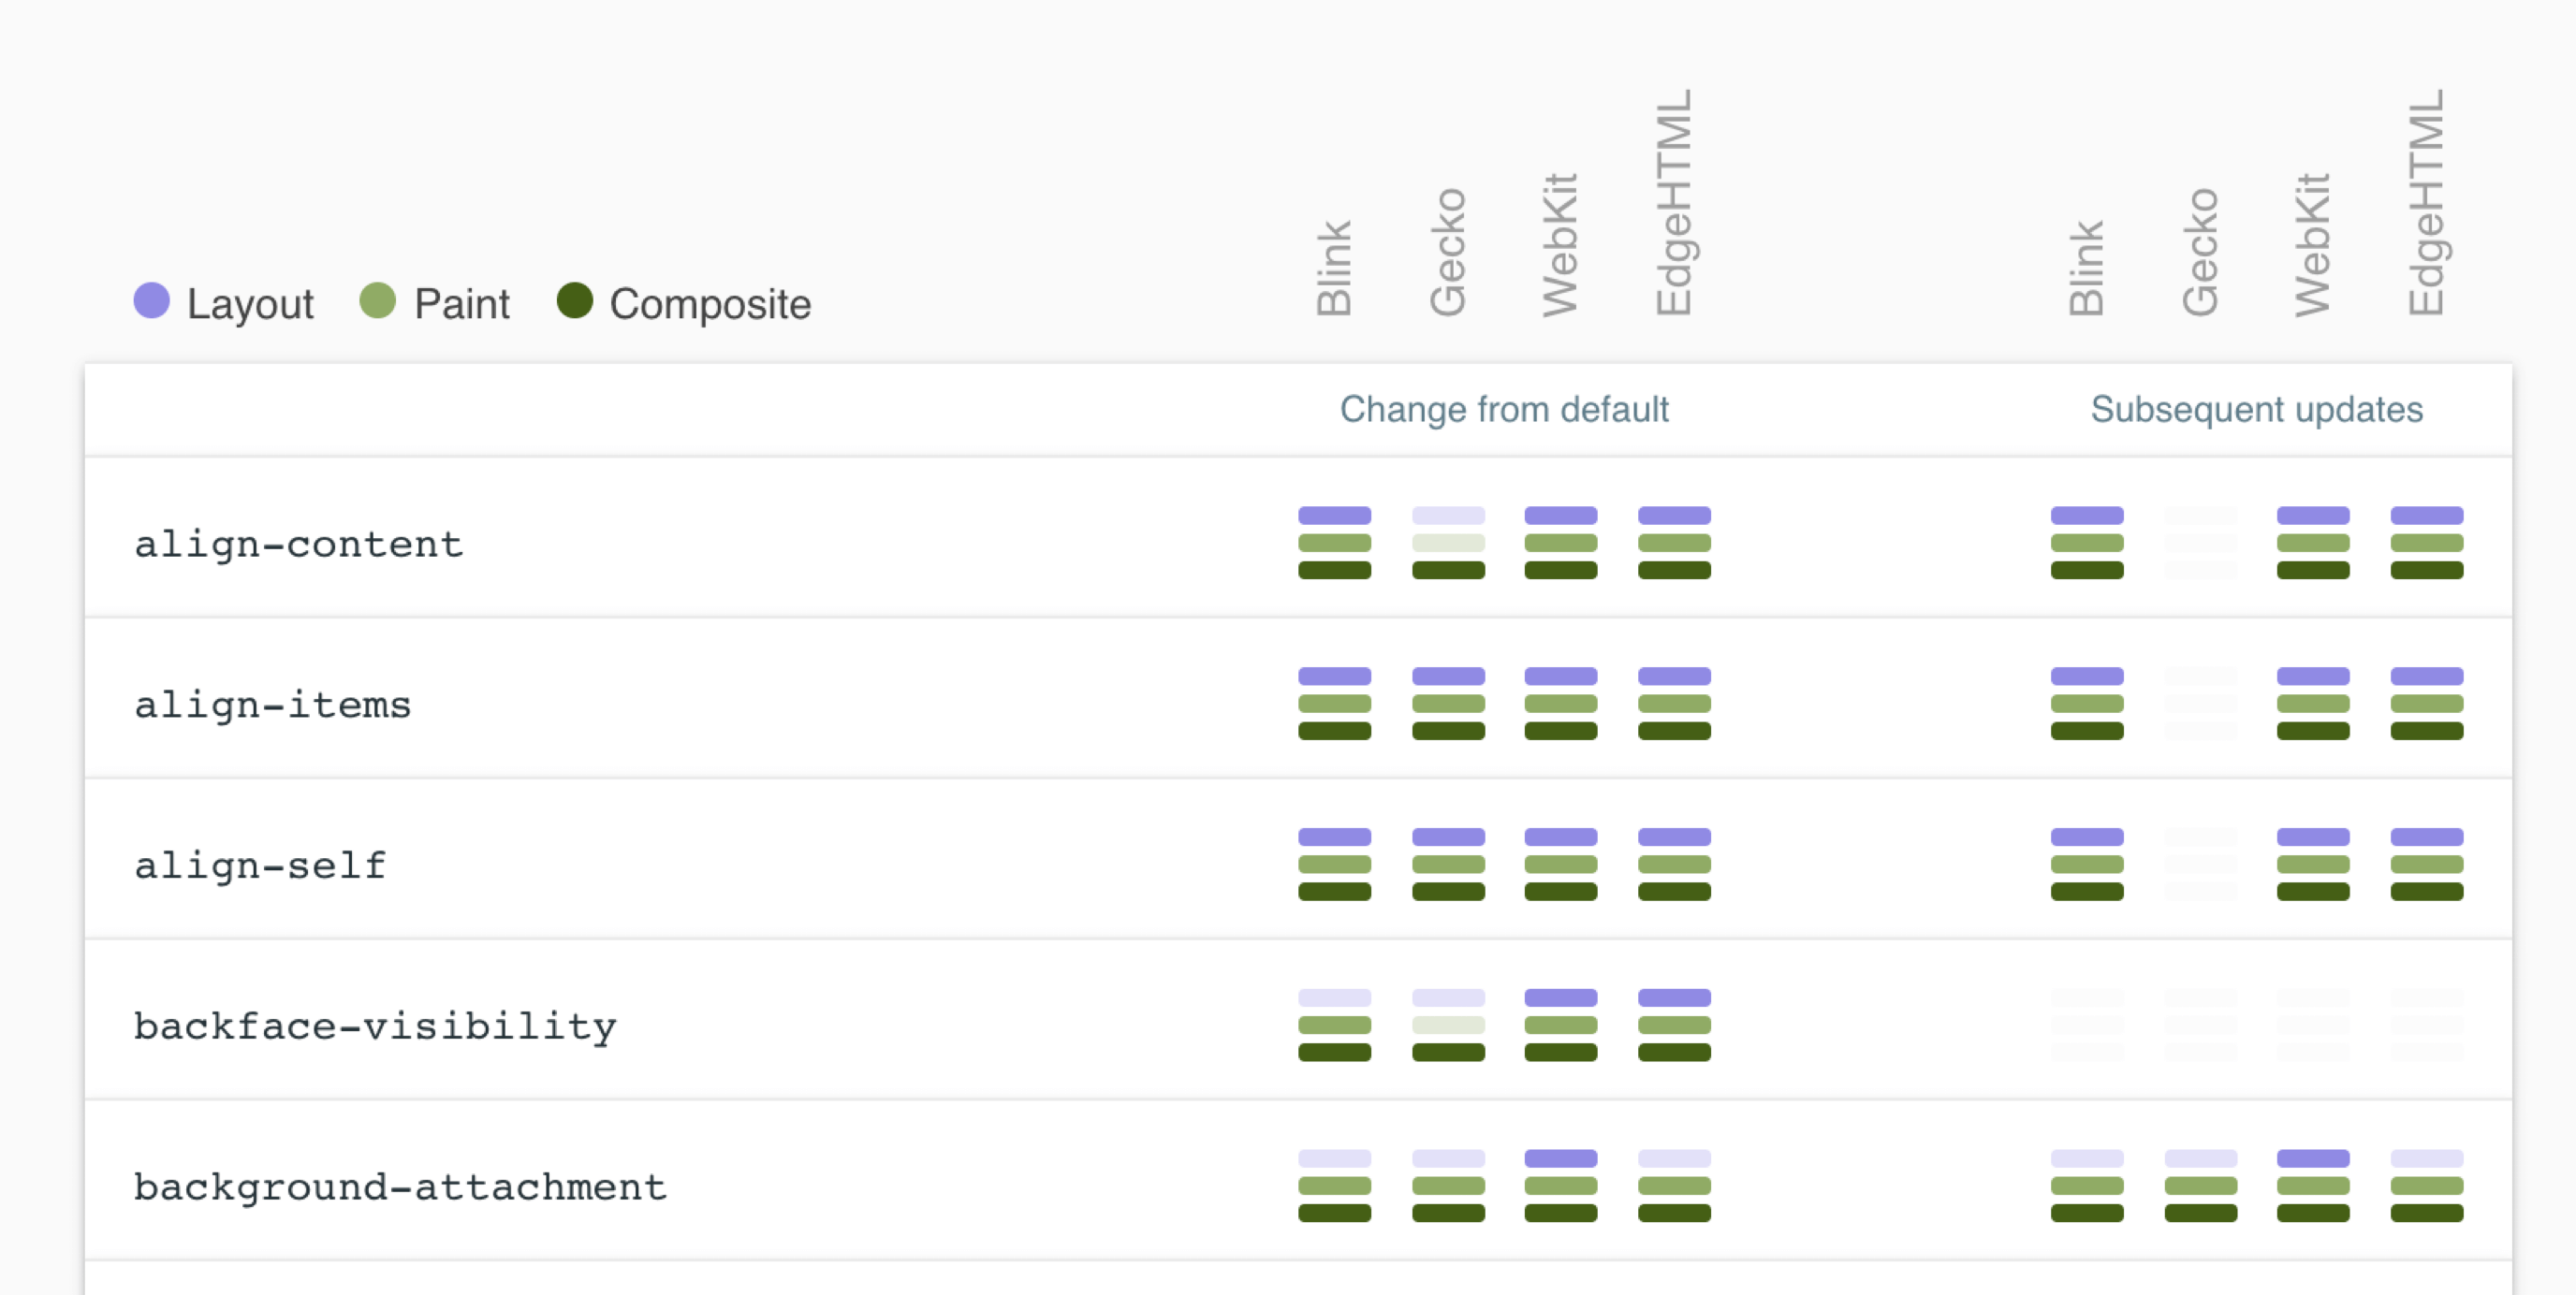
Reference CSS Triggers for which CSS properties trigger Layout, Paint, and Compositor on each browser engine.
Pre-paint
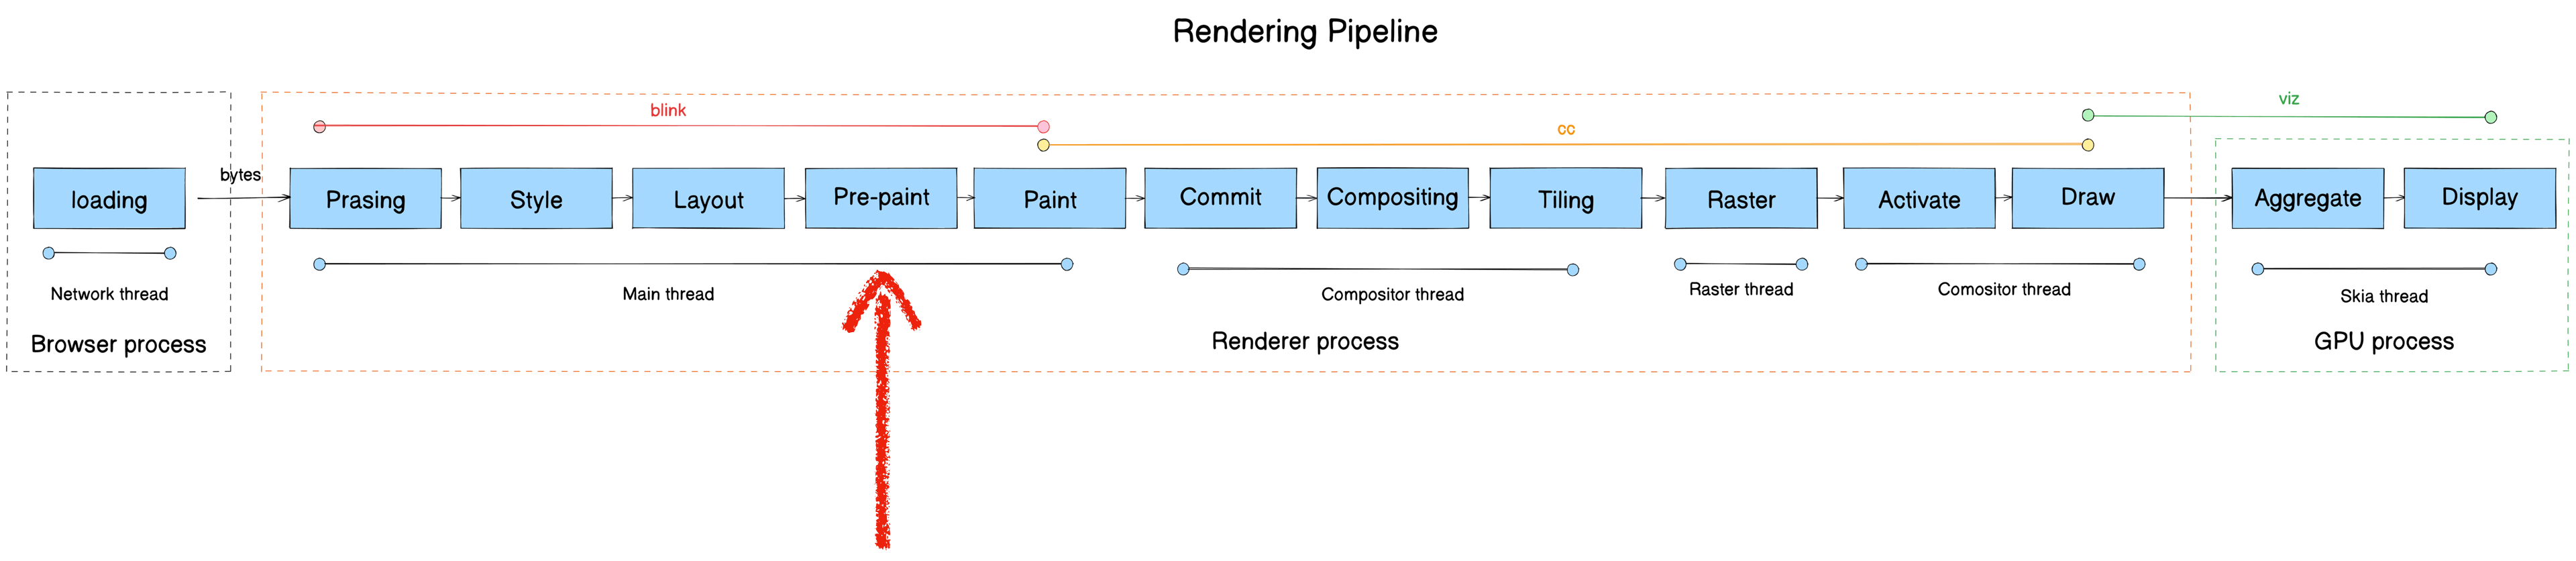
- Module: blink
- Process: Render Process
- Thread: Main thread
- Responsibility: Generate Property Trees for the Compositor thread, preventing redundant rasterization
- Input: Layout Tree
- Output: Property Tree
Using Property Trees, Chromium can independently apply transforms, clips, effects, and scrolls to a node without affecting its children.
Core functions:
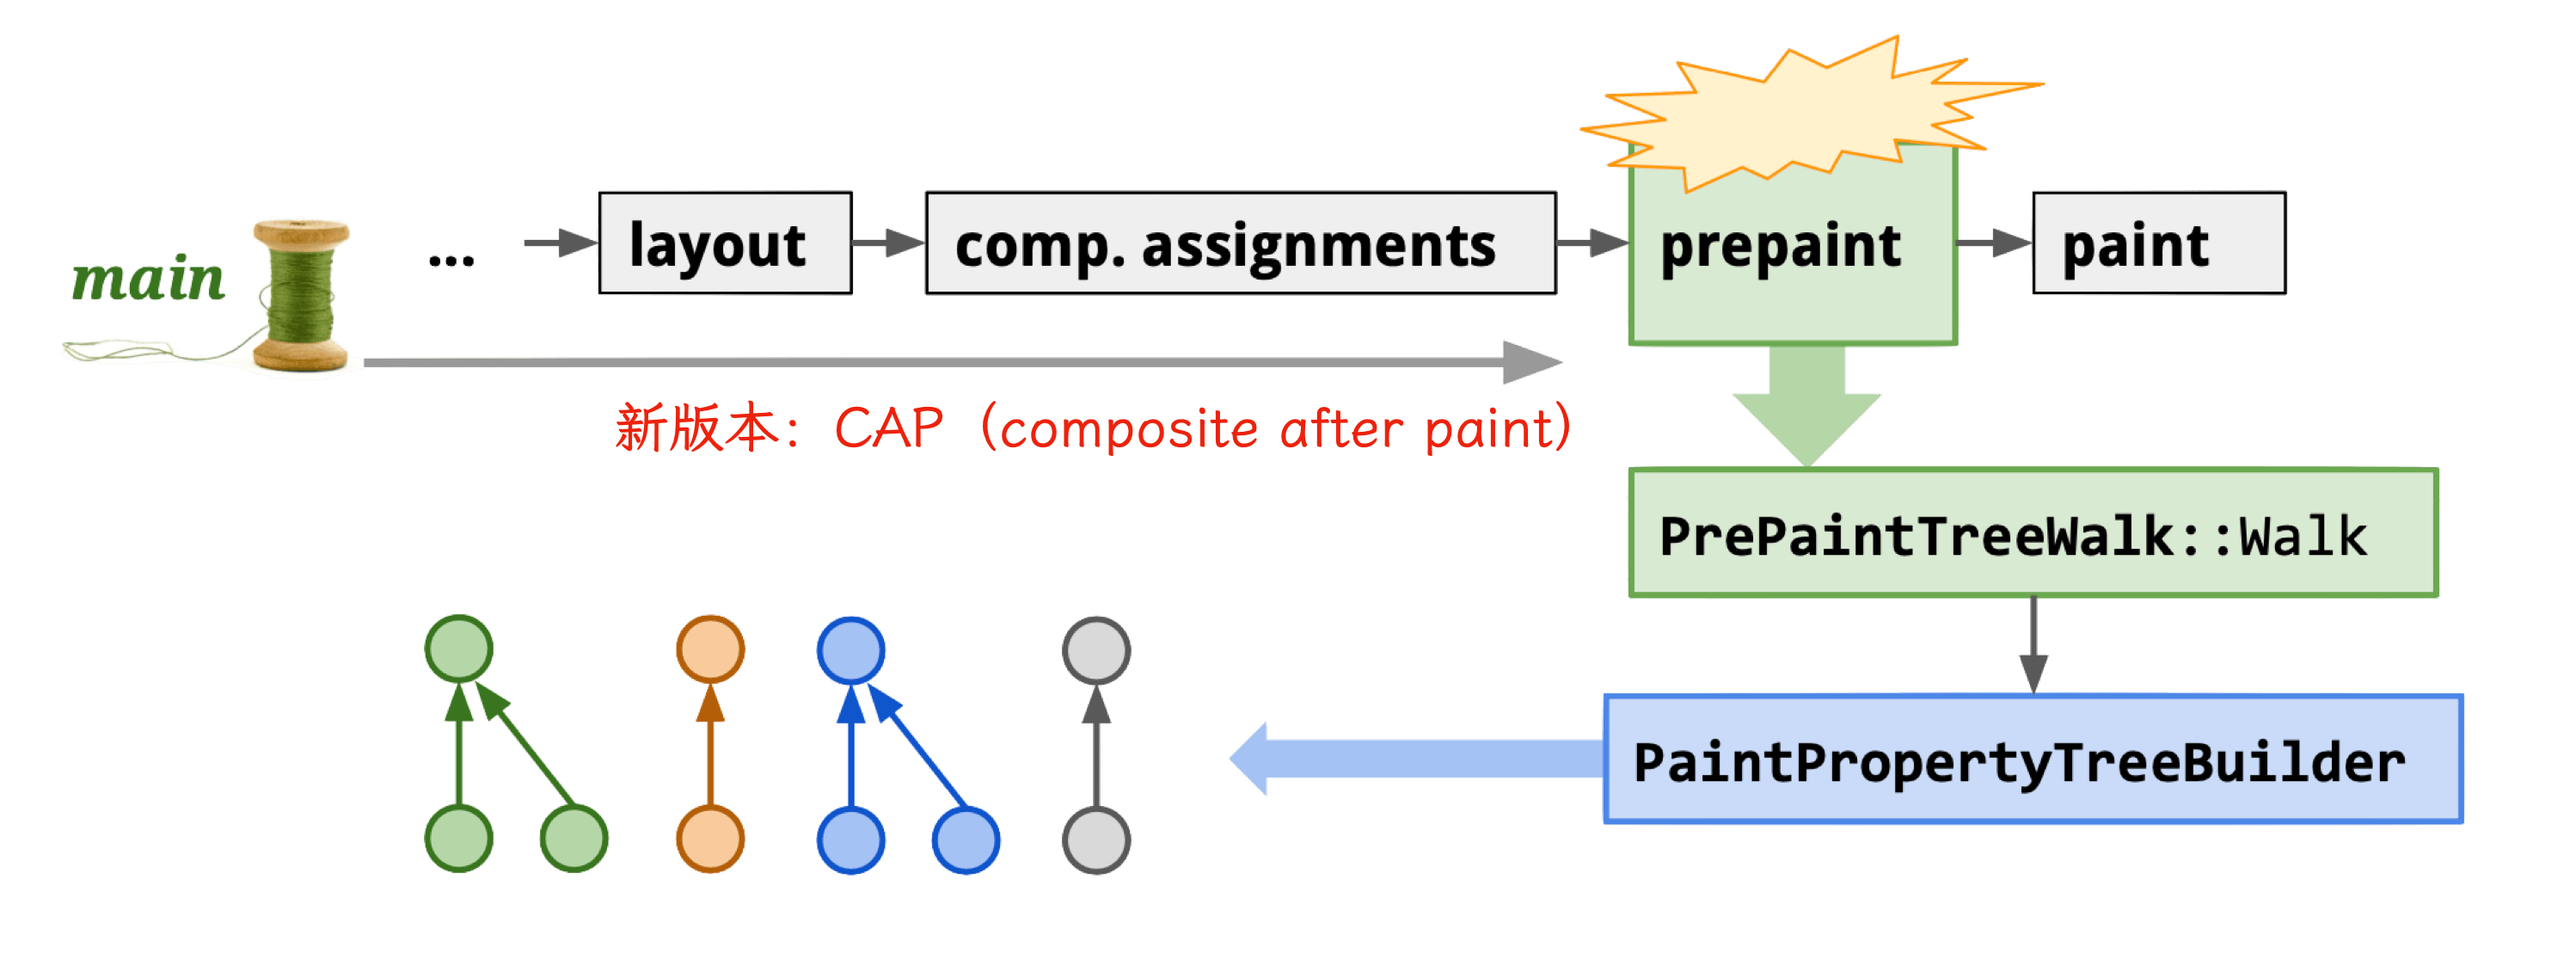
Newer Chromium versions use CAP (composite after paint) mode.
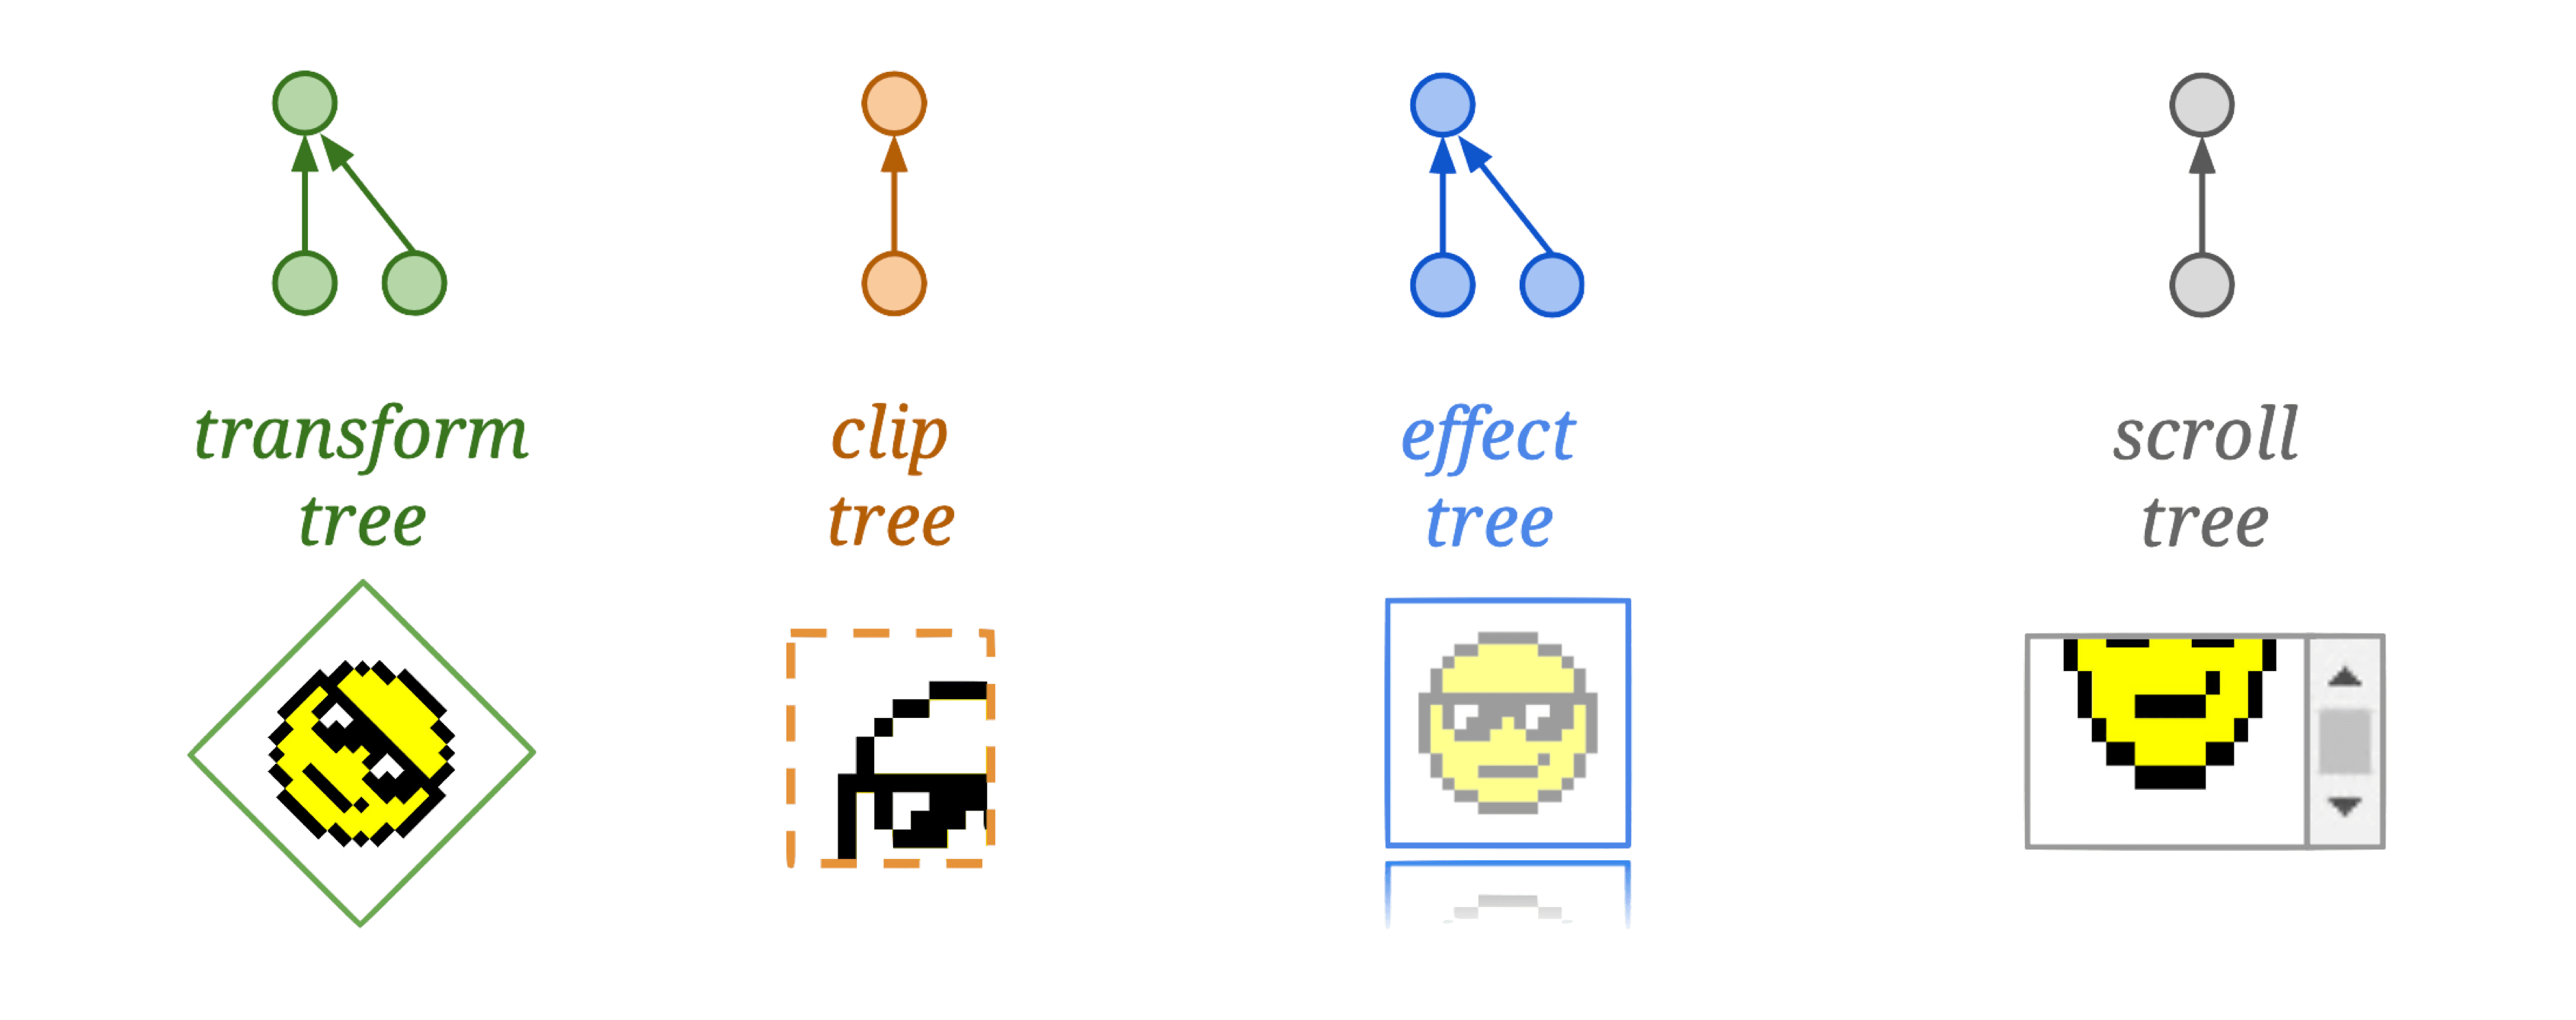
Property Trees consist of four trees:
Paint
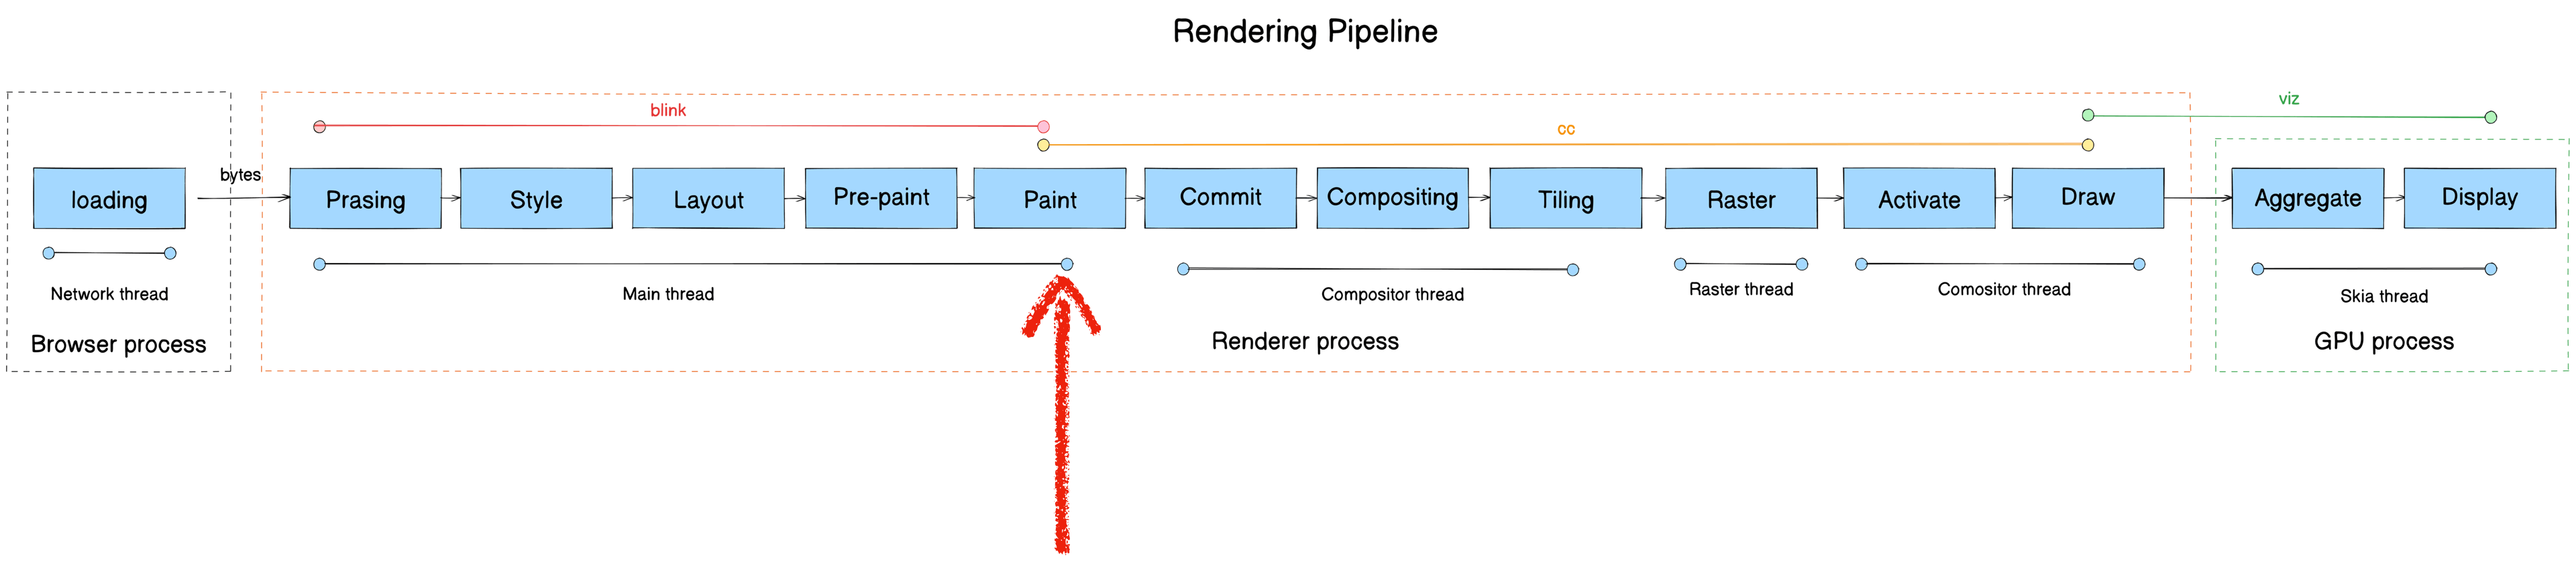
- Module: blink
- Process: Render Process
- Thread: Main thread
- Responsibility: Blink calls cc’s drawing interfaces to produce cc::Layer as the data source for the cc module
- Input: Layout Object
- Output: PaintLayer (cc::Layer)
Note: cc = content collator — not Chromium Compositor.
Core functions:

The Paint stage converts Layout Objects to drawing instructions, encapsulated in cc::DisplayItemList, which are injected into cc::PictureLayer.
Generating the display item list uses a stack traversal:
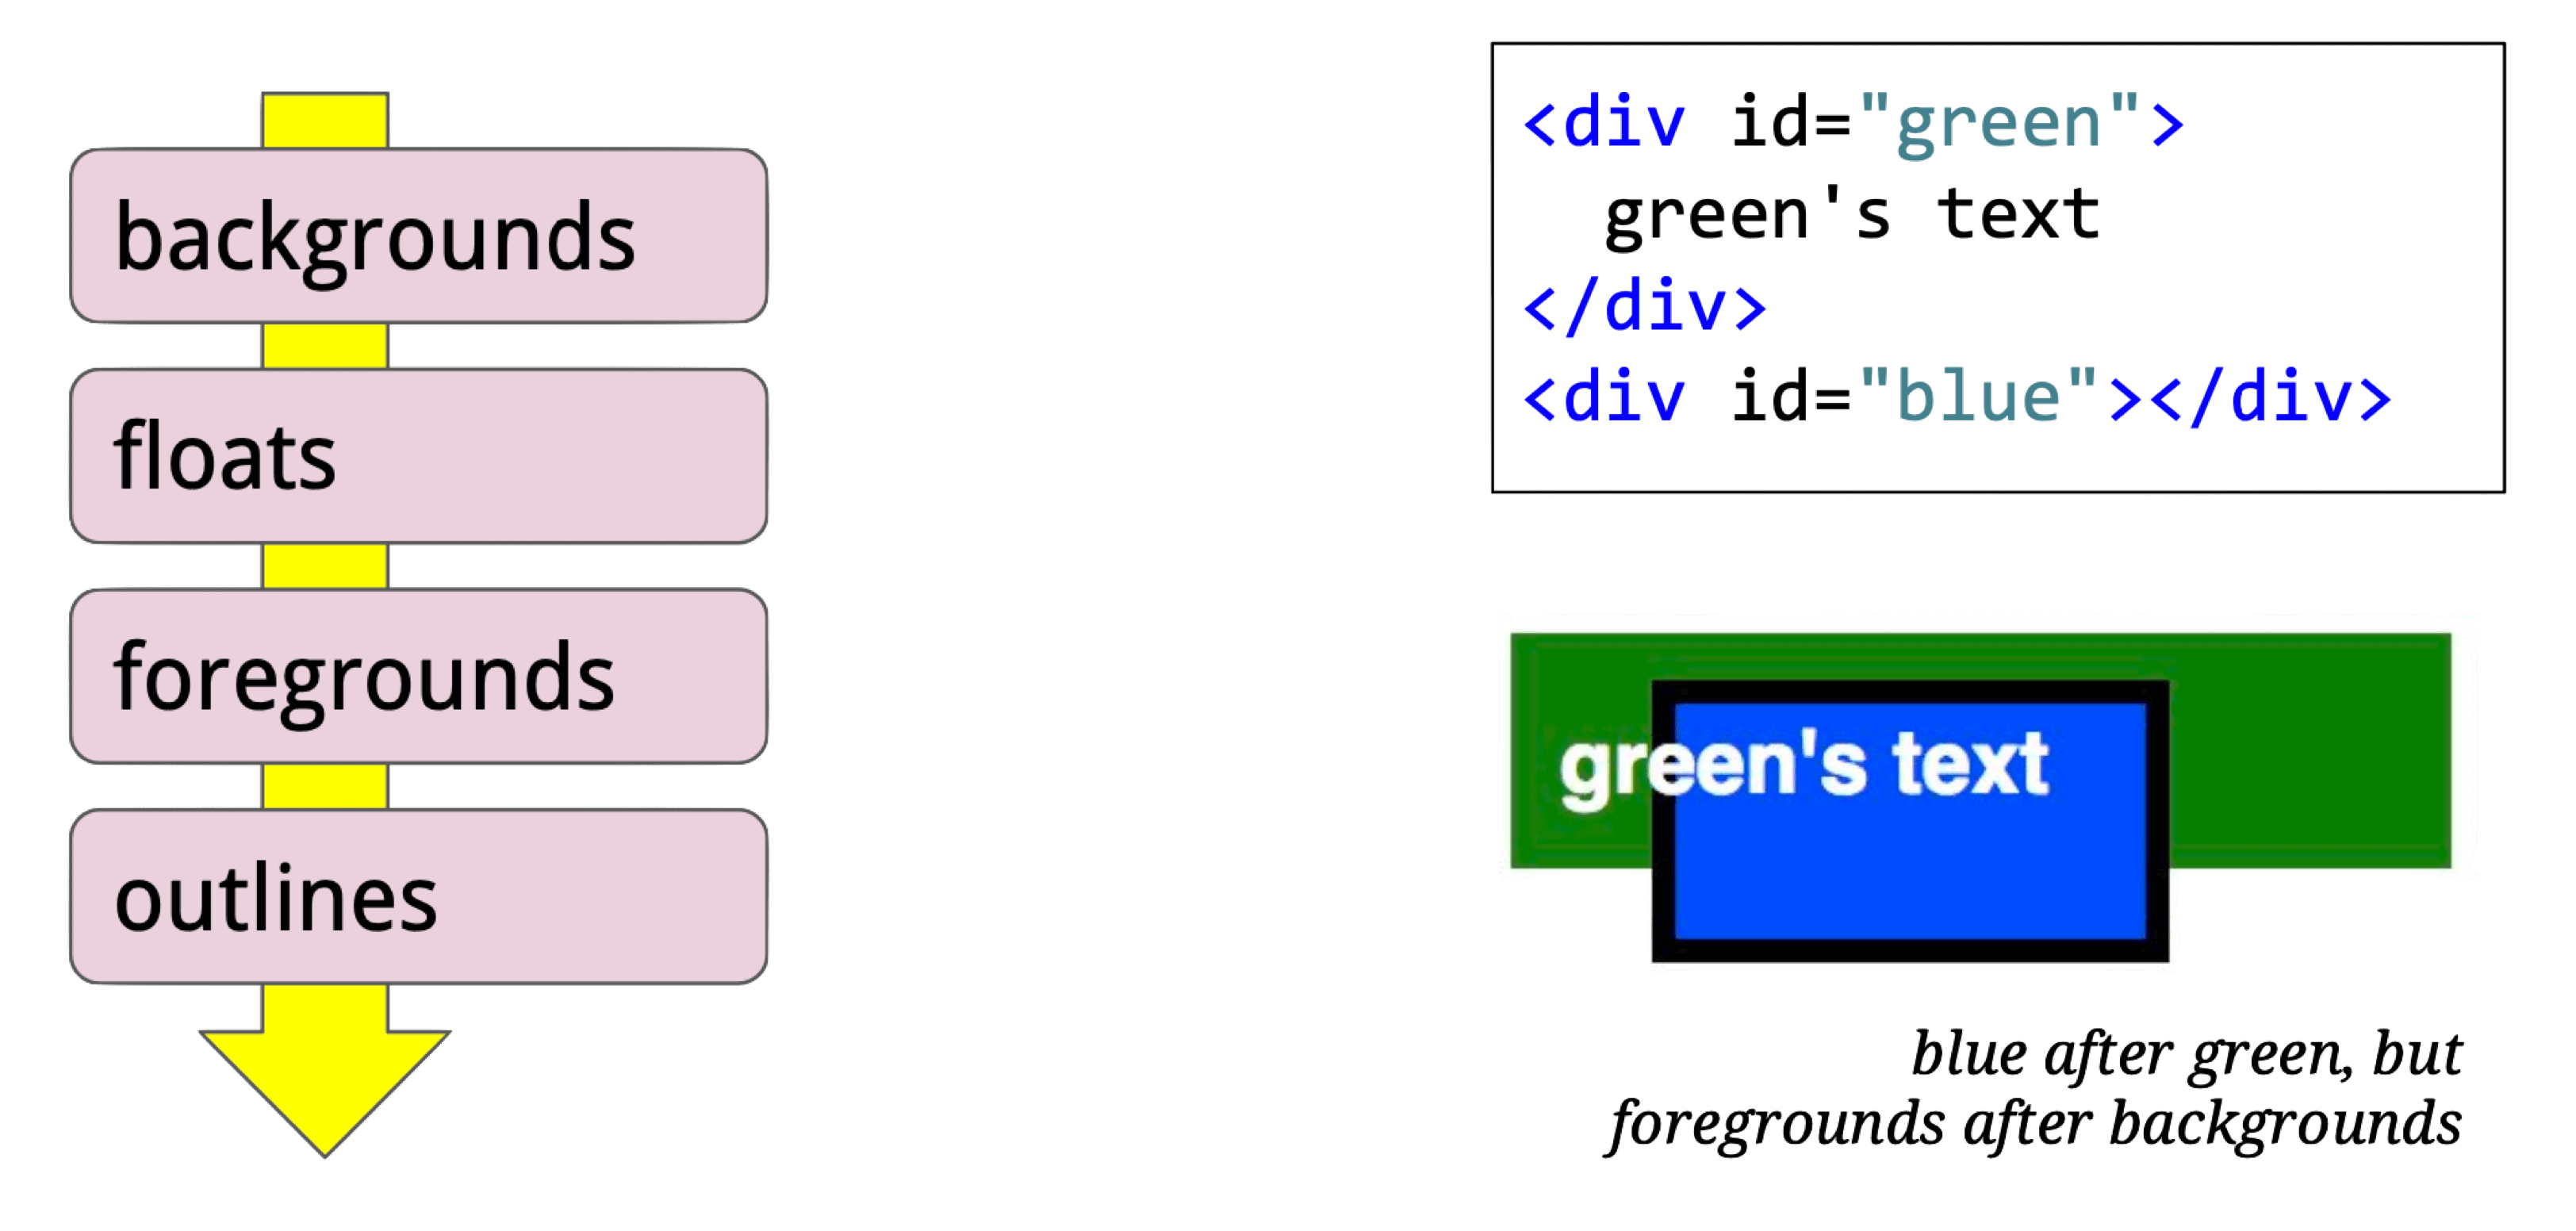
For this HTML:
<style> #p {
  position: absolute; padding: 2px;
  width: 50px; height: 20px;
  left: 25px; top: 25px;
  border: 4px solid purple;
  background-color: lightgrey;
} </style>
<div id=p> pixels </div>
The resulting display items:

cc::Layer runs on the main thread; each Render Process has exactly one cc::Layer tree. Subtypes:
- cc::PictureLayer: Self-drawing UI components. Provides a
cc::DisplayItemListviacc::ContentLayerClient. After going through the cc pipeline, this becomes one or moreviz::TileDrawQuads stored in aviz::CompositorFrame. - cc::TextureLayer: For components doing their own rasterization (Flash plugins, WebGL, etc.) — corresponds to
viz::TextureDrawQuad. - cc::UIResourceLayer / cc::NinePatchLayer: Like TextureLayer, used in software rendering.
- cc::SurfaceLayer: Embeds other CompositorFrames — used for iframes and video players.
- cc::SolidColorLayer: Solid color UI components.
Commit

- Module: cc
- Process: Render Process
- Thread: Compositor thread
- Responsibility: Transfer Paint-stage output (cc::Layer) to the Compositor thread
- Input: cc::Layer (main thread)
- Output: LayerImpl (compositor thread)
Core function: PushPropertiesTo
Core logic: commit LayerTreeHost data to LayerTreeHostImpl.
cc::PictureLayer::PushPropertiesTo
cc::PushLayerPropertiesInternal
cc::TreeSynchronizer::PushLayerProperties
cc::LayerTreeHost::FinishCommitOnImplThread
cc::SingleThreadProxy::DoCommit
...
Compositing
- Module: cc
- Process: Render Process
- Thread: Compositor thread
- Responsibility: Decompose the full page into independent layers for isolated updates
- Input: PaintLayer (cc::Layer)
- Output: GraphicsLayer
Core function: Compositor::UpdateLayerTreeHost
Why have a Compositor thread at all? Without it, if we rasterize and display directly after Paint — what happens?
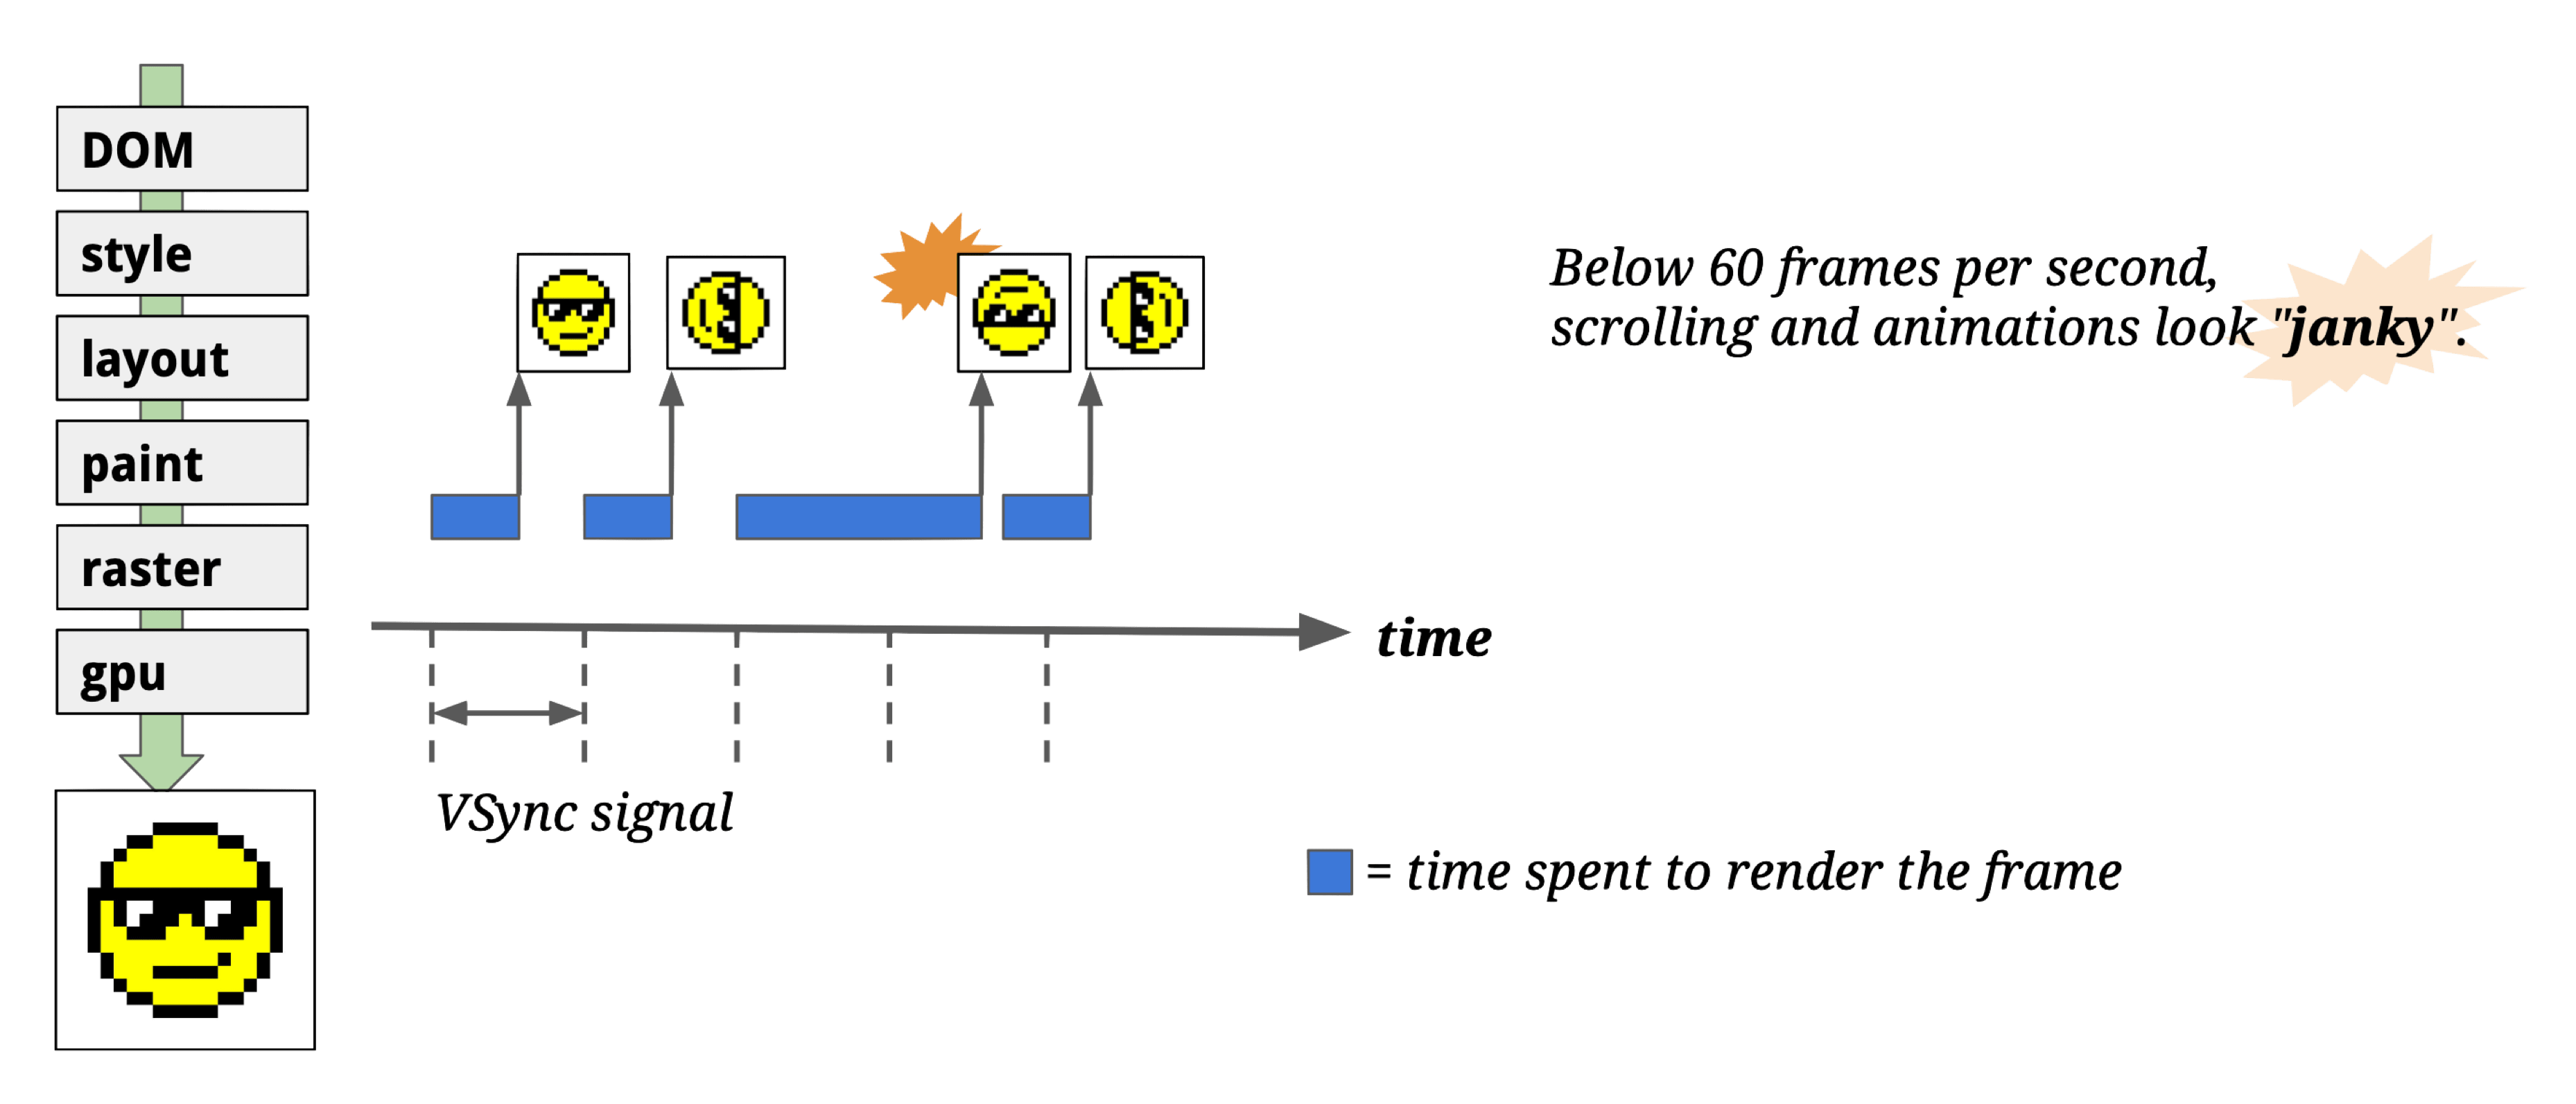
If rasterization data isn’t ready when the vsync signal arrives, you drop frames and get “janky” rendering.
Even with caching at each pipeline stage (Style, Layout, Paint, Raster) to minimize unnecessary redraws:
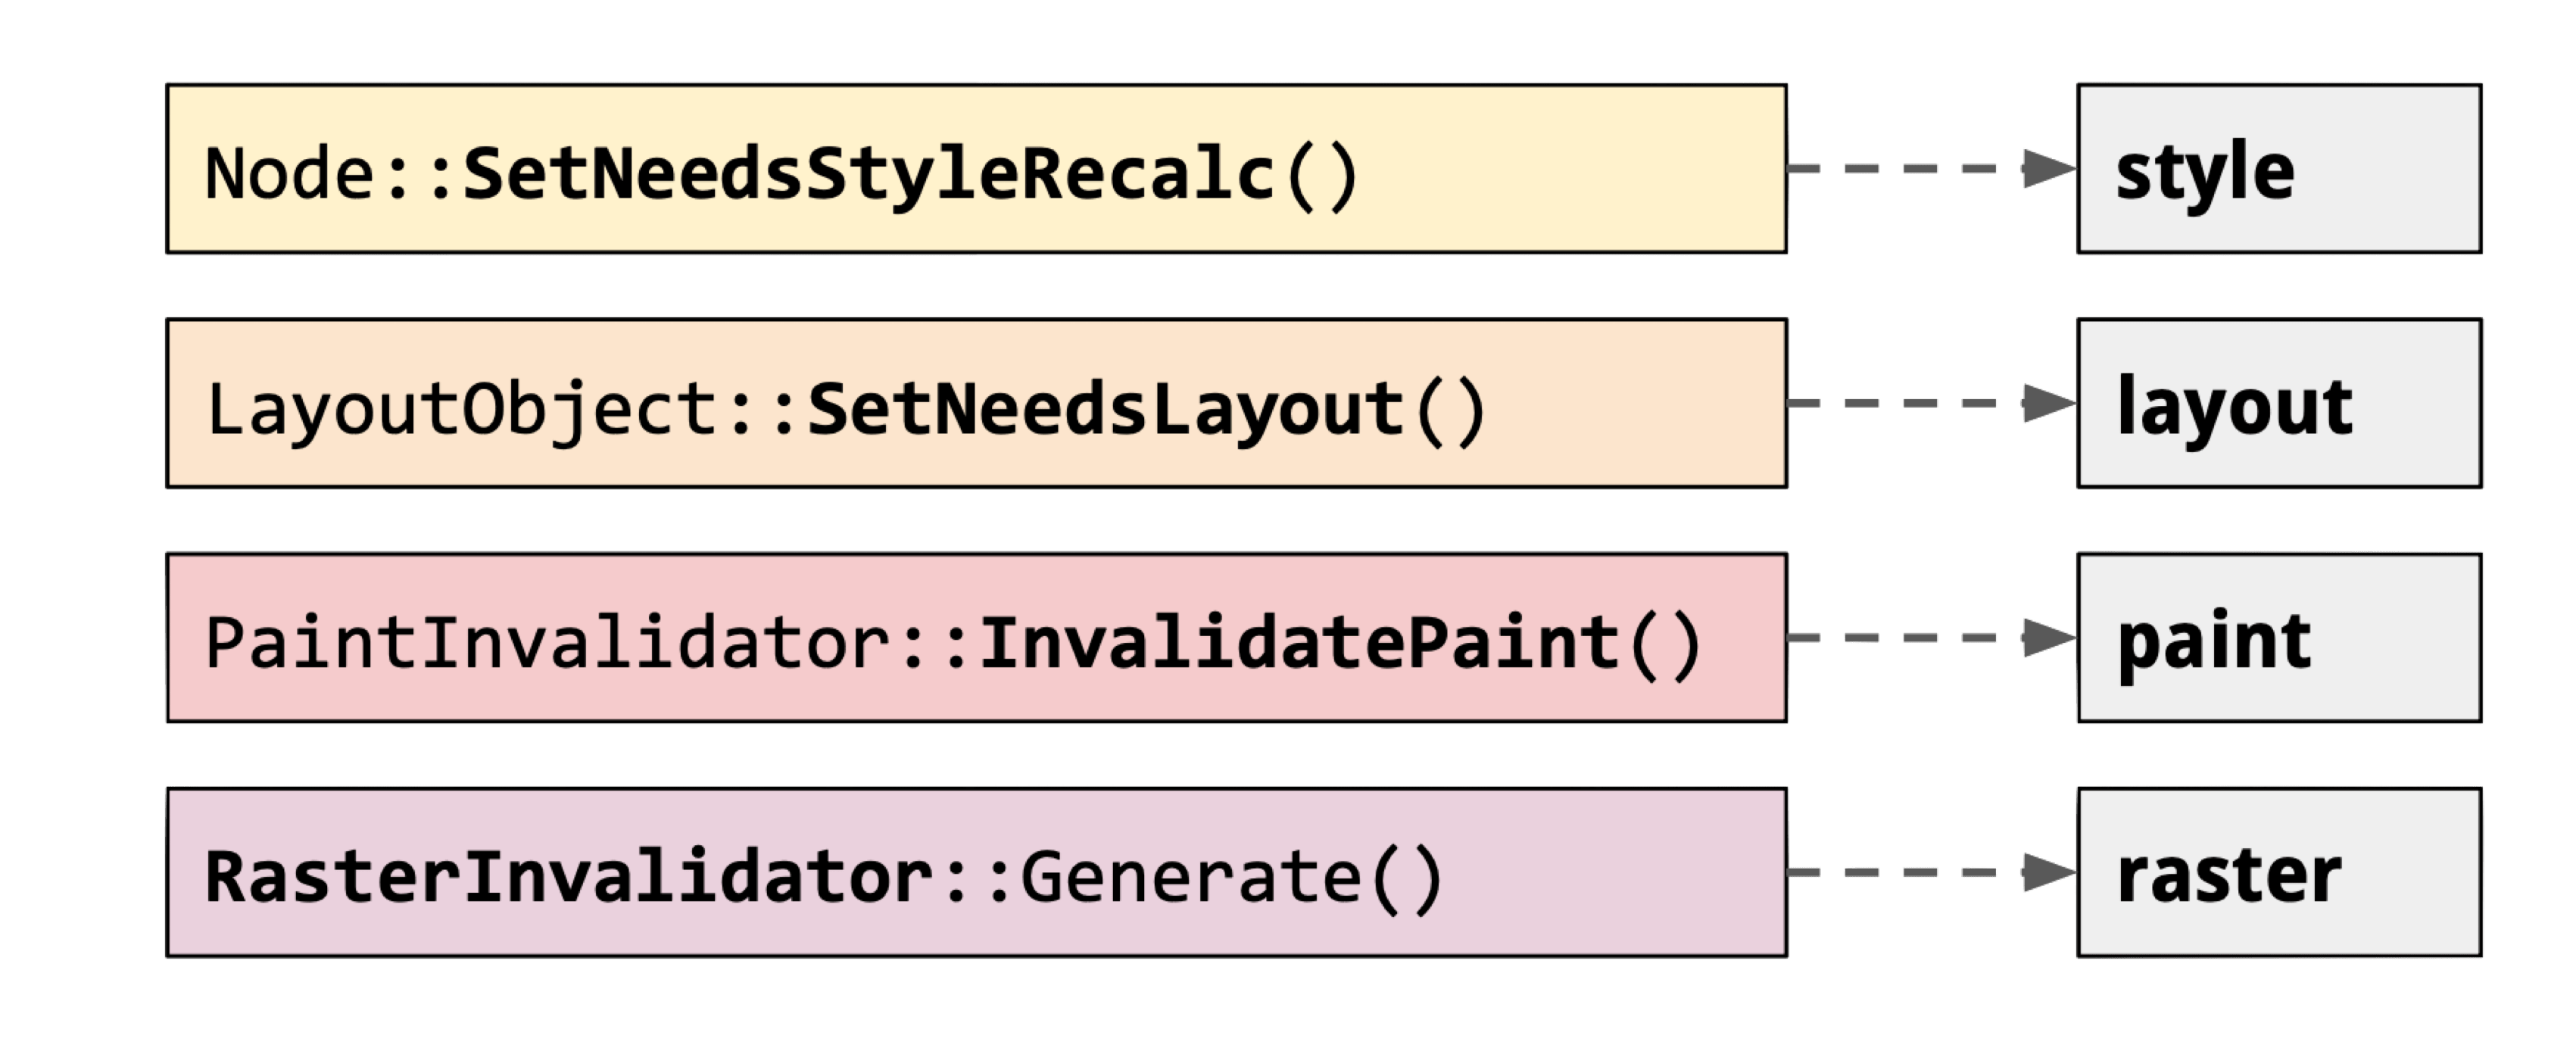
A simple scroll would still cause all pixels to re-Paint + re-Raster!

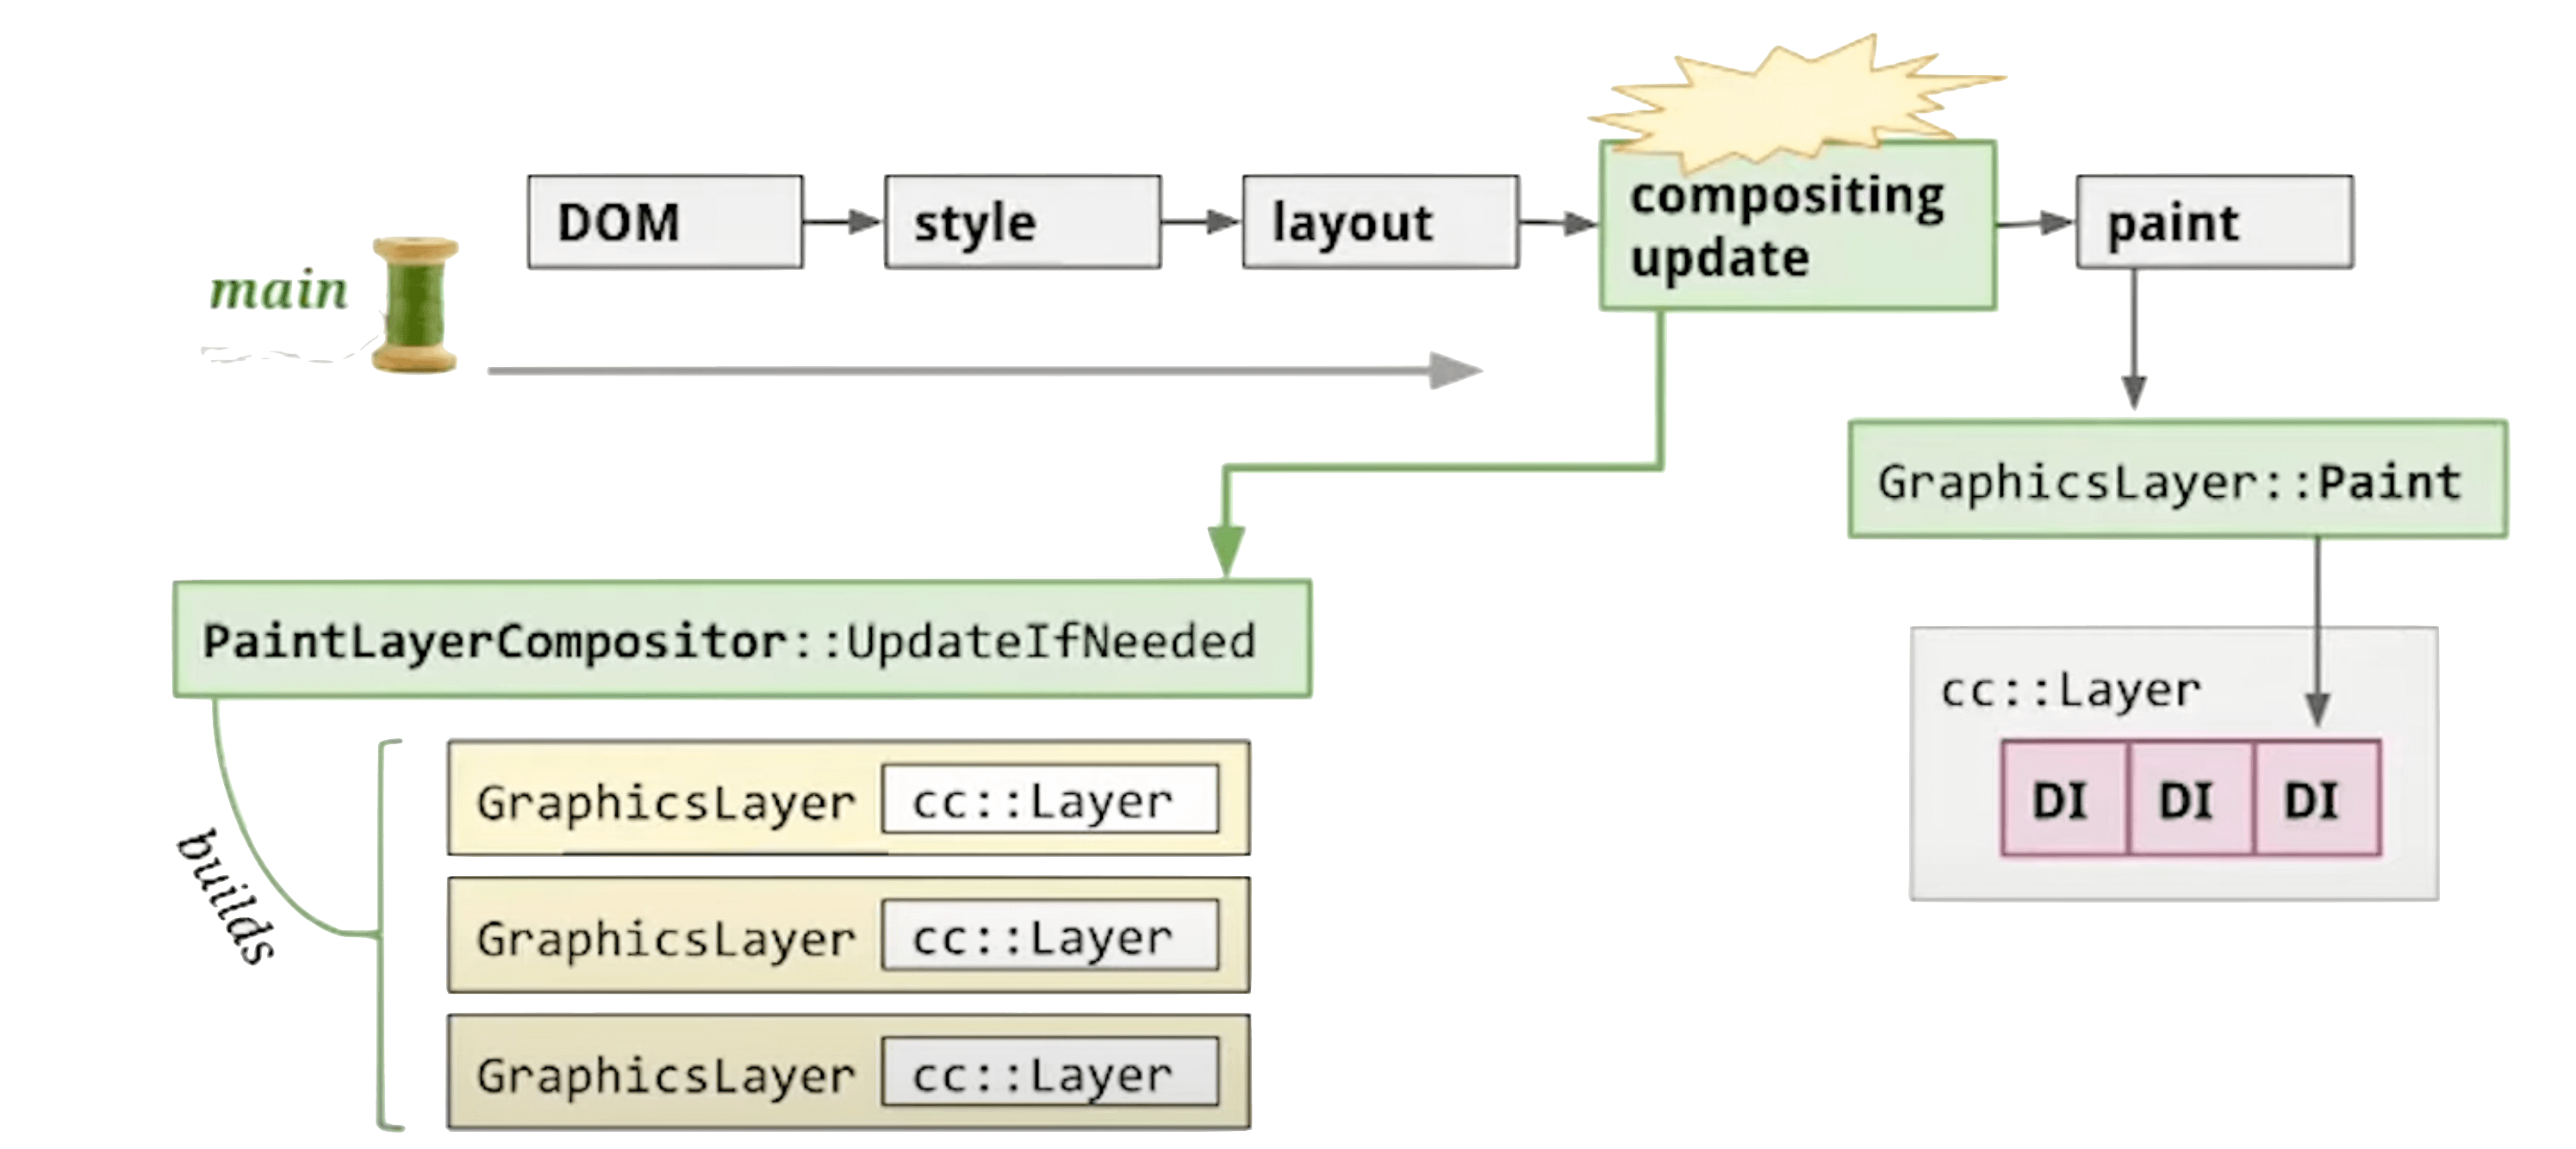
The Compositing stage decomposes the page into GraphicsLayers. Chromium only needs to re-render the affected layers — others just participate in compositing:
A div with a CSS transform animation becomes its own independent GraphicsLayer — only that layer needs re-rendering during the animation.
DevTools’ Layers panel shows all layers, their creation reasons, memory usage, and how many times they’ve been painted — useful for memory and rendering optimization.
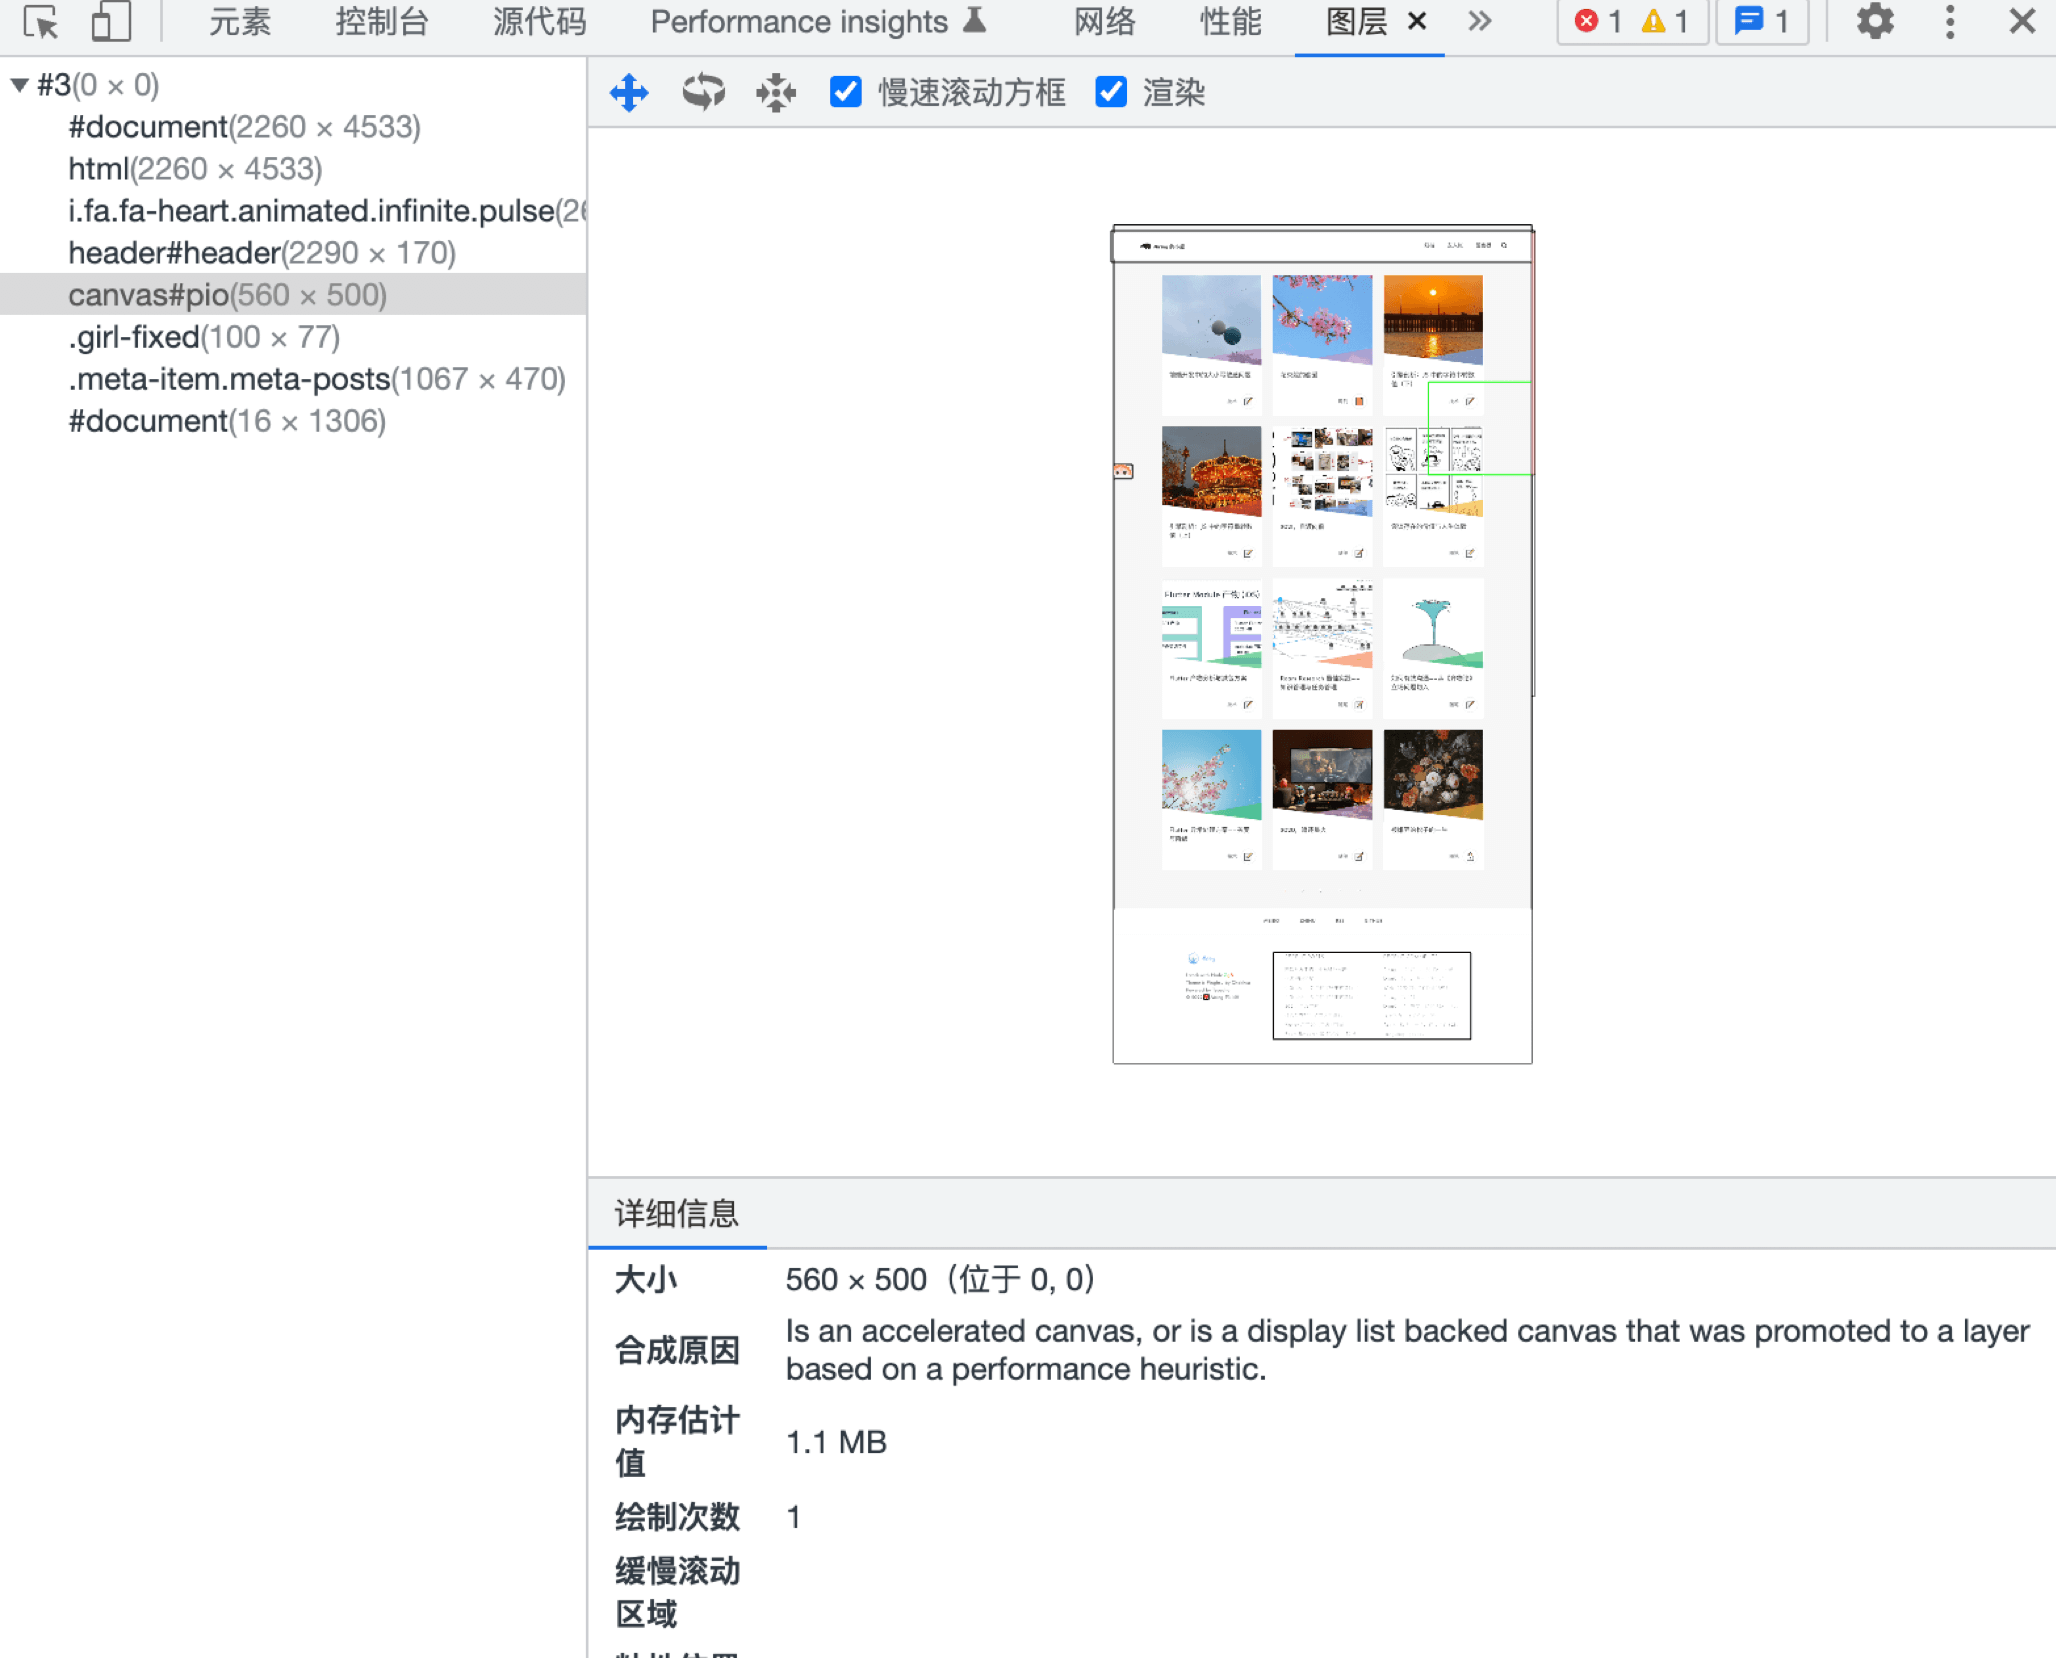
This explains why CSS animations perform well: the Compositor thread handles CSS animations independently using Property Tree-based layer compositing. You can also use will-change to hint to the Compositor thread ahead of time. The trade-off: each extra layer consumes memory.
The Compositor thread can also handle input events — monitoring events from the Browser Process:
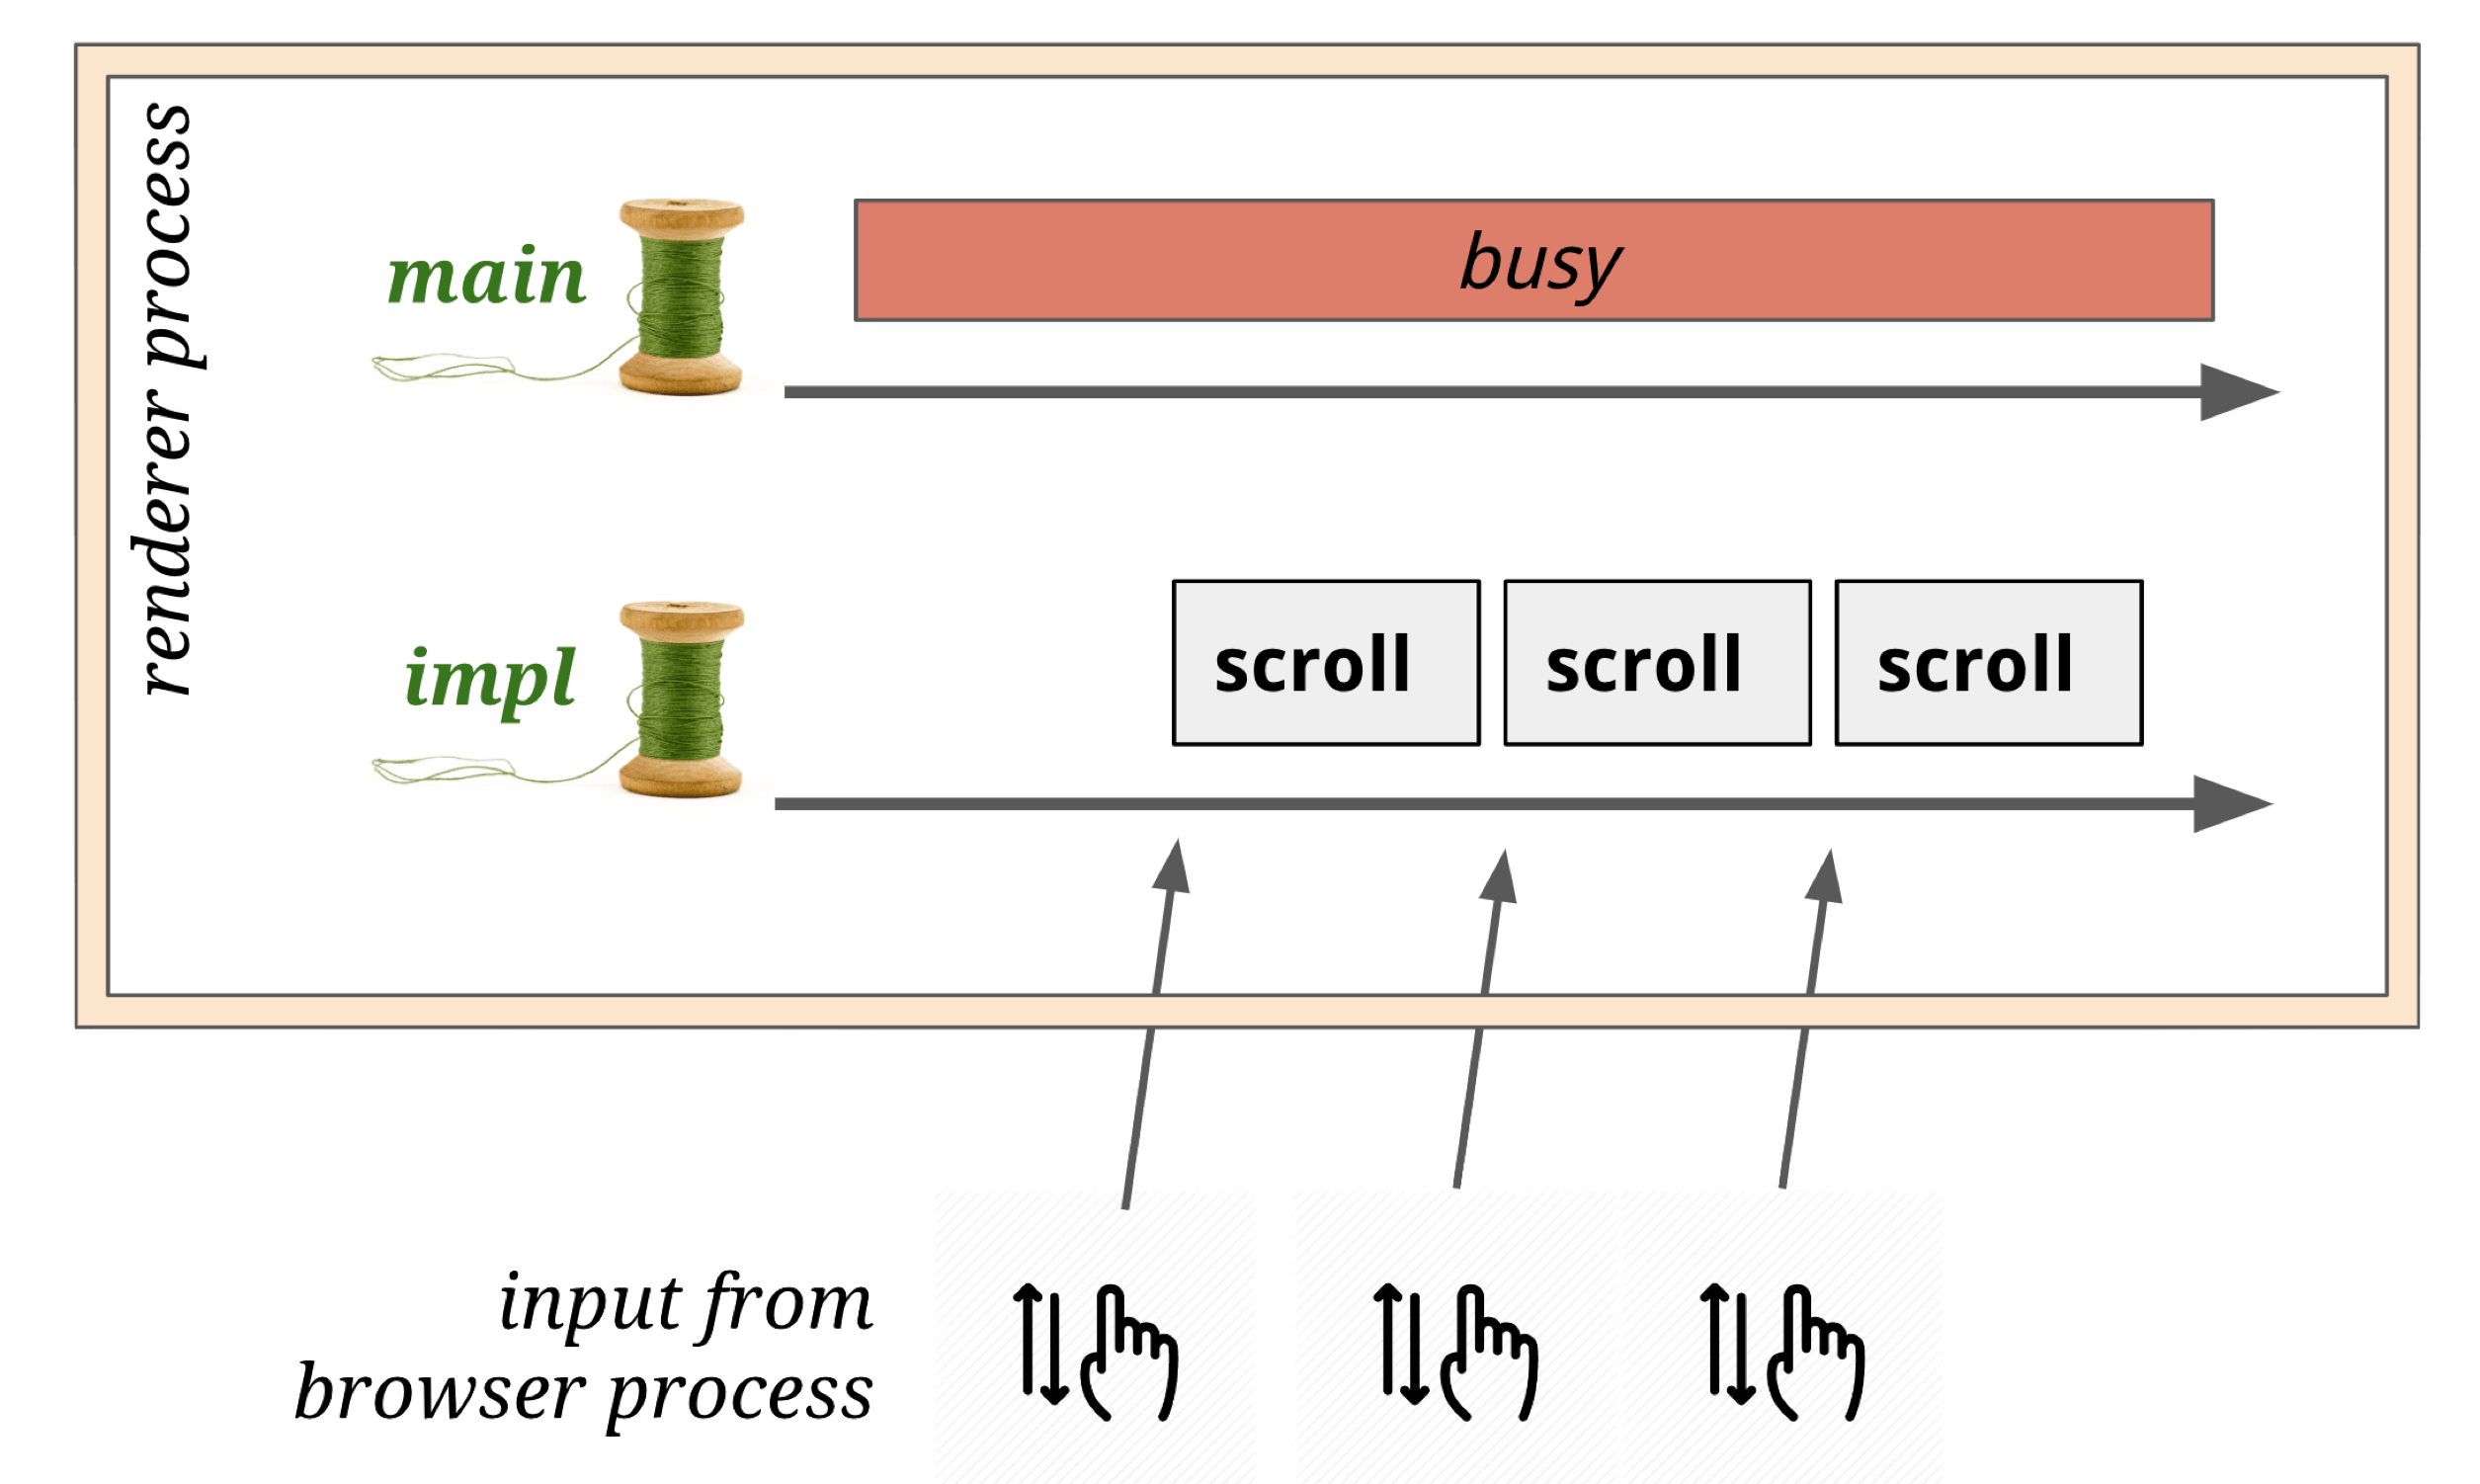
However: if JavaScript has registered event listeners, the Compositor thread forwards input events to the main thread for handling.
Tiling
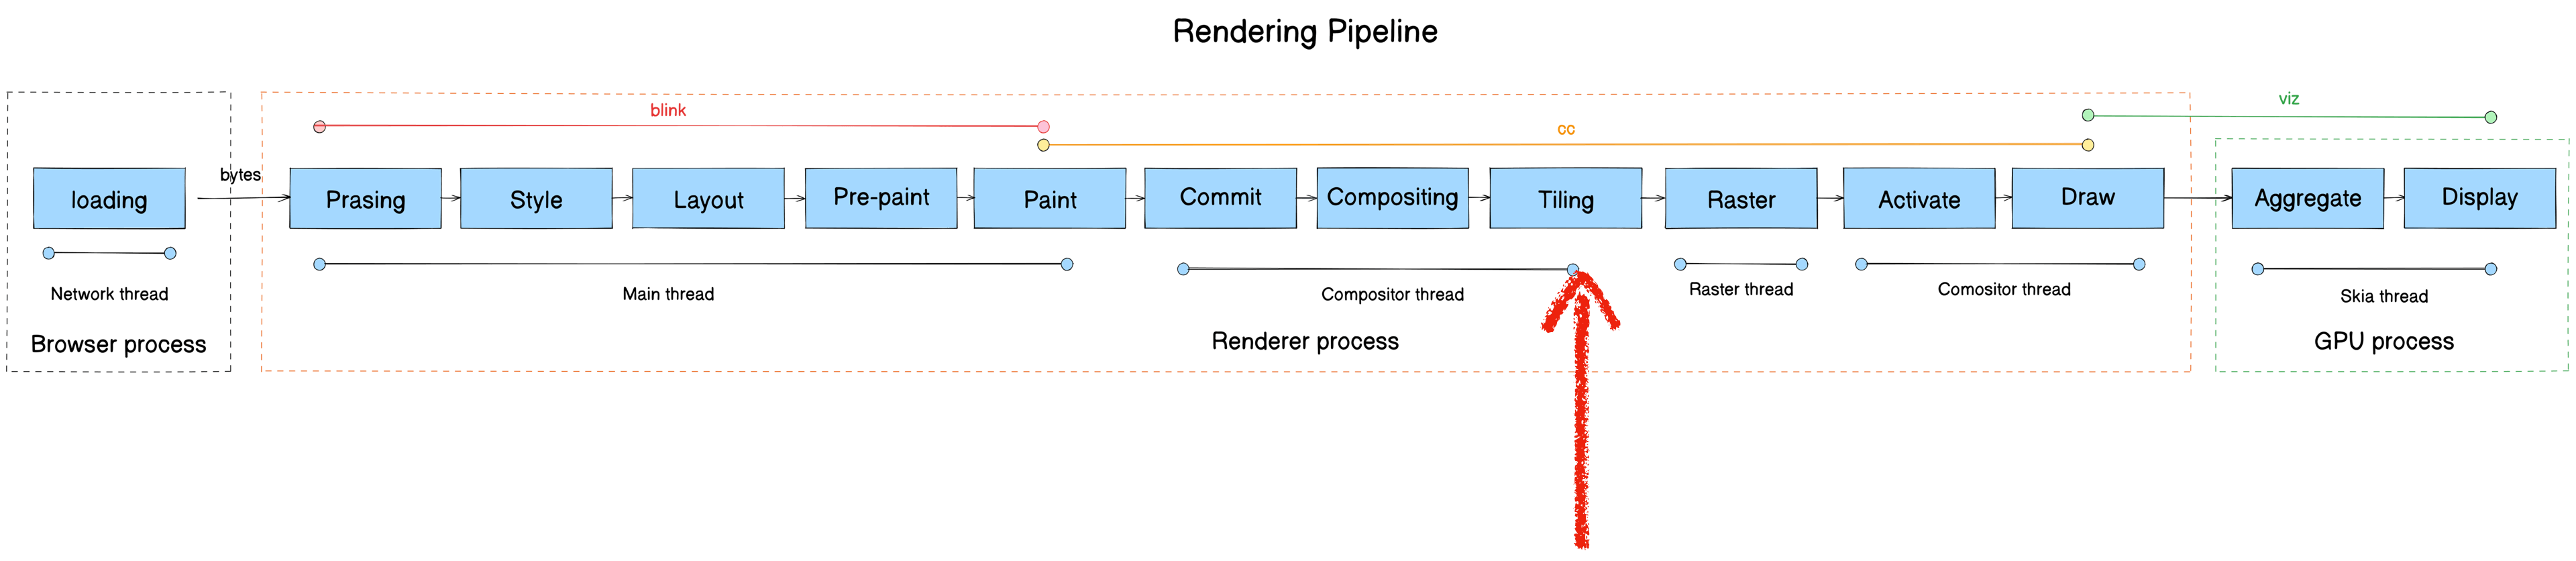
- Module: cc
- Process: Render Process
- Thread: Compositor thread
- Responsibility: Split a cc::PictureLayerImpl into multiple cc::TileTask tasks at various scale levels for the Raster thread
- Input: LayerImpl (compositor thread)
- Output: cc::TileTask (raster thread)
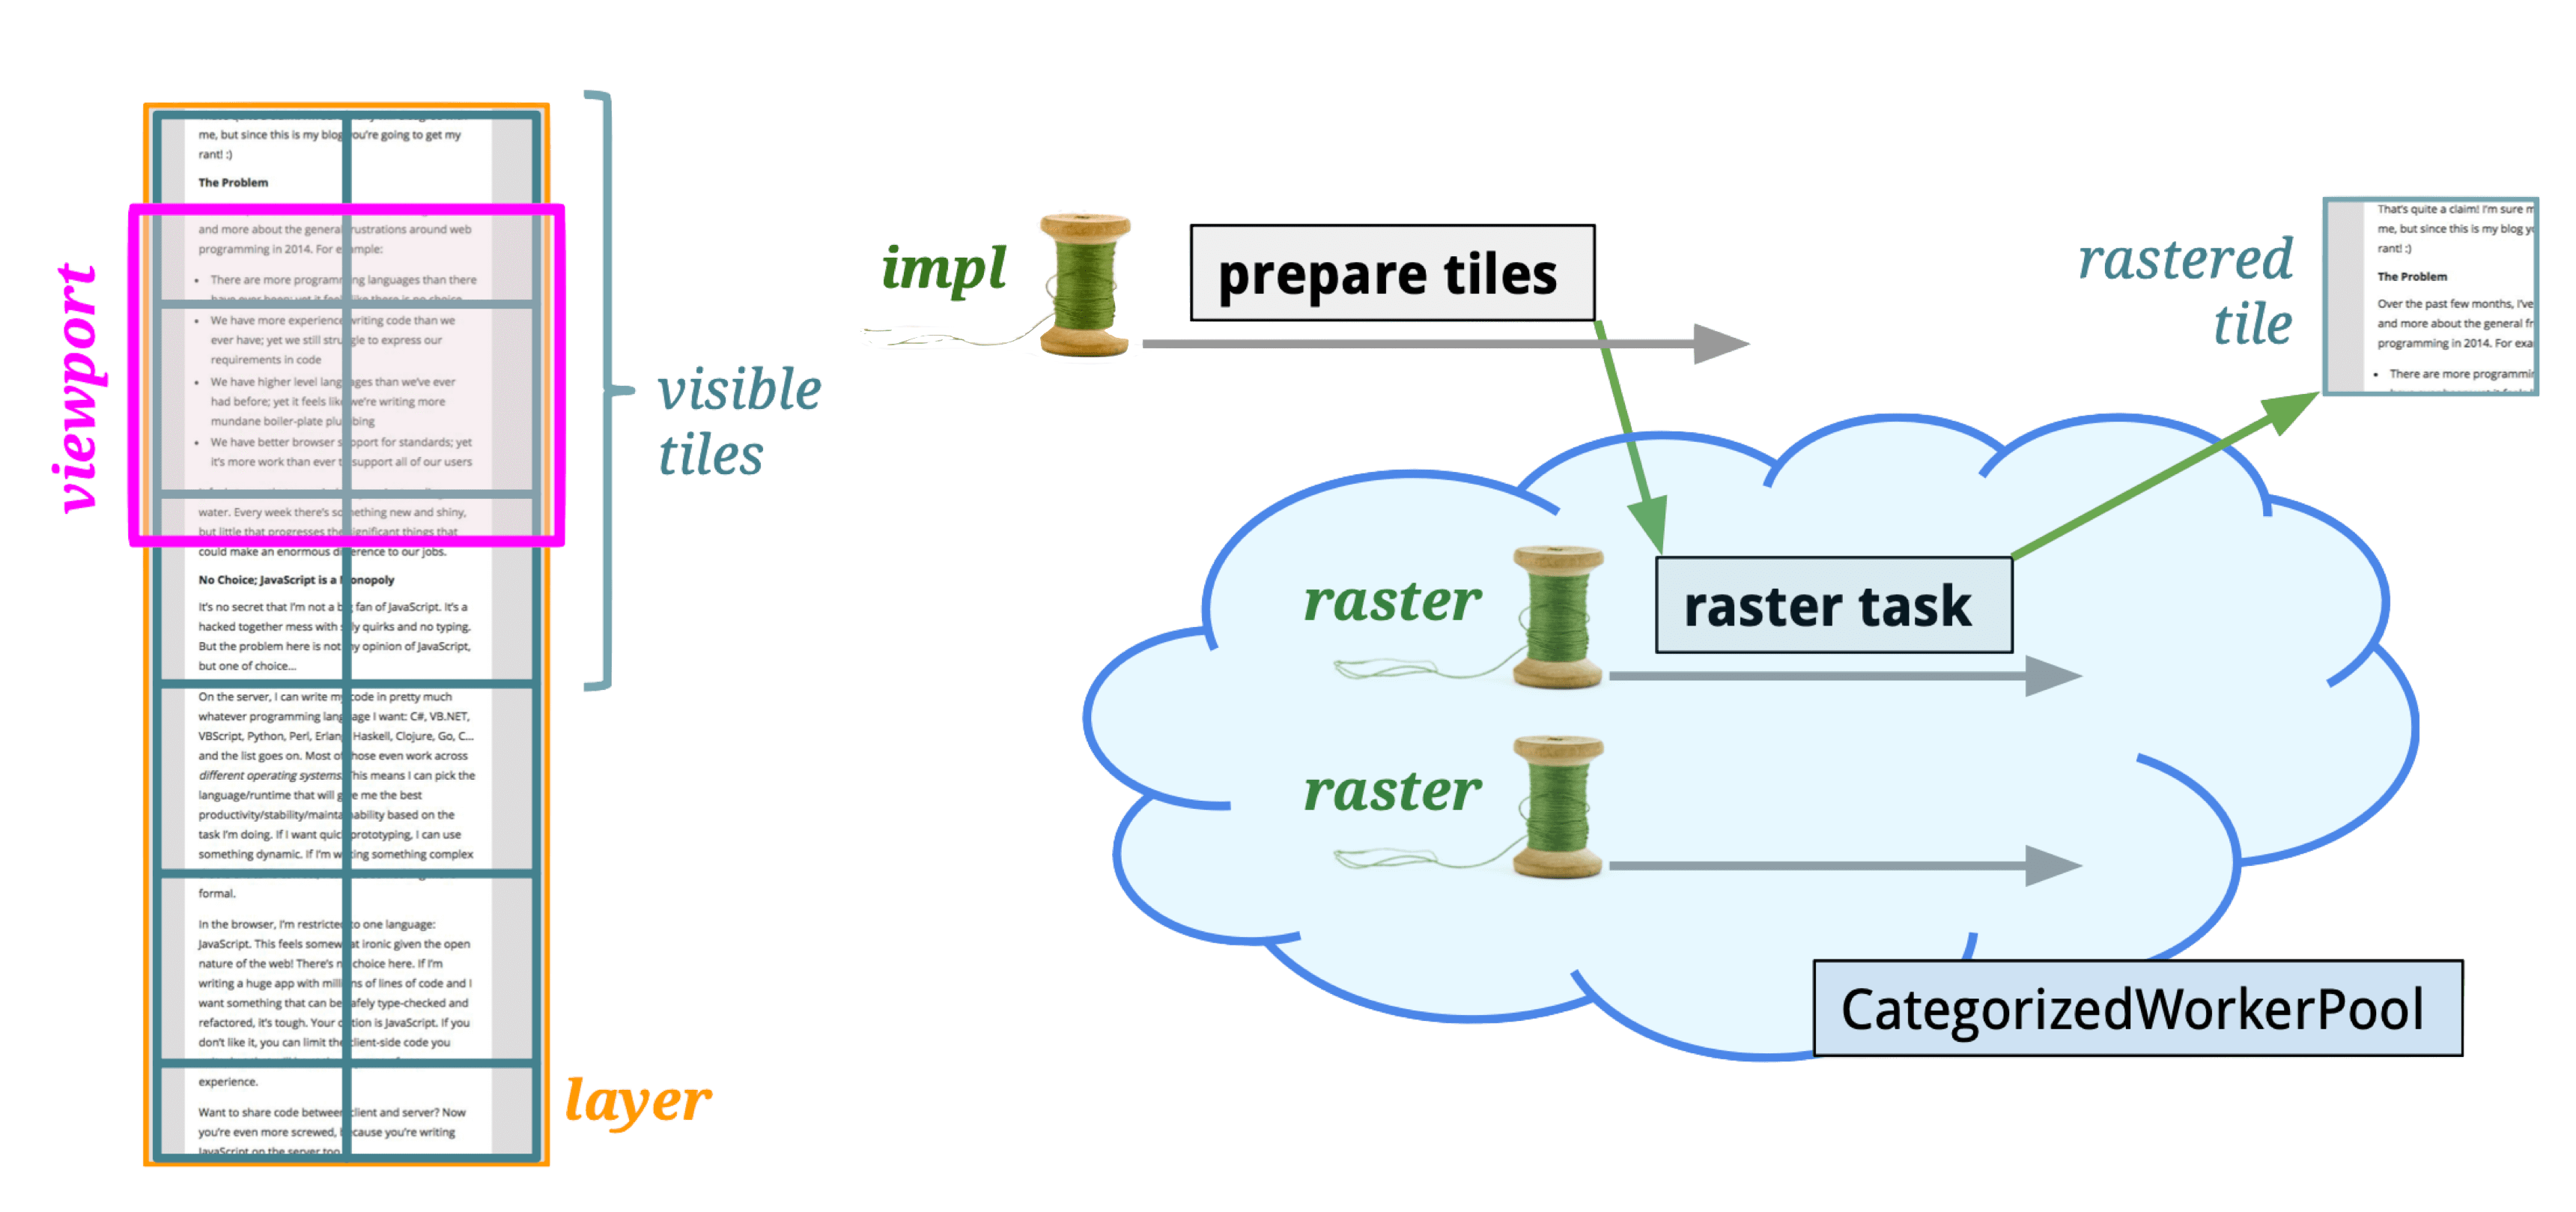
Tiles are the basic unit of rasterization. After Commit, cc::RasterTaskImpl tasks are created and posted to the Raster thread.
Core function: PrepareTiles
Tiles are typically 256×256 or 512×512 pixels. Why tile?
- GPU limitations: GPU compositing via OpenGL ES uses textures (GL Texture), and many GPUs have texture size limits. The GPU can’t handle arbitrarily large textures.
- Shared buffer pool: A unified buffer pool manages tiles for all WebViews. Tiles are allocated from the pool when pages open and returned when they close.
If Compositing provides macro-level rendering efficiency improvements, Tiling provides micro-level improvements.
Tiling optimization strategies:
- Prioritize tiles near the viewport: Closer tiles raster first; farther ones get lower priority.
- Lower resolution on first composite: Reduces texture compositing and upload time on initial load.
Raster
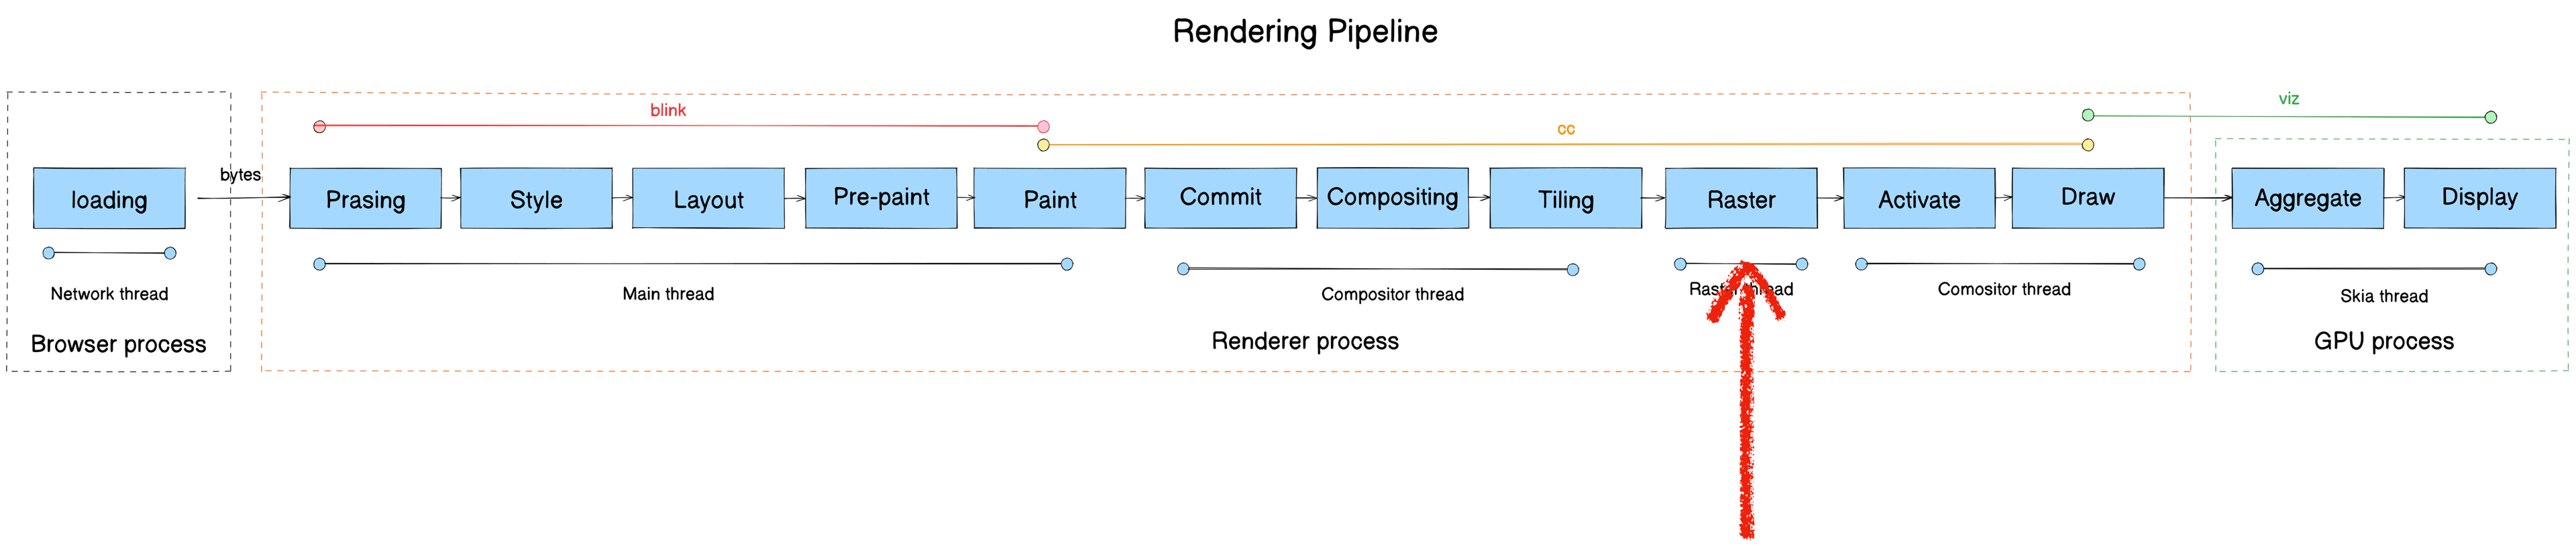
- Module: cc
- Process: Render Process
- Thread: Raster thread
- Responsibility: Execute each TileTask, producing resources stored in LayerImpl. Playback drawing instructions from DisplayItemList into viz’s CompositorFrame.
- Input: cc::TileTask
- Output: LayerImpl (cc::PictureLayerImpl)
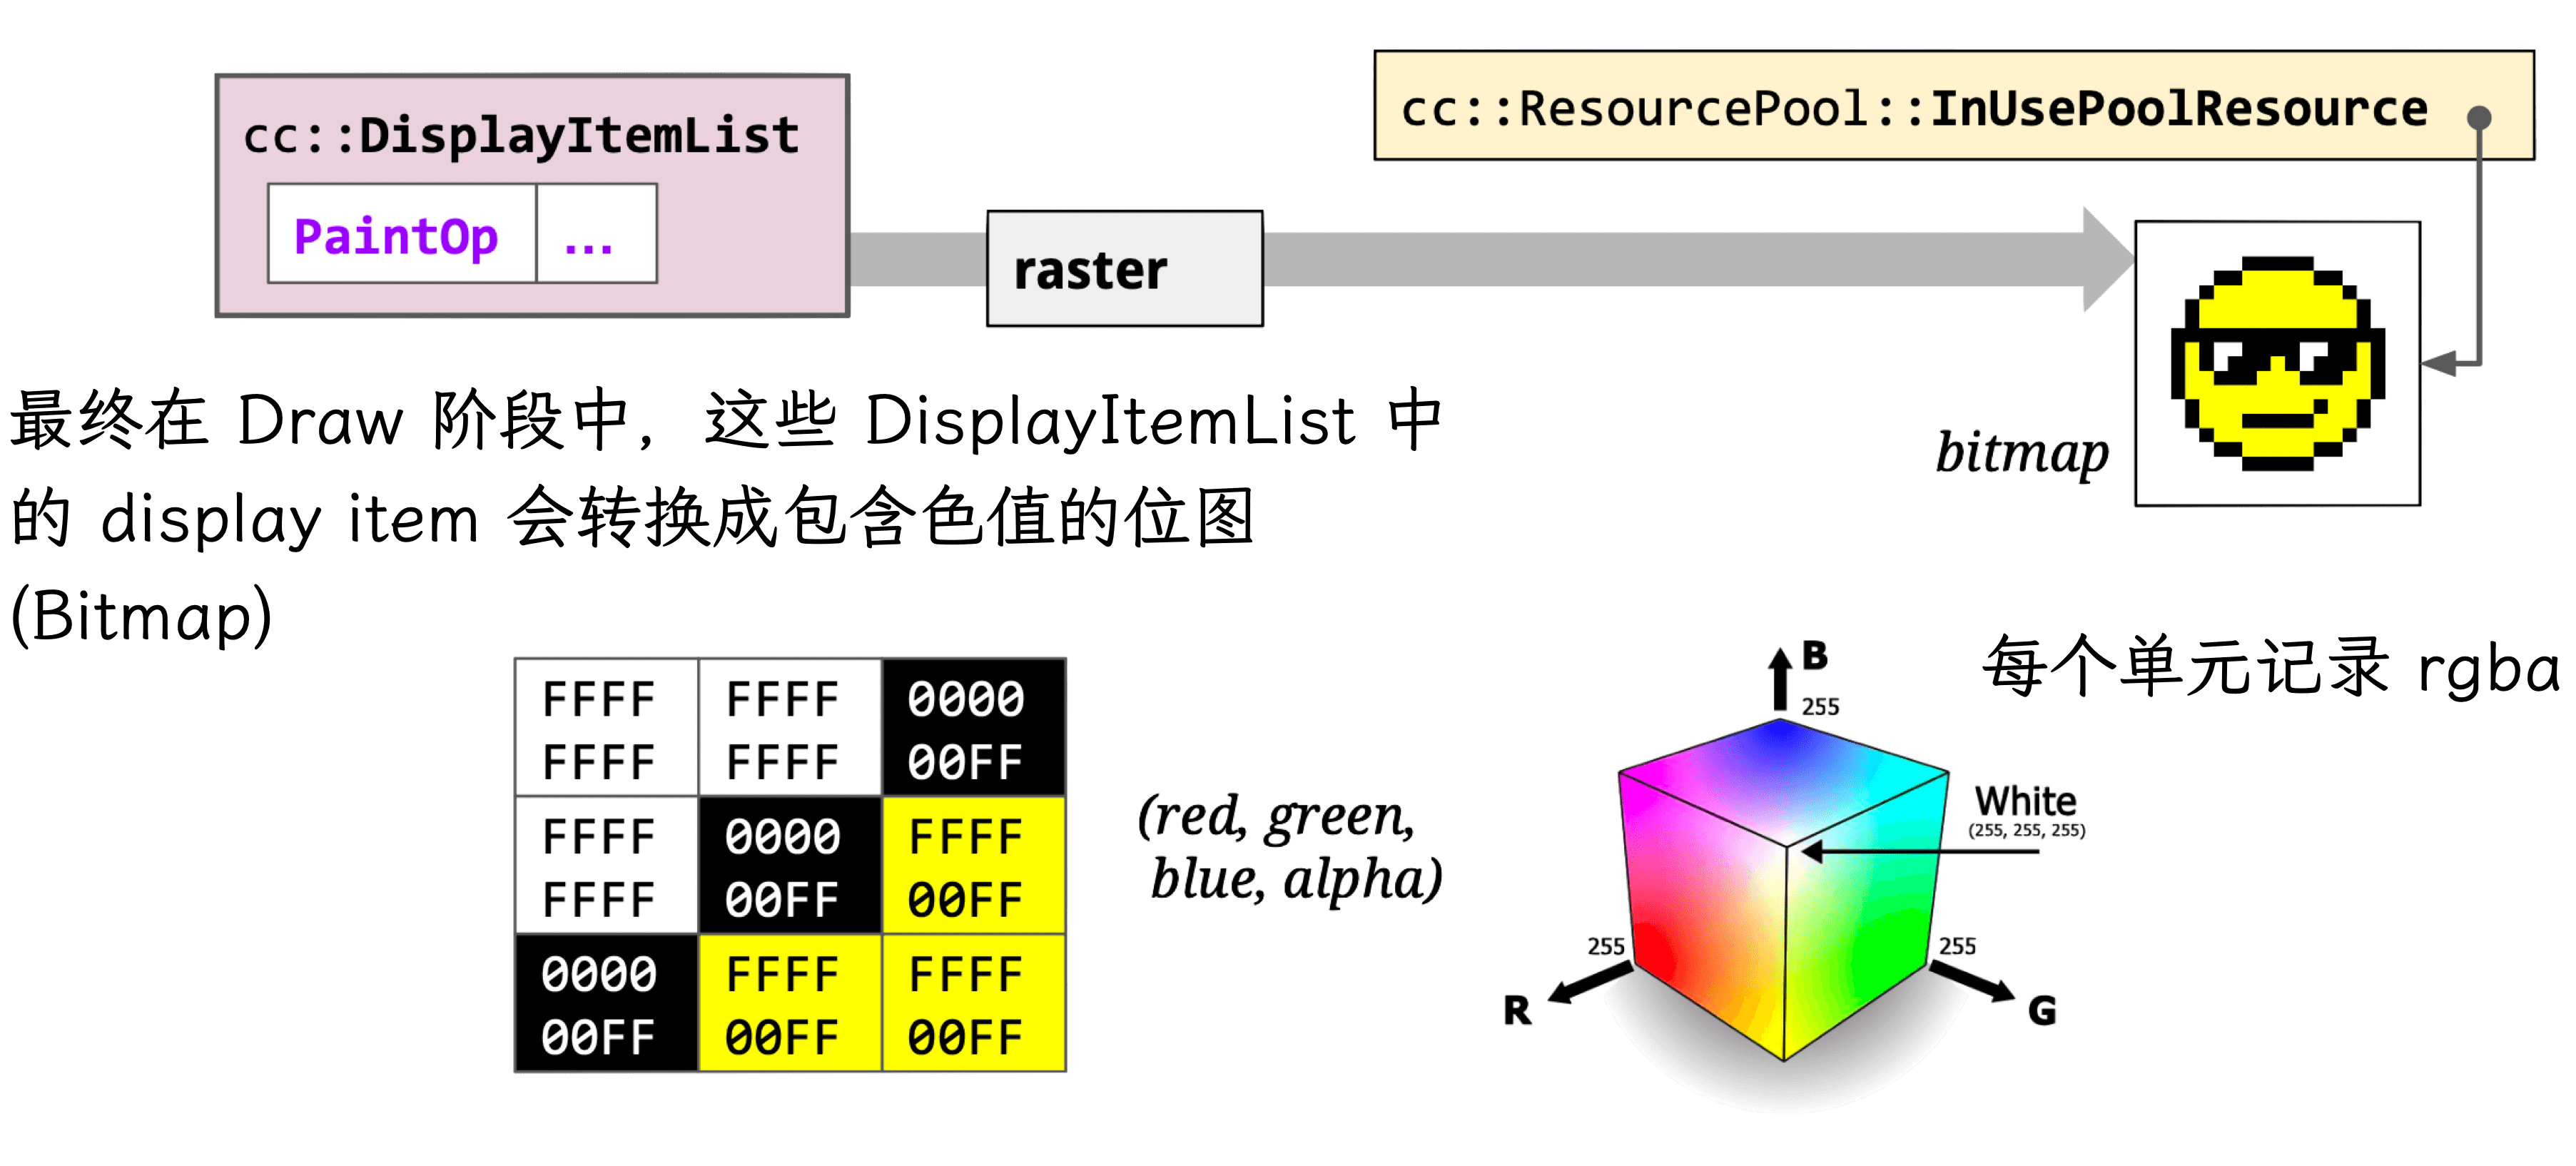
Pixel bitmaps and their OpenGL references are stored in GPU memory. (The GPU can also perform rasterization — hardware acceleration.)
Raster also handles image decoding:

The core class cc::RasterBufferProvider has key subclasses:
- cc::GpuRasterBufferProvider: GPU-based rasterization, results stored directly in SharedImage.
- cc::OneCopyRasterBufferProvider: Skia-based rasterization, results go to GpuMemoryBuffer, then copied to SharedImage via CopySubTexture.
- cc::ZeroCopyRasterBufferProvider: Skia-based rasterization, results go to GpuMemoryBuffer, then directly create a SharedImage.
- cc::BitmapRasterBufferProvider: Skia-based rasterization, results stored in shared memory.
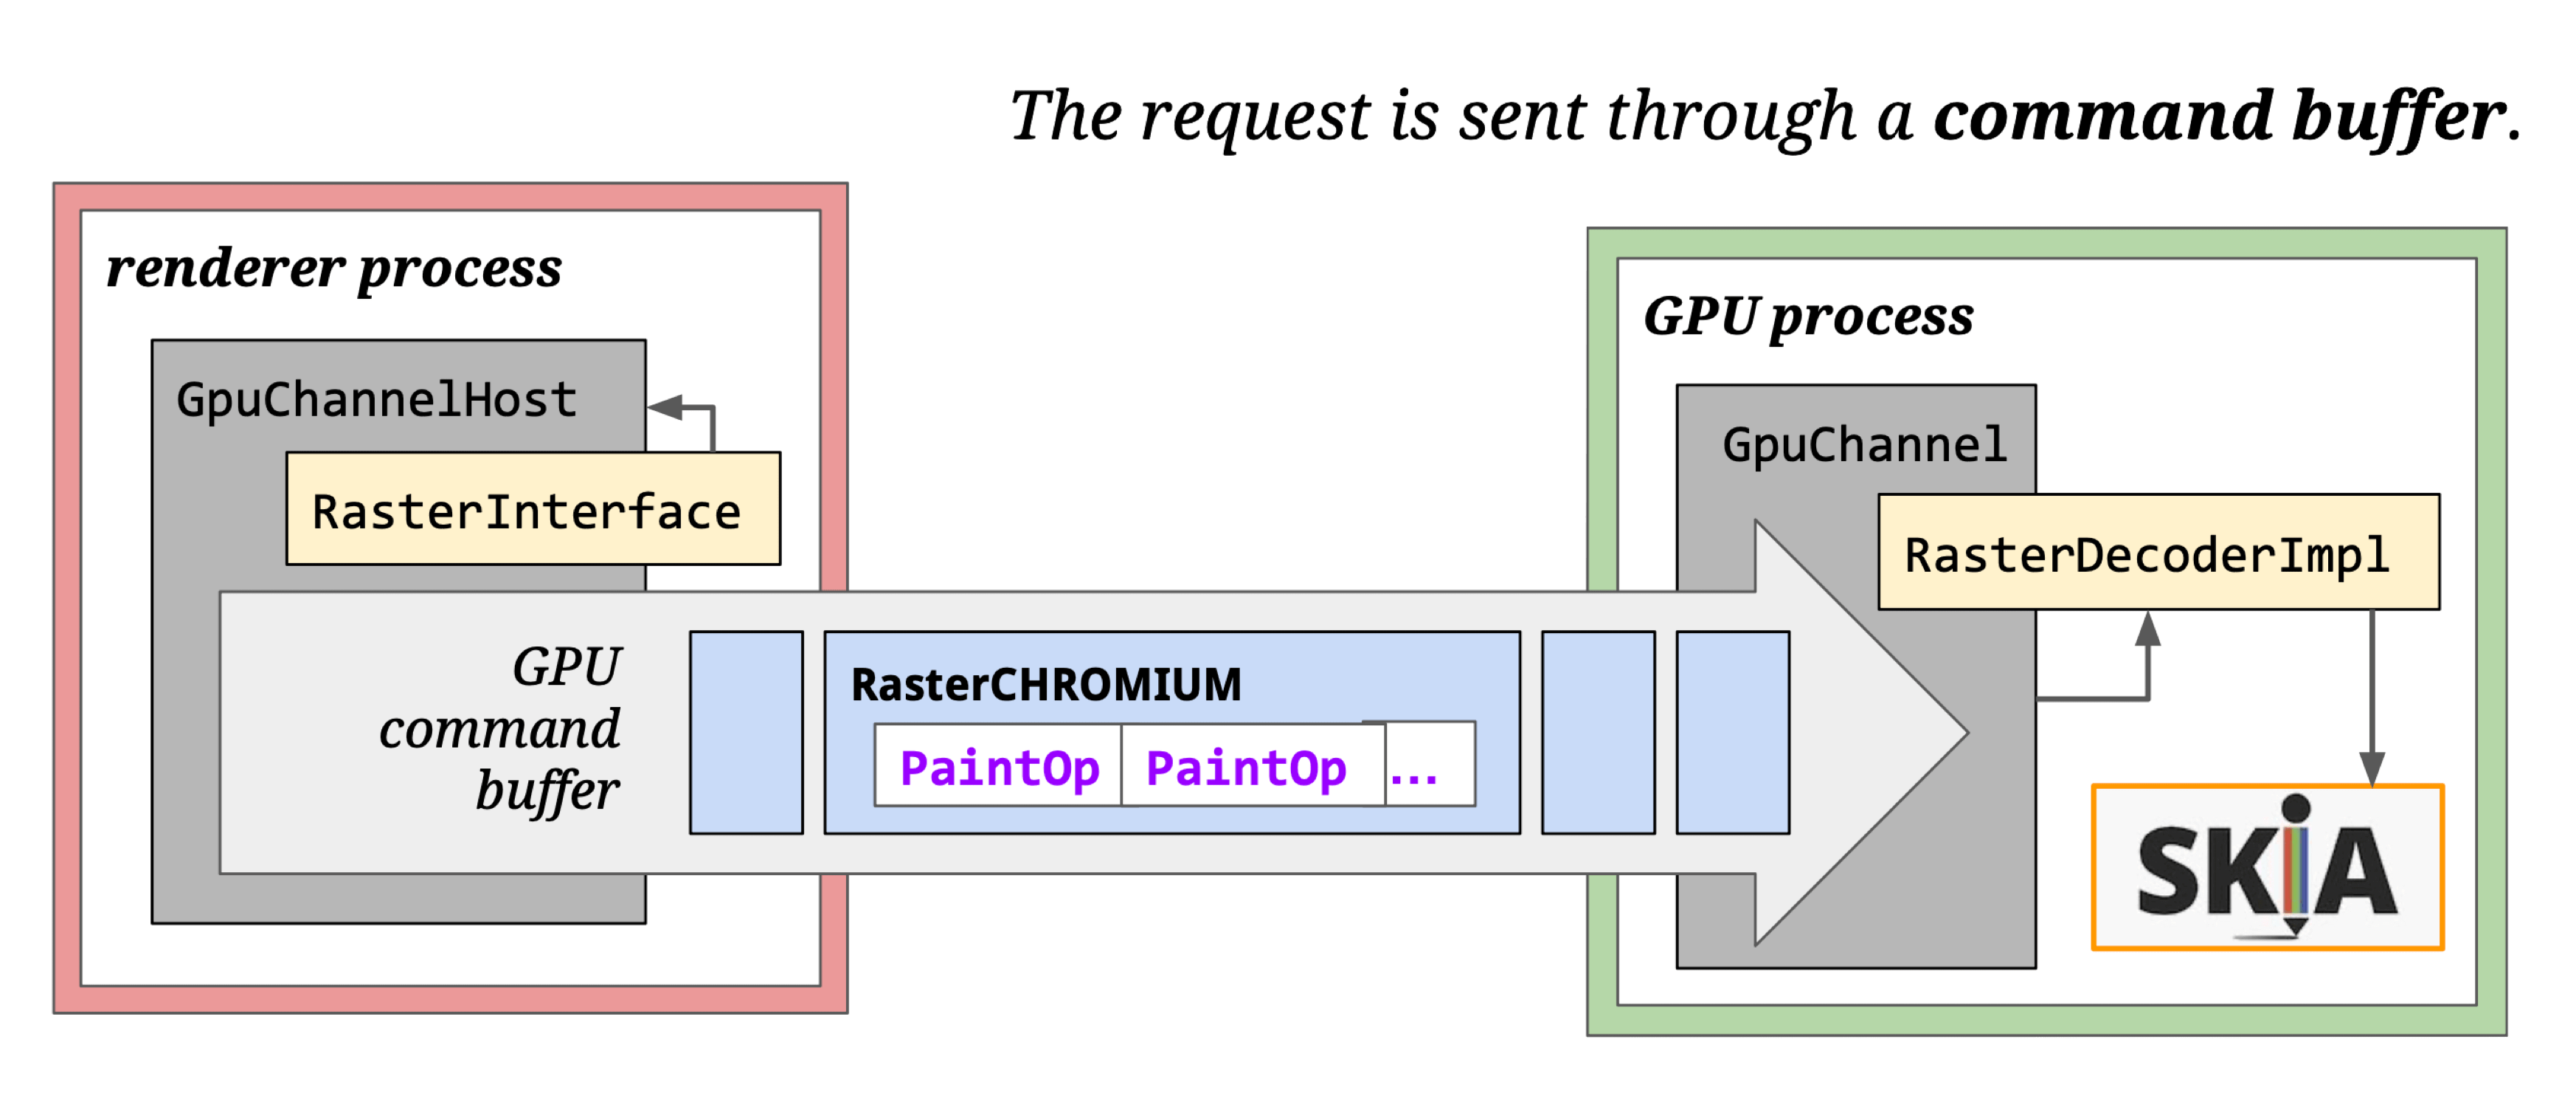
GPU SharedImage: Abstracts GPU data storage — allows applications to write to and read from GPU memory directly, crossing shared-group boundaries. Earlier Chromium used the Mailbox mechanism; modern code uses GPU SharedImage.
SharedImage has Client and Service sides. Clients (Browser, Render, GPU processes) can be multiple; the Service runs in the GPU process.
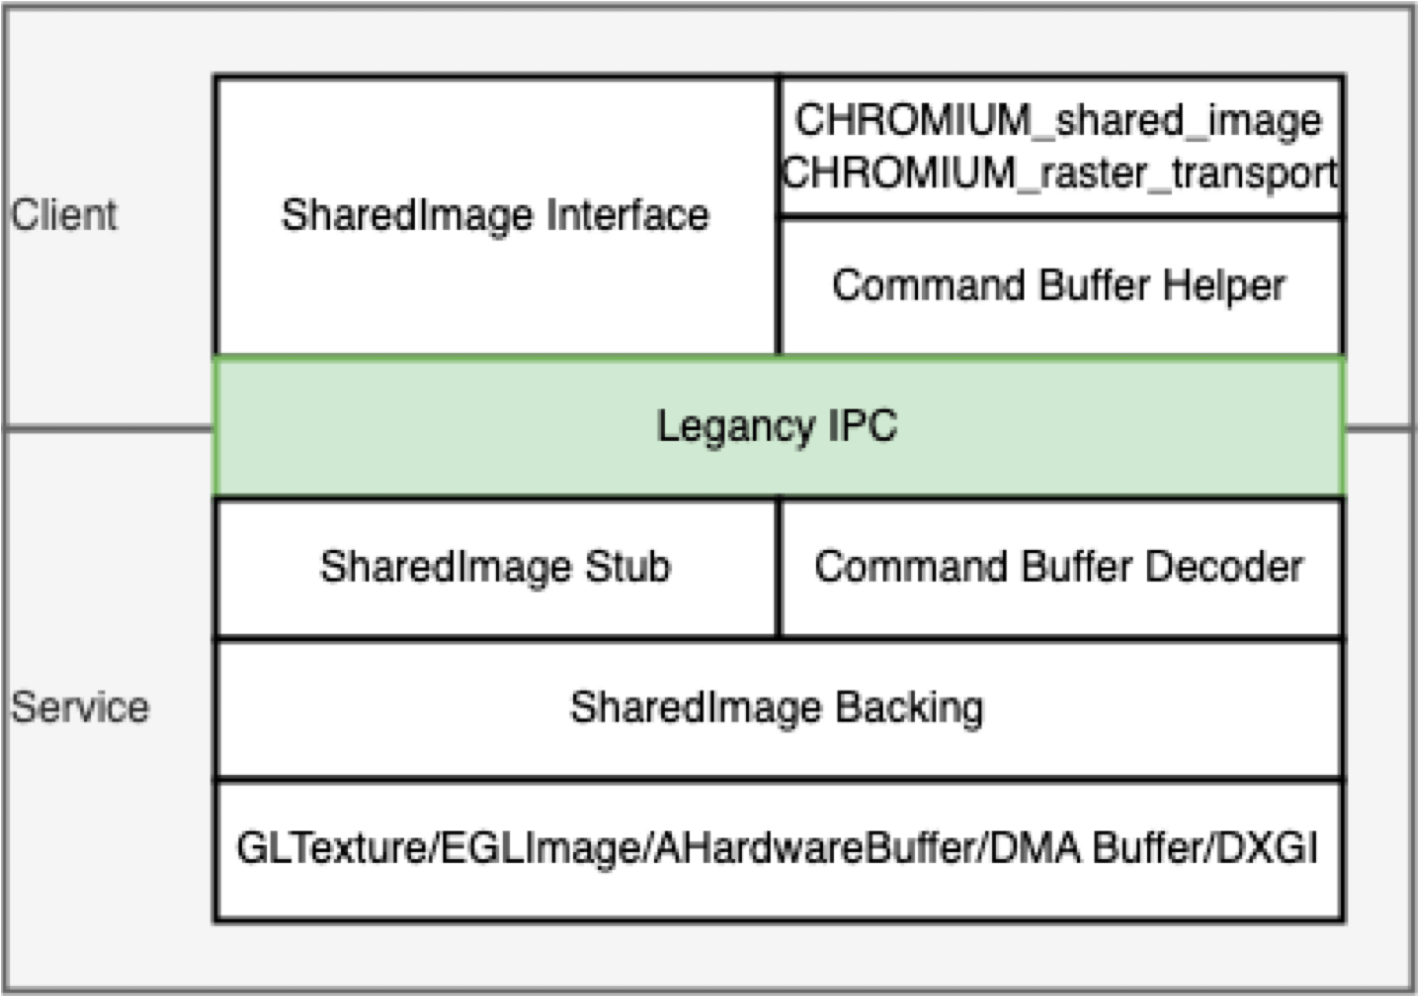
SharedImage usage scenarios:
- CC module: Rasterize to SharedImage, send to Viz for compositing.
- OffscreenCanvas: Rasterize canvas to SharedImage, send to Viz.
- Image processing: One thread decodes images to GPU; another thread modifies or renders them.
- Video playback: One thread decodes video to GPU; another renders it.
Rasterization strategies: Synchronous and asynchronous.
Synchronous rasterization is used by Android, iOS, and Flutter. It also supports layer-based off-screen pixel buffers for indirect rasterization.
Synchronous pipeline is simple:
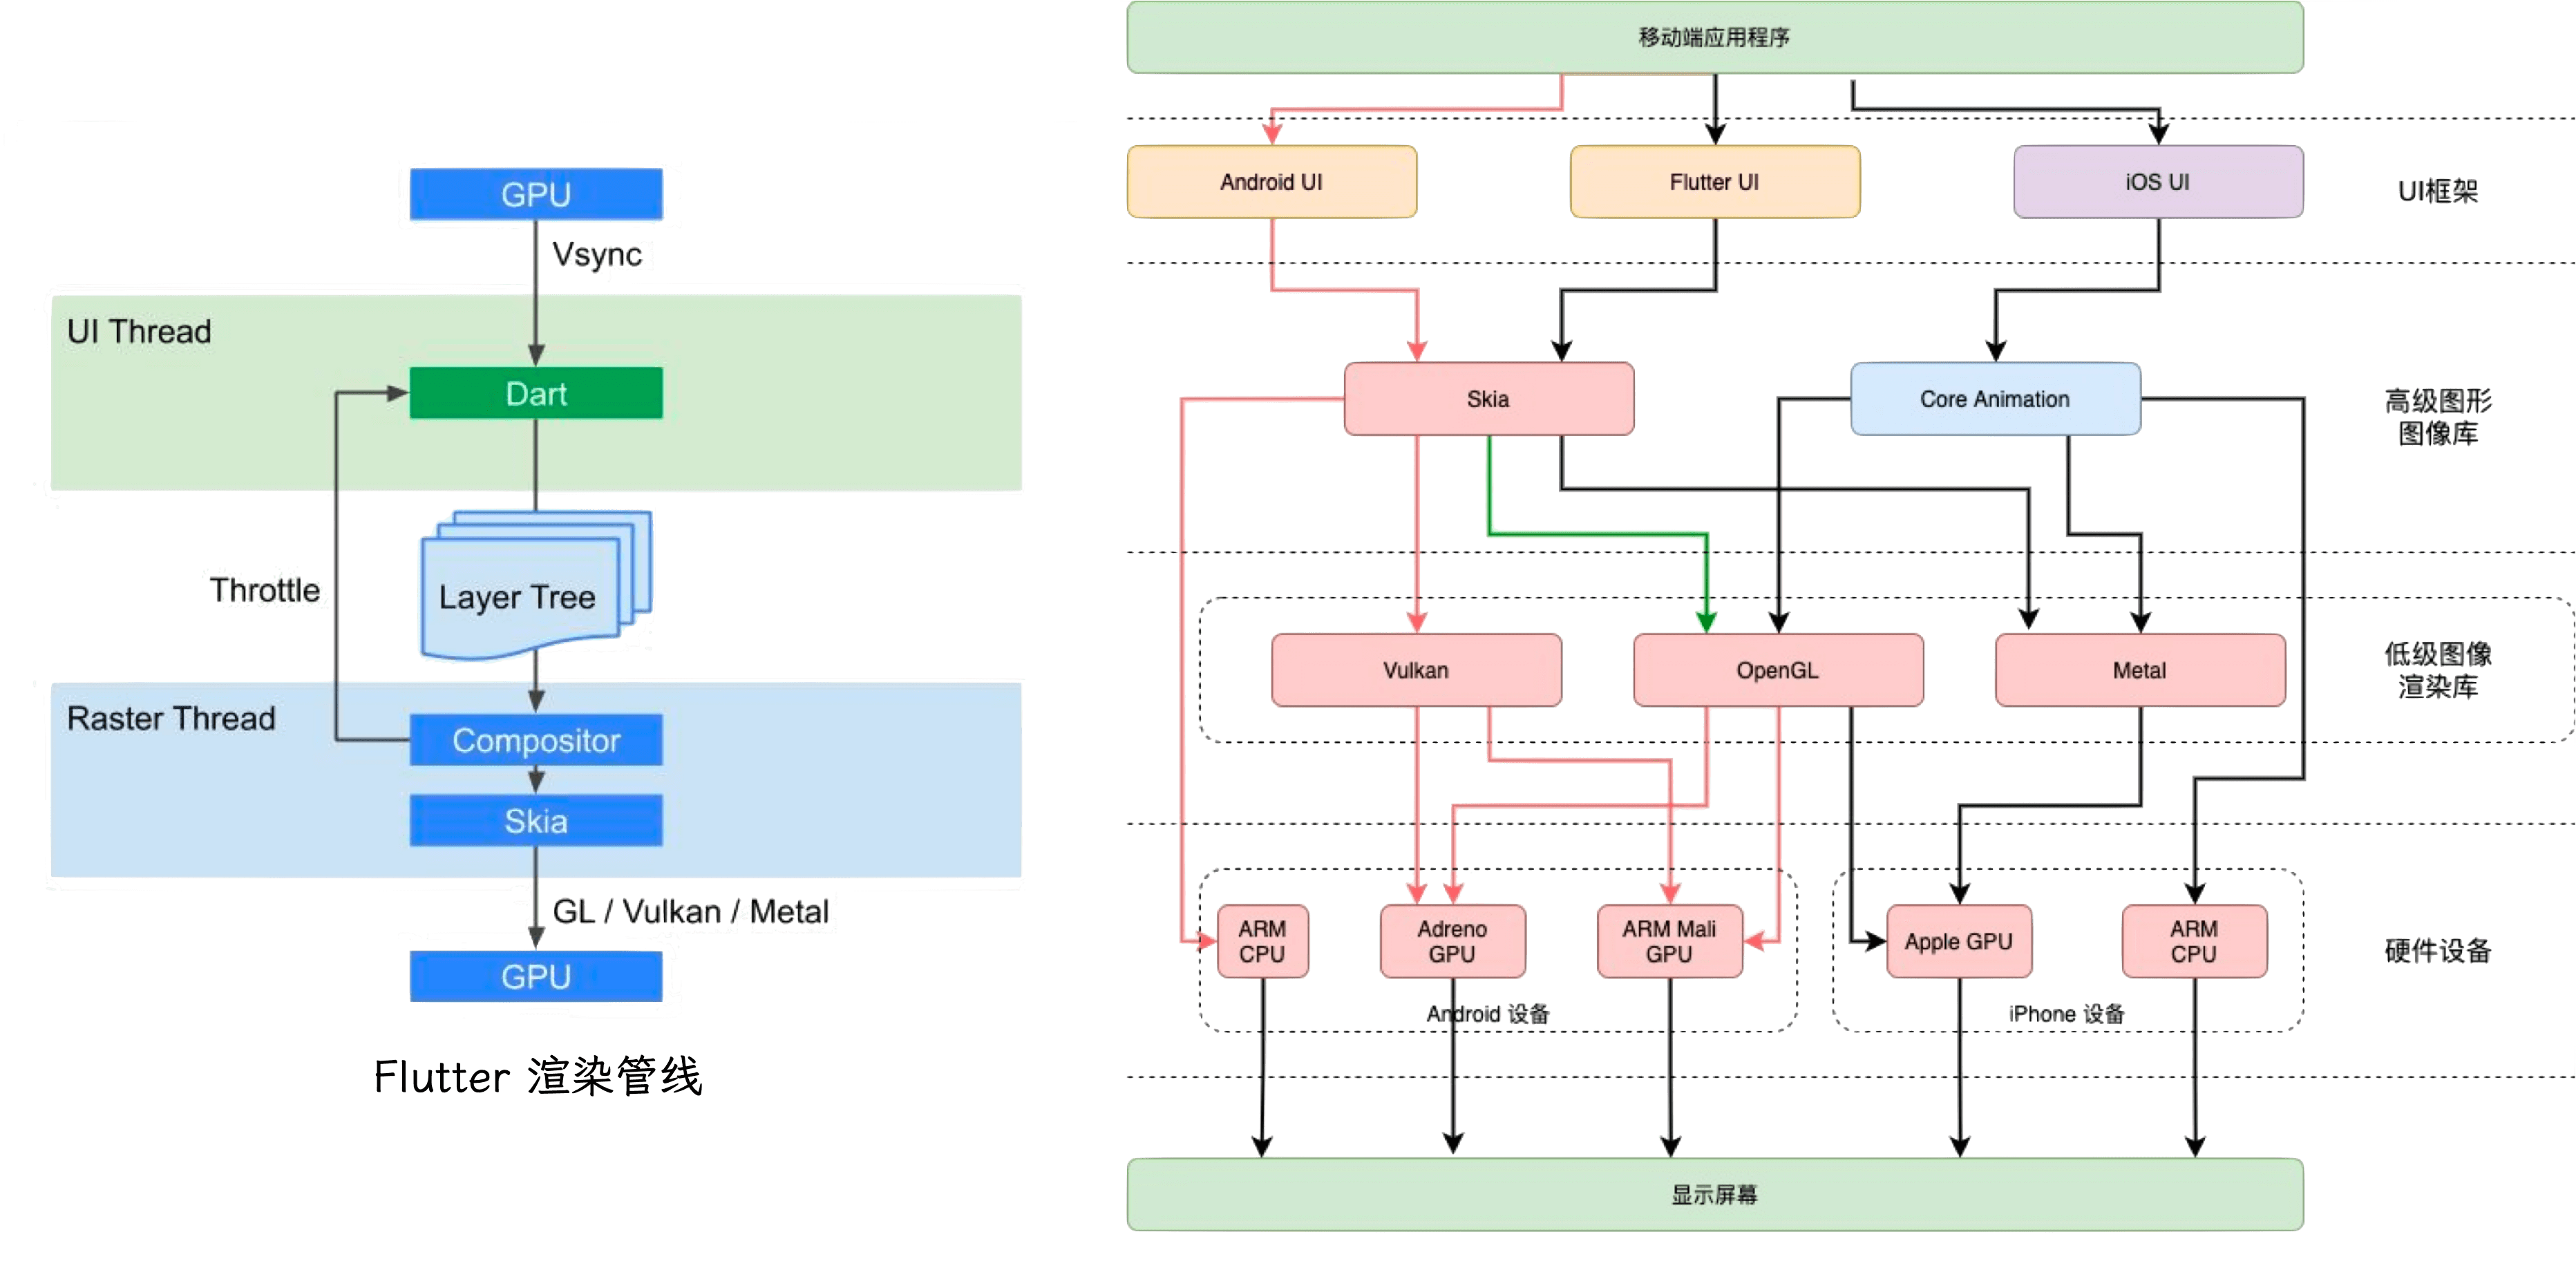
Asynchronous rasterization is used by browsers and WebViews. Except for special layers (Canvas, Video), layers are tiled and rasterized asynchronously. Each rasterization task handles drawing instructions for its tile, writing results to the tile’s pixel buffer. Rasterization and compositing run on different threads and are not synchronized — if a tile hasn’t finished rasterizing during compositing, it shows blank or a checkerboard pattern.
Comparison:
| Synchronous | Asynchronous | |
|---|---|---|
| Memory usage | Excellent | Poor |
| First-screen performance | Good | Fair |
| Dynamic content rendering | High | Low |
| Layer animations | Fair | Inertial animation advantage |
| Rasterization performance | Lower on low-end | Good |
Memory: Synchronous has a clear advantage. Async rasterization is memory-hungry — browsers essentially trade memory for performance.
First-screen: Synchronous’s leaner pipeline typically displays 1-2 frames (~20ms) earlier, though this advantage is modest.
Dynamic content: Frequently changing content invalidates async rasterization caches repeatedly. Synchronous’s leaner pipeline handles re-rendering more efficiently.
Layer animations: Async has a clear advantage here. Property Trees + Compositing let it control which layers re-render, with minimal overhead (~2ms). For momentum scrolling (inertial scroll), async pre-rasterizes areas outside the viewport. Synchronous compensates with cell-level reuse mechanisms on iOS, Android, and Flutter.
Rasterization performance: Synchronous requires more CPU computation; low-end devices may drop frames. But as mobile CPUs improve, synchronous’s absolute memory advantage becomes more significant.
Async rasterization also has unavoidable issues like white-flash during fast scrolling and DOM updates not syncing during scroll.
Activate
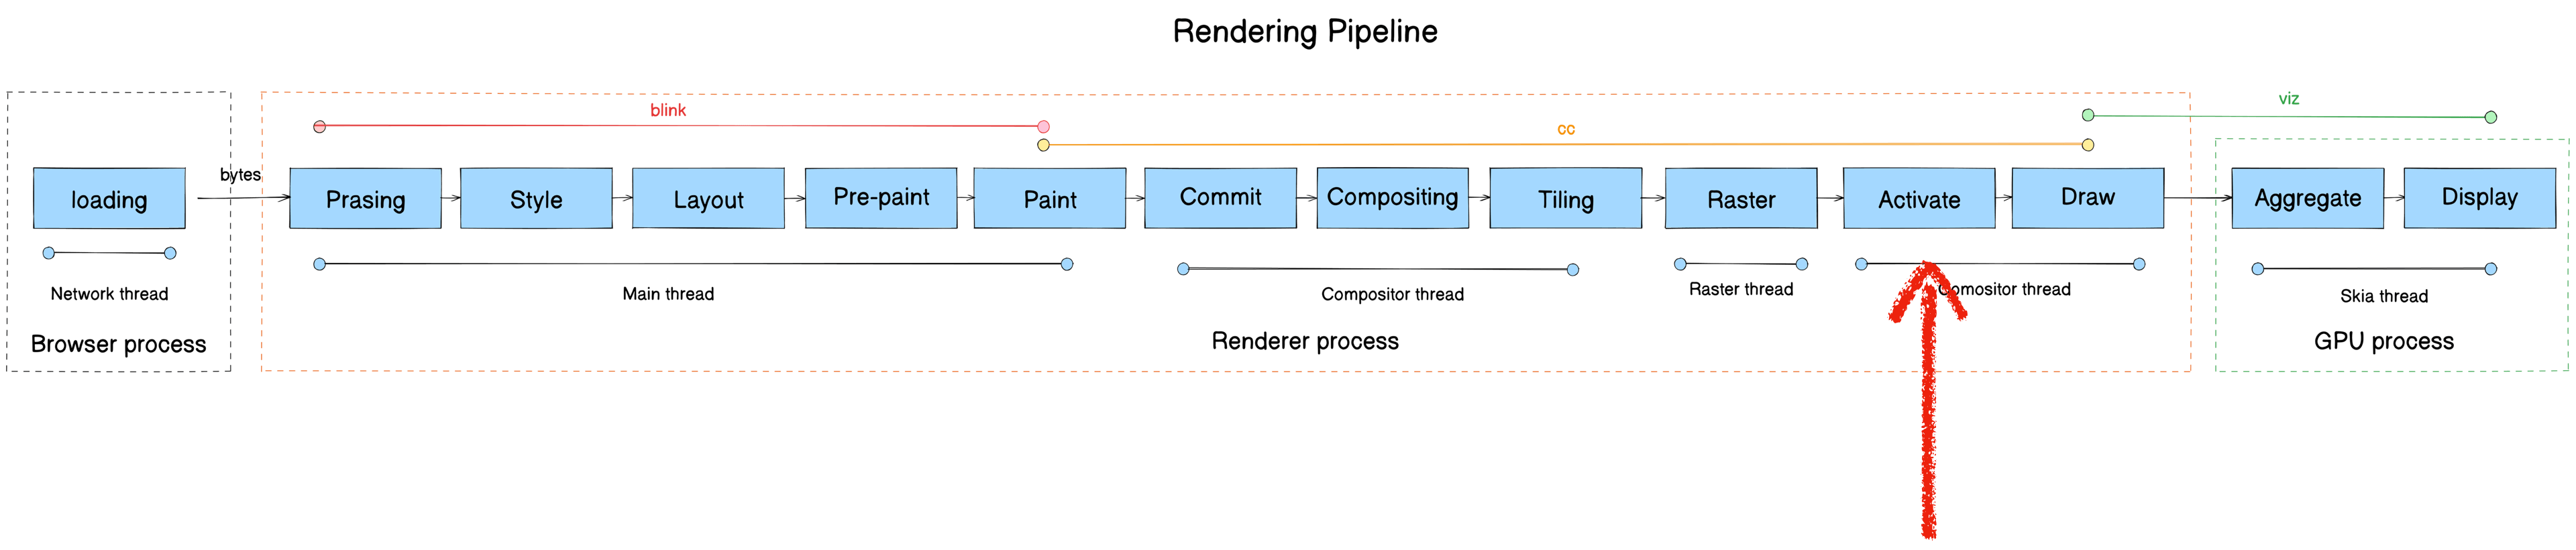
- Module: cc
- Process: Render Process
- Thread: Compositor thread
- Responsibility: Buffer mechanism — ensures rasterized data is ready before the Draw phase. Splits the Layer Tree into a Pending Tree and Active Tree. Activate copies layers from Pending Tree to Active Tree.
Core function: LayerTreeHostImpl::ActivateSyncTree
The Compositor thread maintains three cc::LayerImpl trees:
- Pending tree: Receives commits and rasterizes LayerImpl
- Active tree: Provides rasterized LayerImpl for the Draw phase
- Recycle tree: The Pending tree isn’t destroyed after activation — it becomes the Recycle tree to avoid frequent LayerImpl object creation
// Tree currently being drawn.
std::unique_ptr<LayerTreeImpl> active_tree_;

// In impl-side painting mode, tree with possibly incomplete rasterized content.
// May be promoted to active by ActivateSyncTree().
std::unique_ptr<LayerTreeImpl> pending_tree_;

// In impl-side painting mode, inert tree with layers that can be recycled
// by the next sync from the main thread.
std::unique_ptr<LayerTreeImpl> recycle_tree_;
Commit targets the Pending tree; rasterization results also live in the Pending tree. The Active tree allows display of the previous commit while rasterizing the new one simultaneously.
Draw
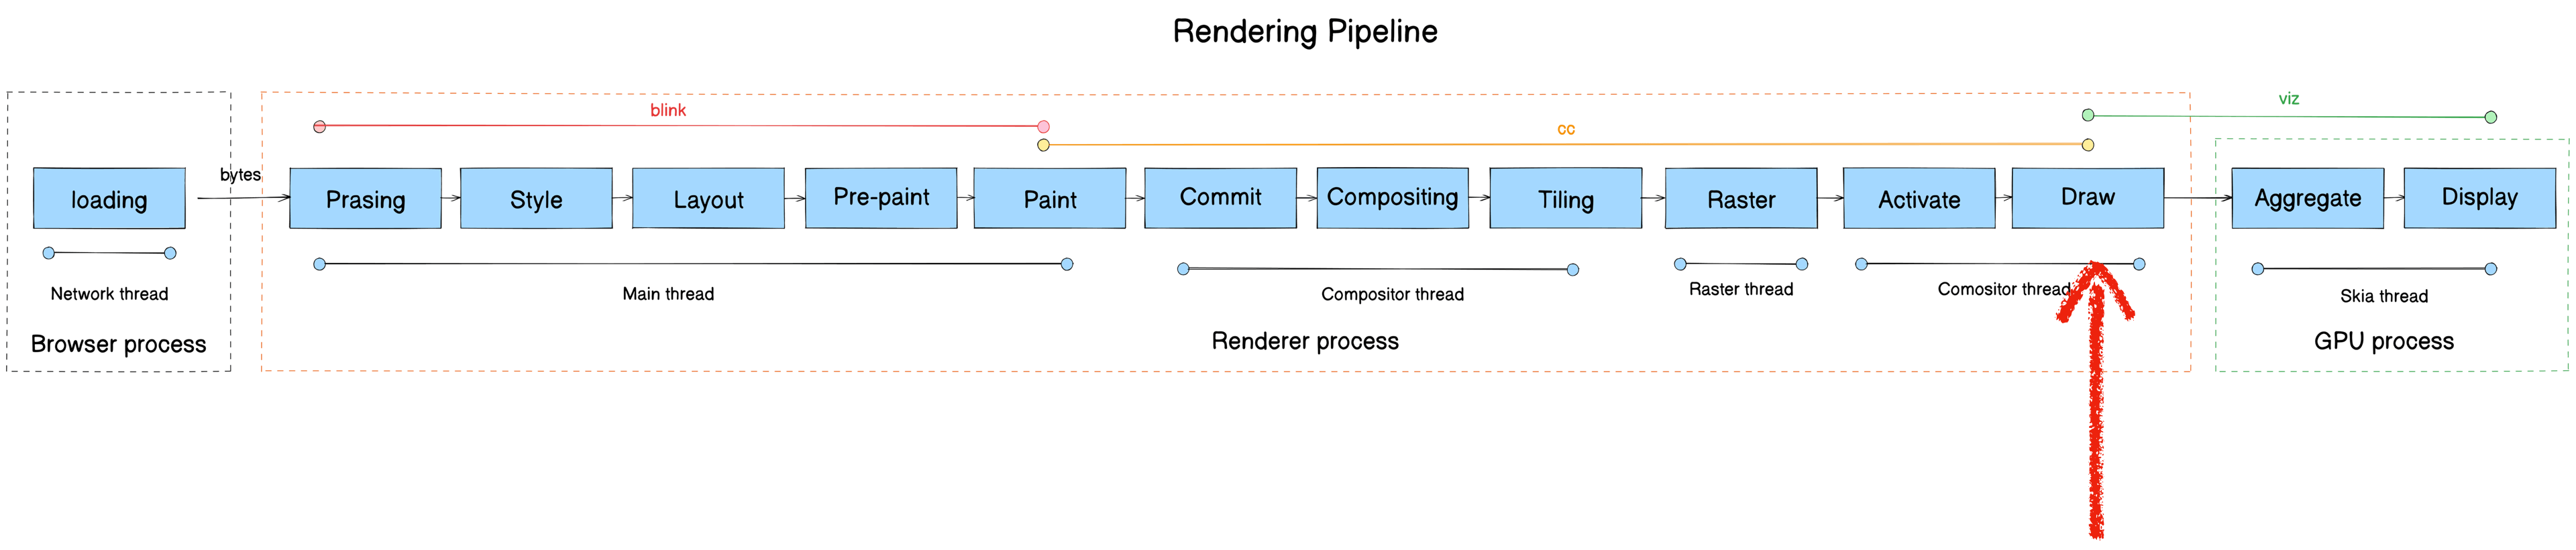
This stage is also called Submit. We’ll use “Draw” throughout.
- Module: cc
- Process: Render Process
- Thread: Compositor thread
- Responsibility: Convert rasterized tiles to draw quads
- Input: cc::LayerImpl (Tiling)
- Output: viz::DrawQuad
Draw doesn’t do actual drawing — it traverses Active Tree’s cc::LayerImpl objects and calls cc::LayerImpl::AppendQuads to create appropriate viz::DrawQuad objects, placing them into the CompositorFrame’s RenderPass.
Core functions:
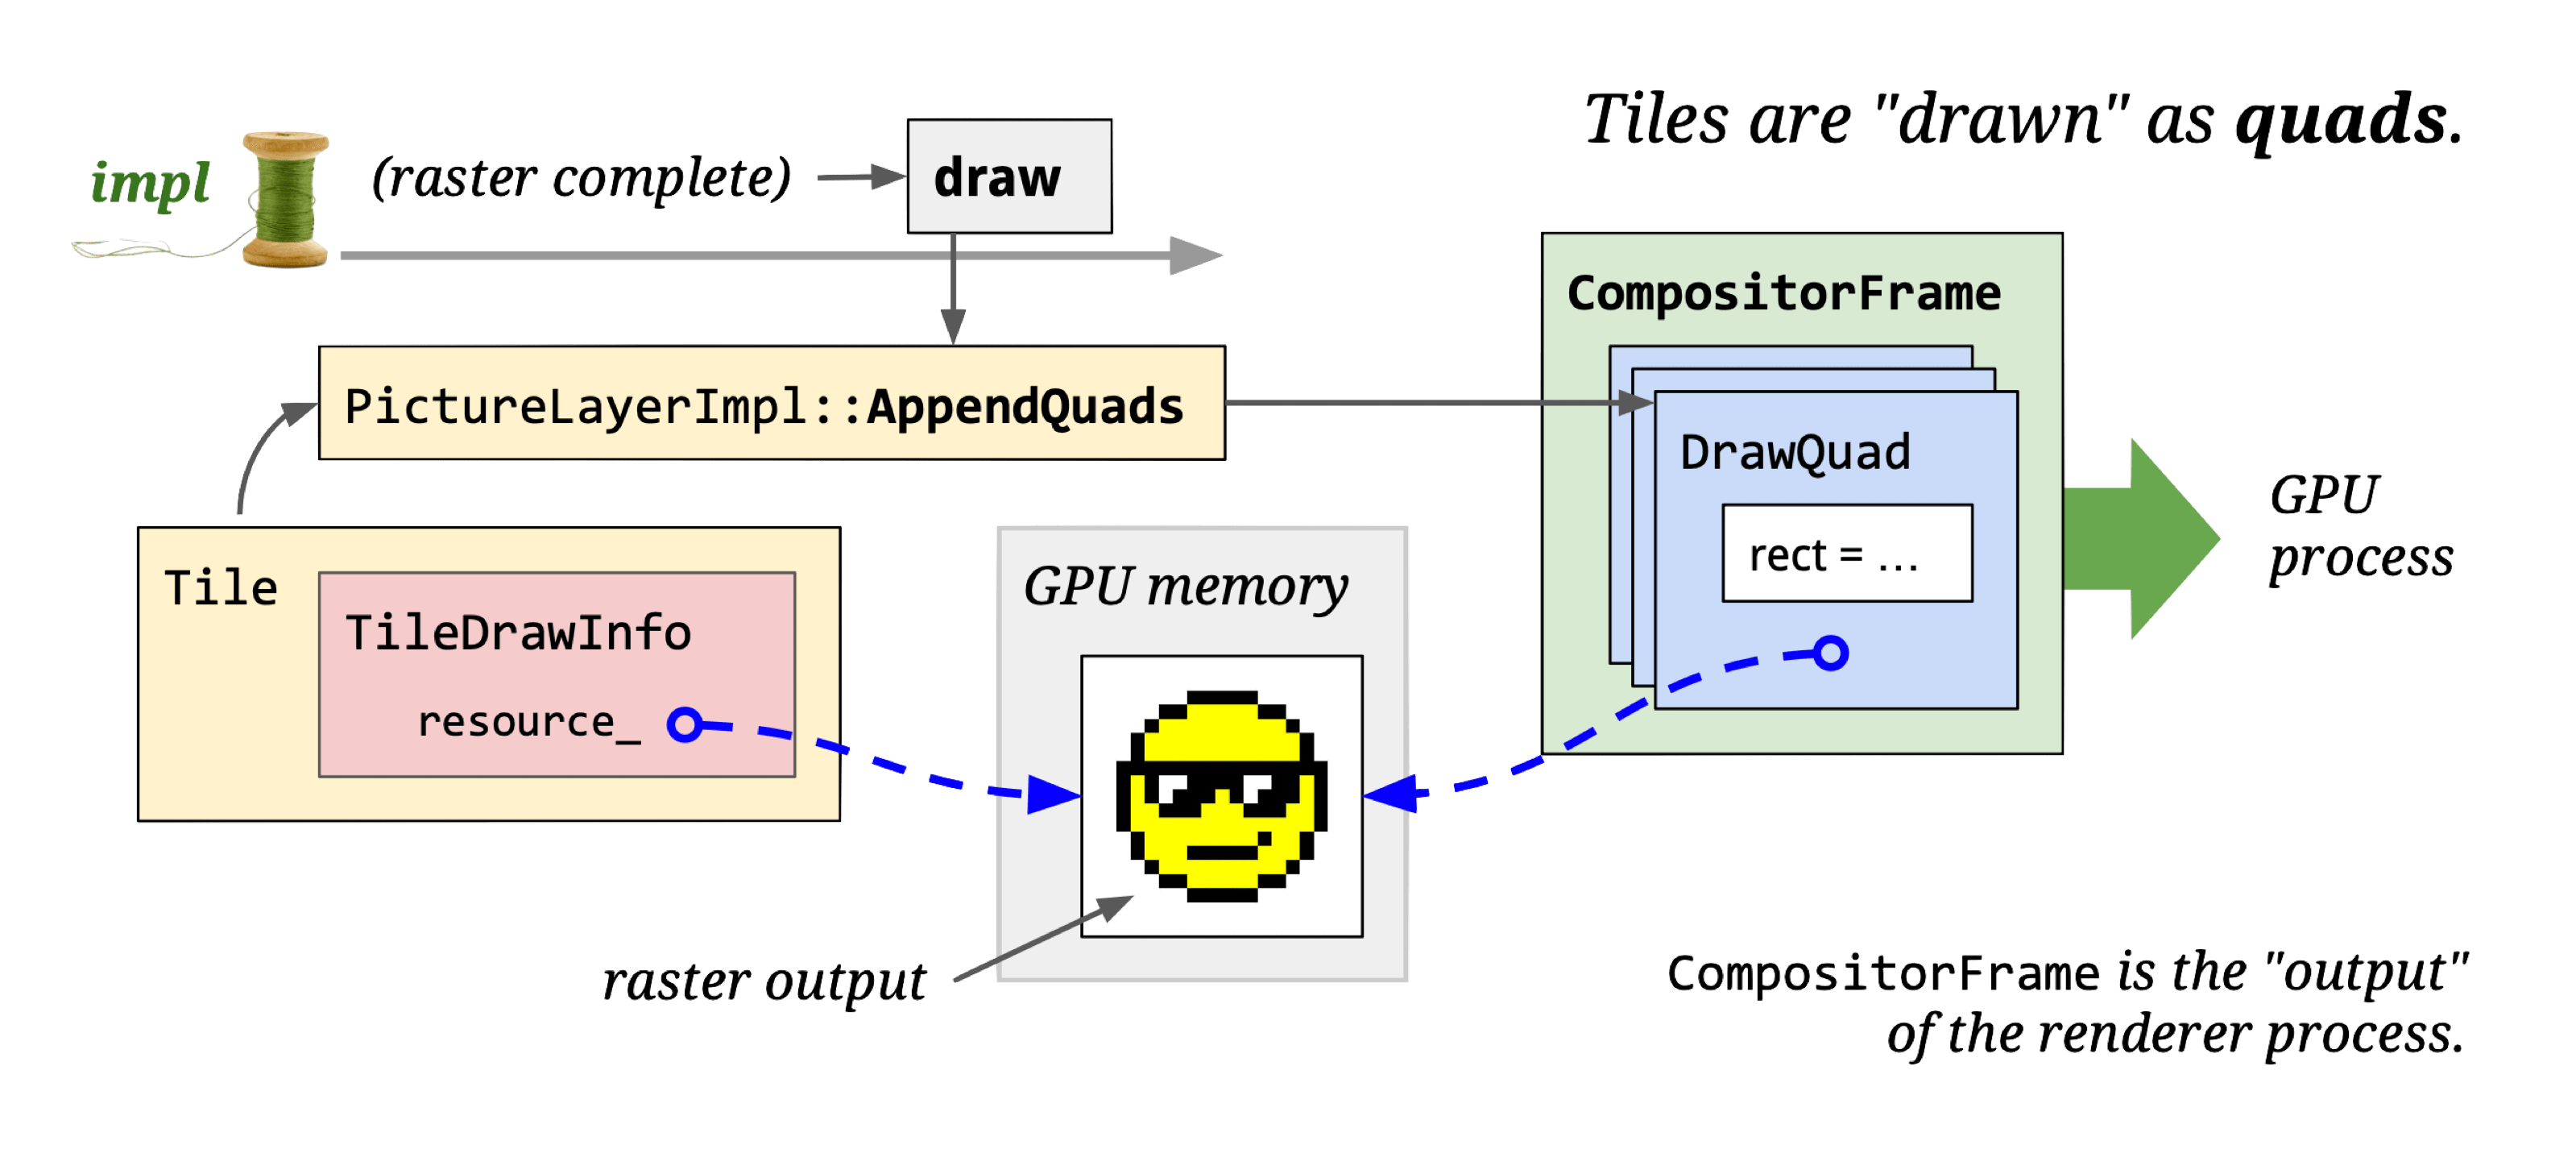
Introducing viz (visuals): The key on-screen display module in Chromium.
Viz’s core logic runs in the Viz Process. It receives viz::CompositorFrame (CF) from other processes, composites them, and renders the result to the window.
Core classes:
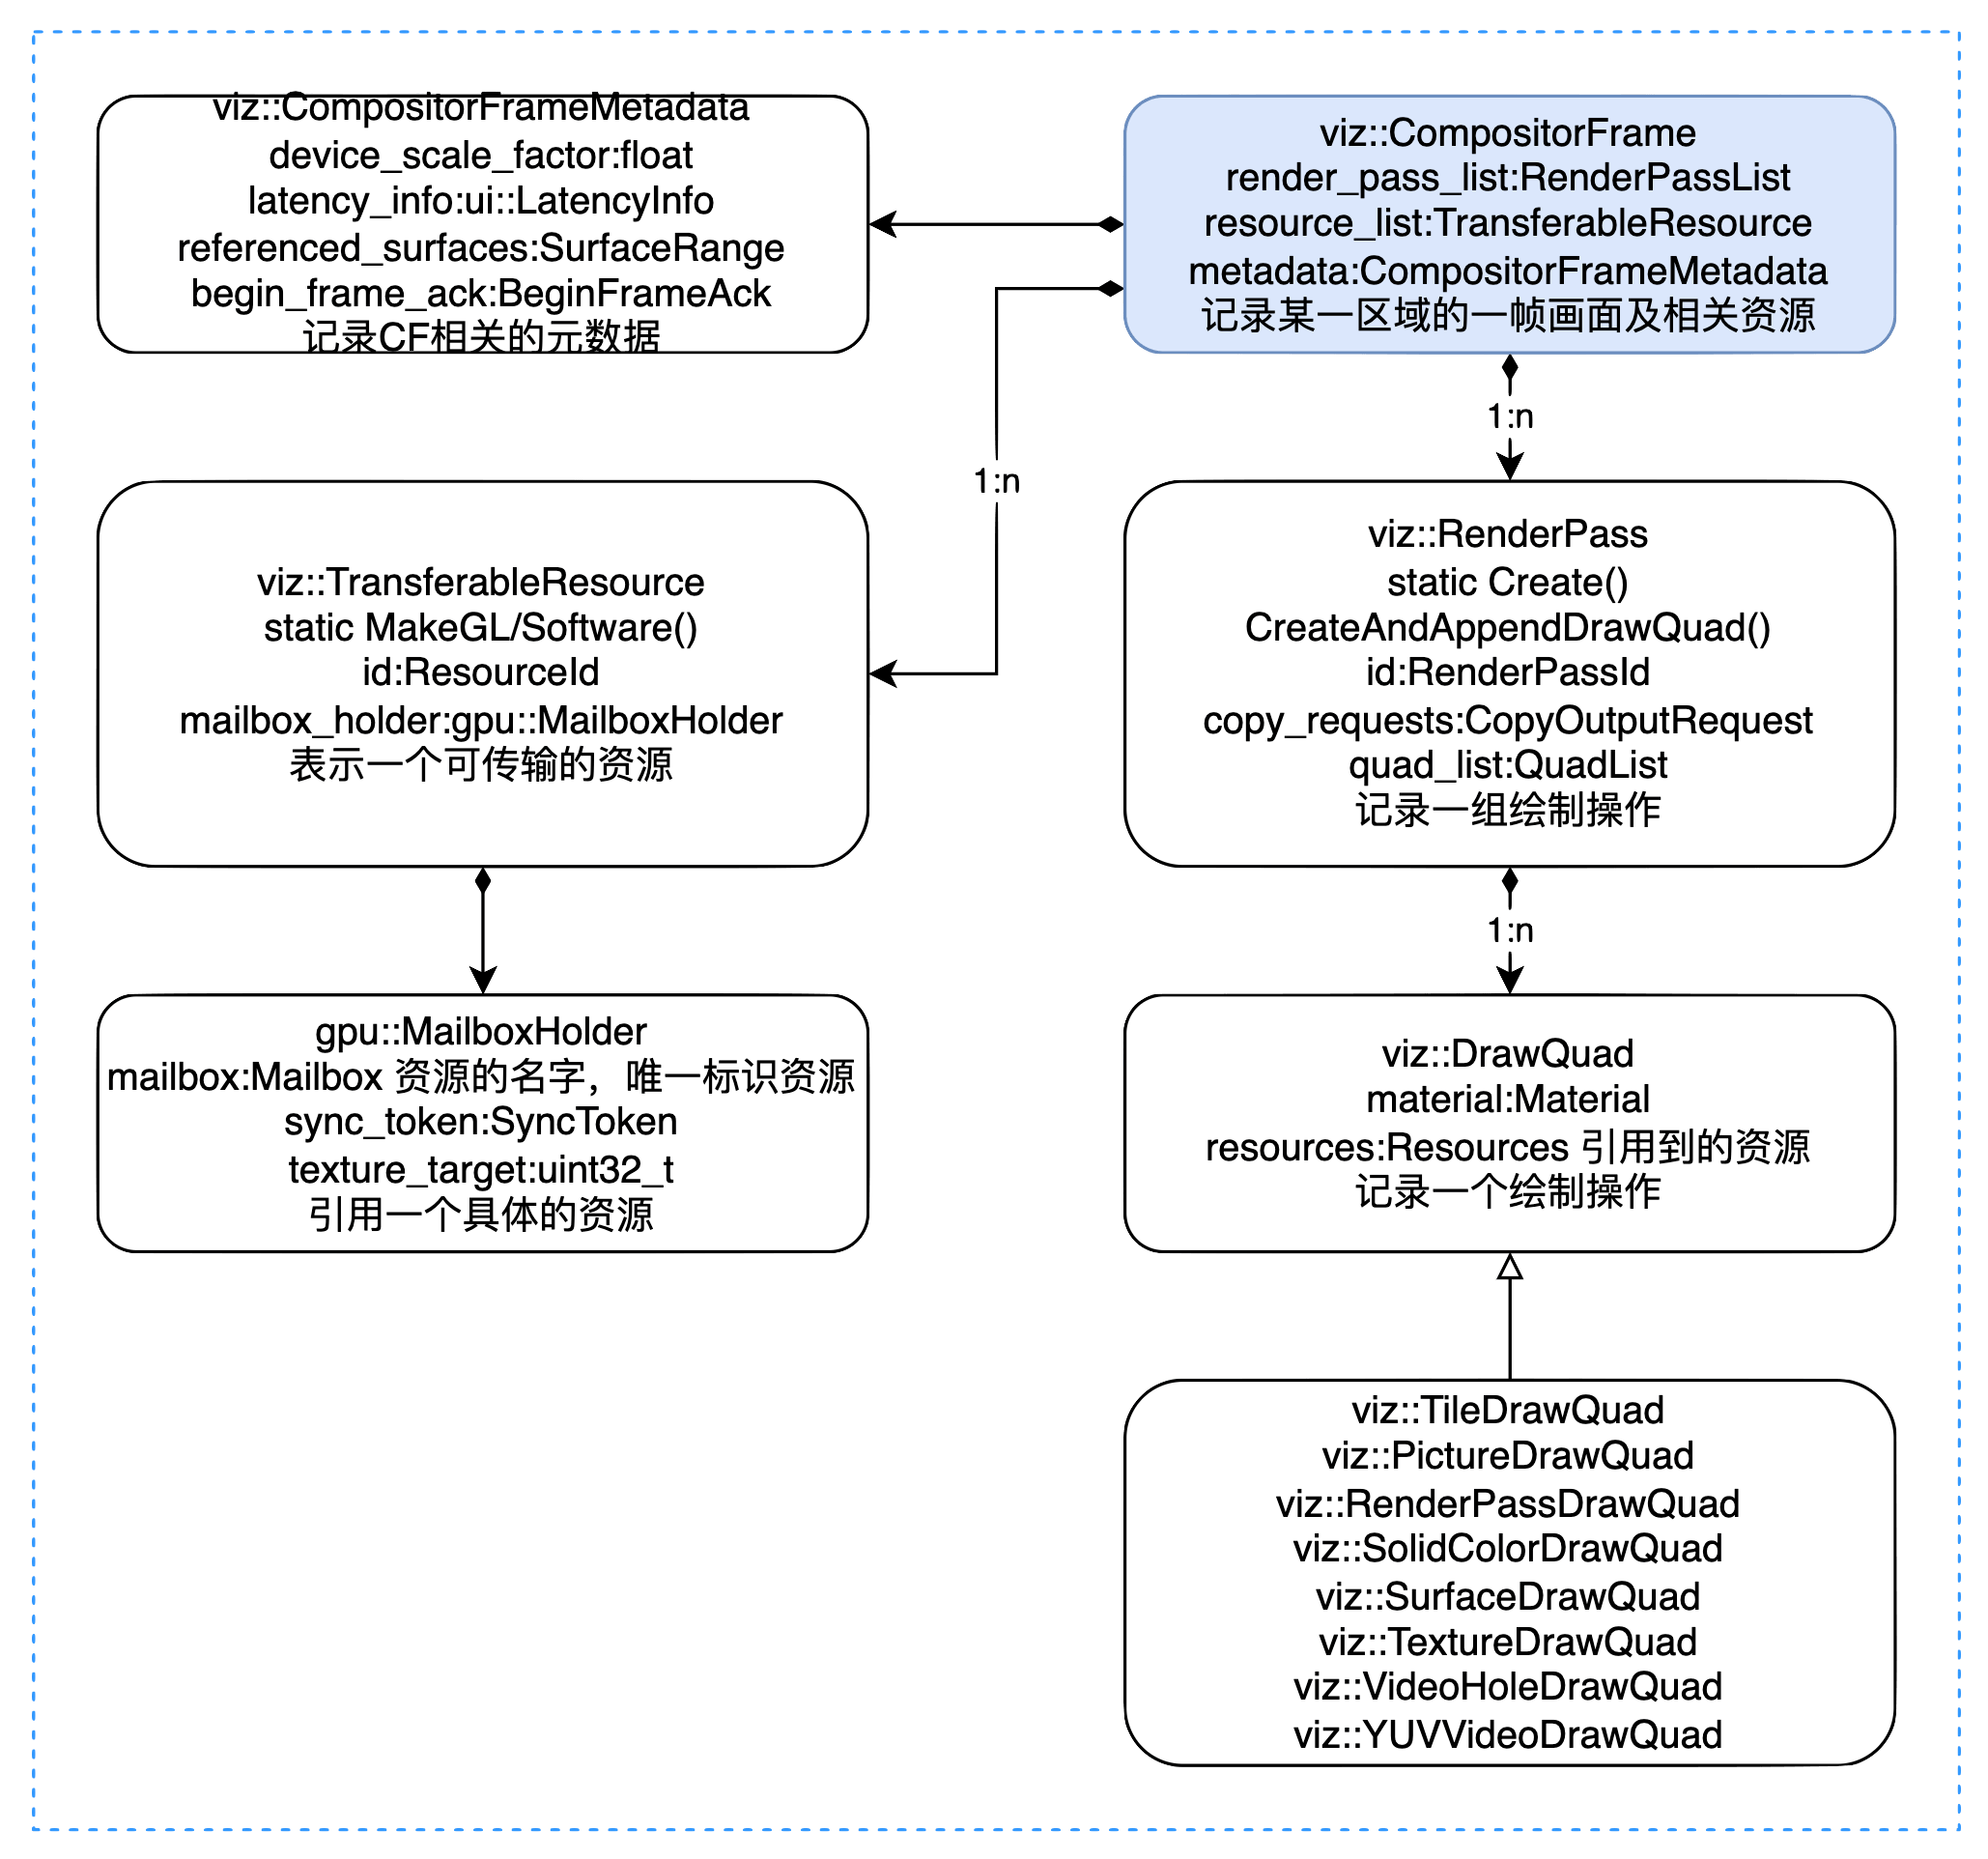
A CF represents one frame of a rectangular display area. It contains:
- Metadata: CompositorFrameMetadata
- Referenced resources: TransferableResource
- Drawing operations: RenderPass/DrawQuad
CompositorFrameMetadata records page scale, scroll regions, referenced surfaces, etc.
TransferableResource records resources (images) referenced by the CF. Resources come in two forms:
- Software resources (stored in memory)
- Textures (stored on GPU)
Hardware acceleration requires GPU-based resources; without it, only software resources are available.
DrawQuad types:
- viz::TextureDrawQuad: References a resource.
- viz::TileDrawQuad: Represents a tile. DisplayItemList is rasterized by cc into TileDrawQuads.
- viz::PictureDrawQuad: Stores DisplayItemList directly. Currently only available for Android WebView.
- viz::SolidColorDrawQuad: Solid color.
- viz::RenderPassDrawQuad: References another RenderPass by ID.
- viz::SurfaceDrawQuad: Embeds another CompositorFrameSinkClient’s output — used for OOPIF, OffscreenCanvas, etc.
Aggregate
- Module: Viz
- Process: Viz Process
- Thread: Display Compositor thread
- Responsibility: Surface aggregation — receive CFs from multiple processes and composite them
Core class: SurfaceAggregator
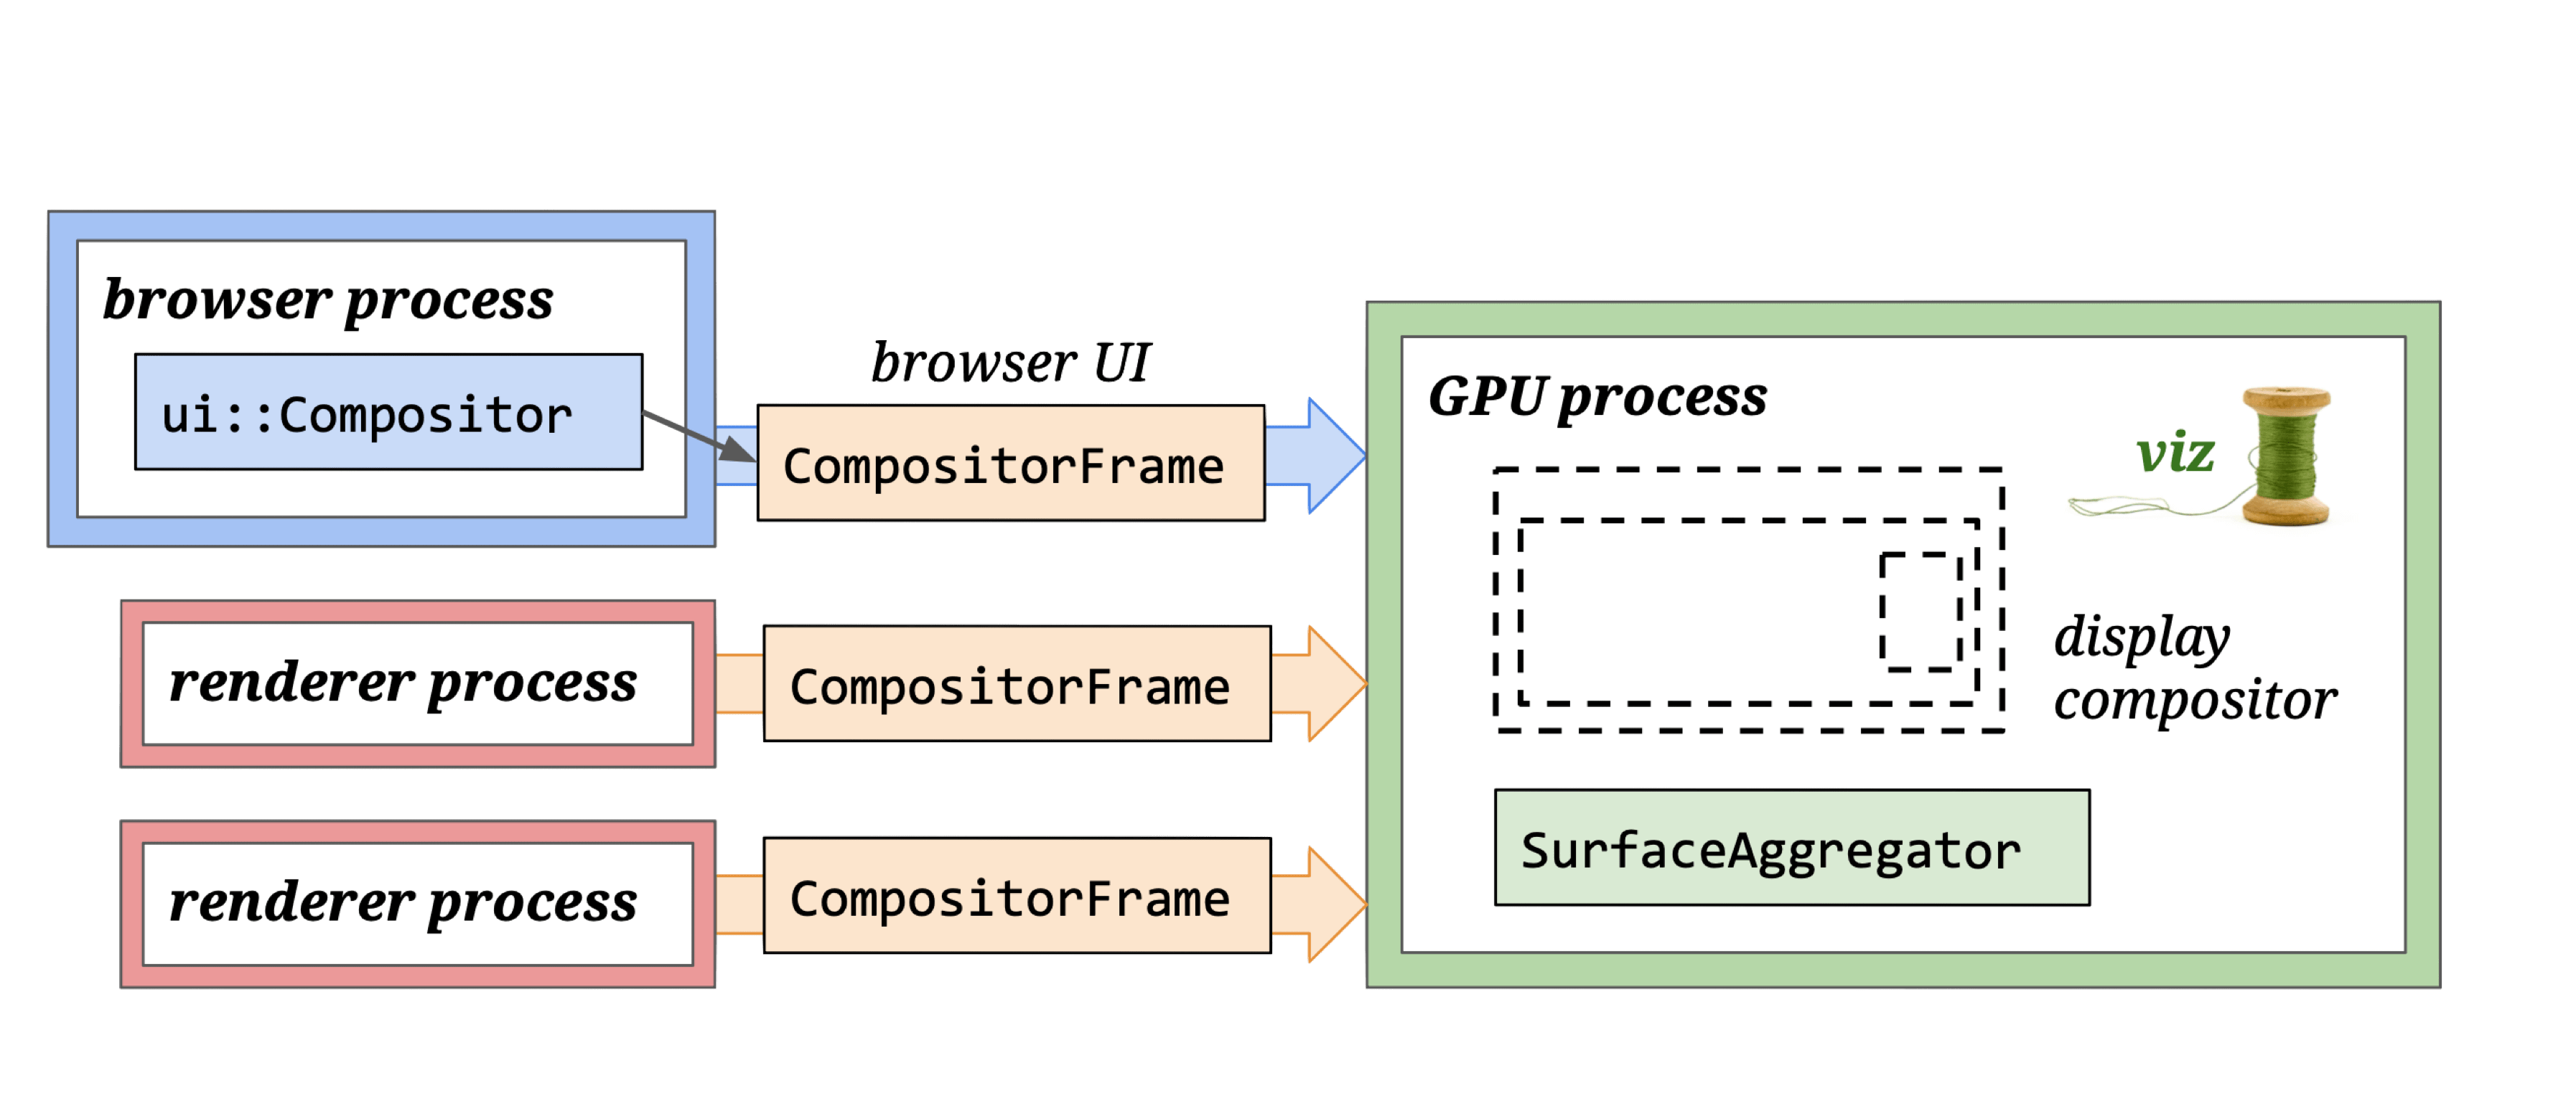
The Display compositor receives CFs from multiple processes and calls SurfaceAggregator to composite them.
Display

- Module: Viz
- Process: Viz Process
- Thread: GPU main thread
- Responsibility: Call GL instructions to render draw quads to screen
- Input: Composited viz::CompositorFrame (draw quads)
- Output: Rendered pixels
Three rendering modes based on viz::DirectRenderer and viz::OutputSurface combinations:
- Software rendering:
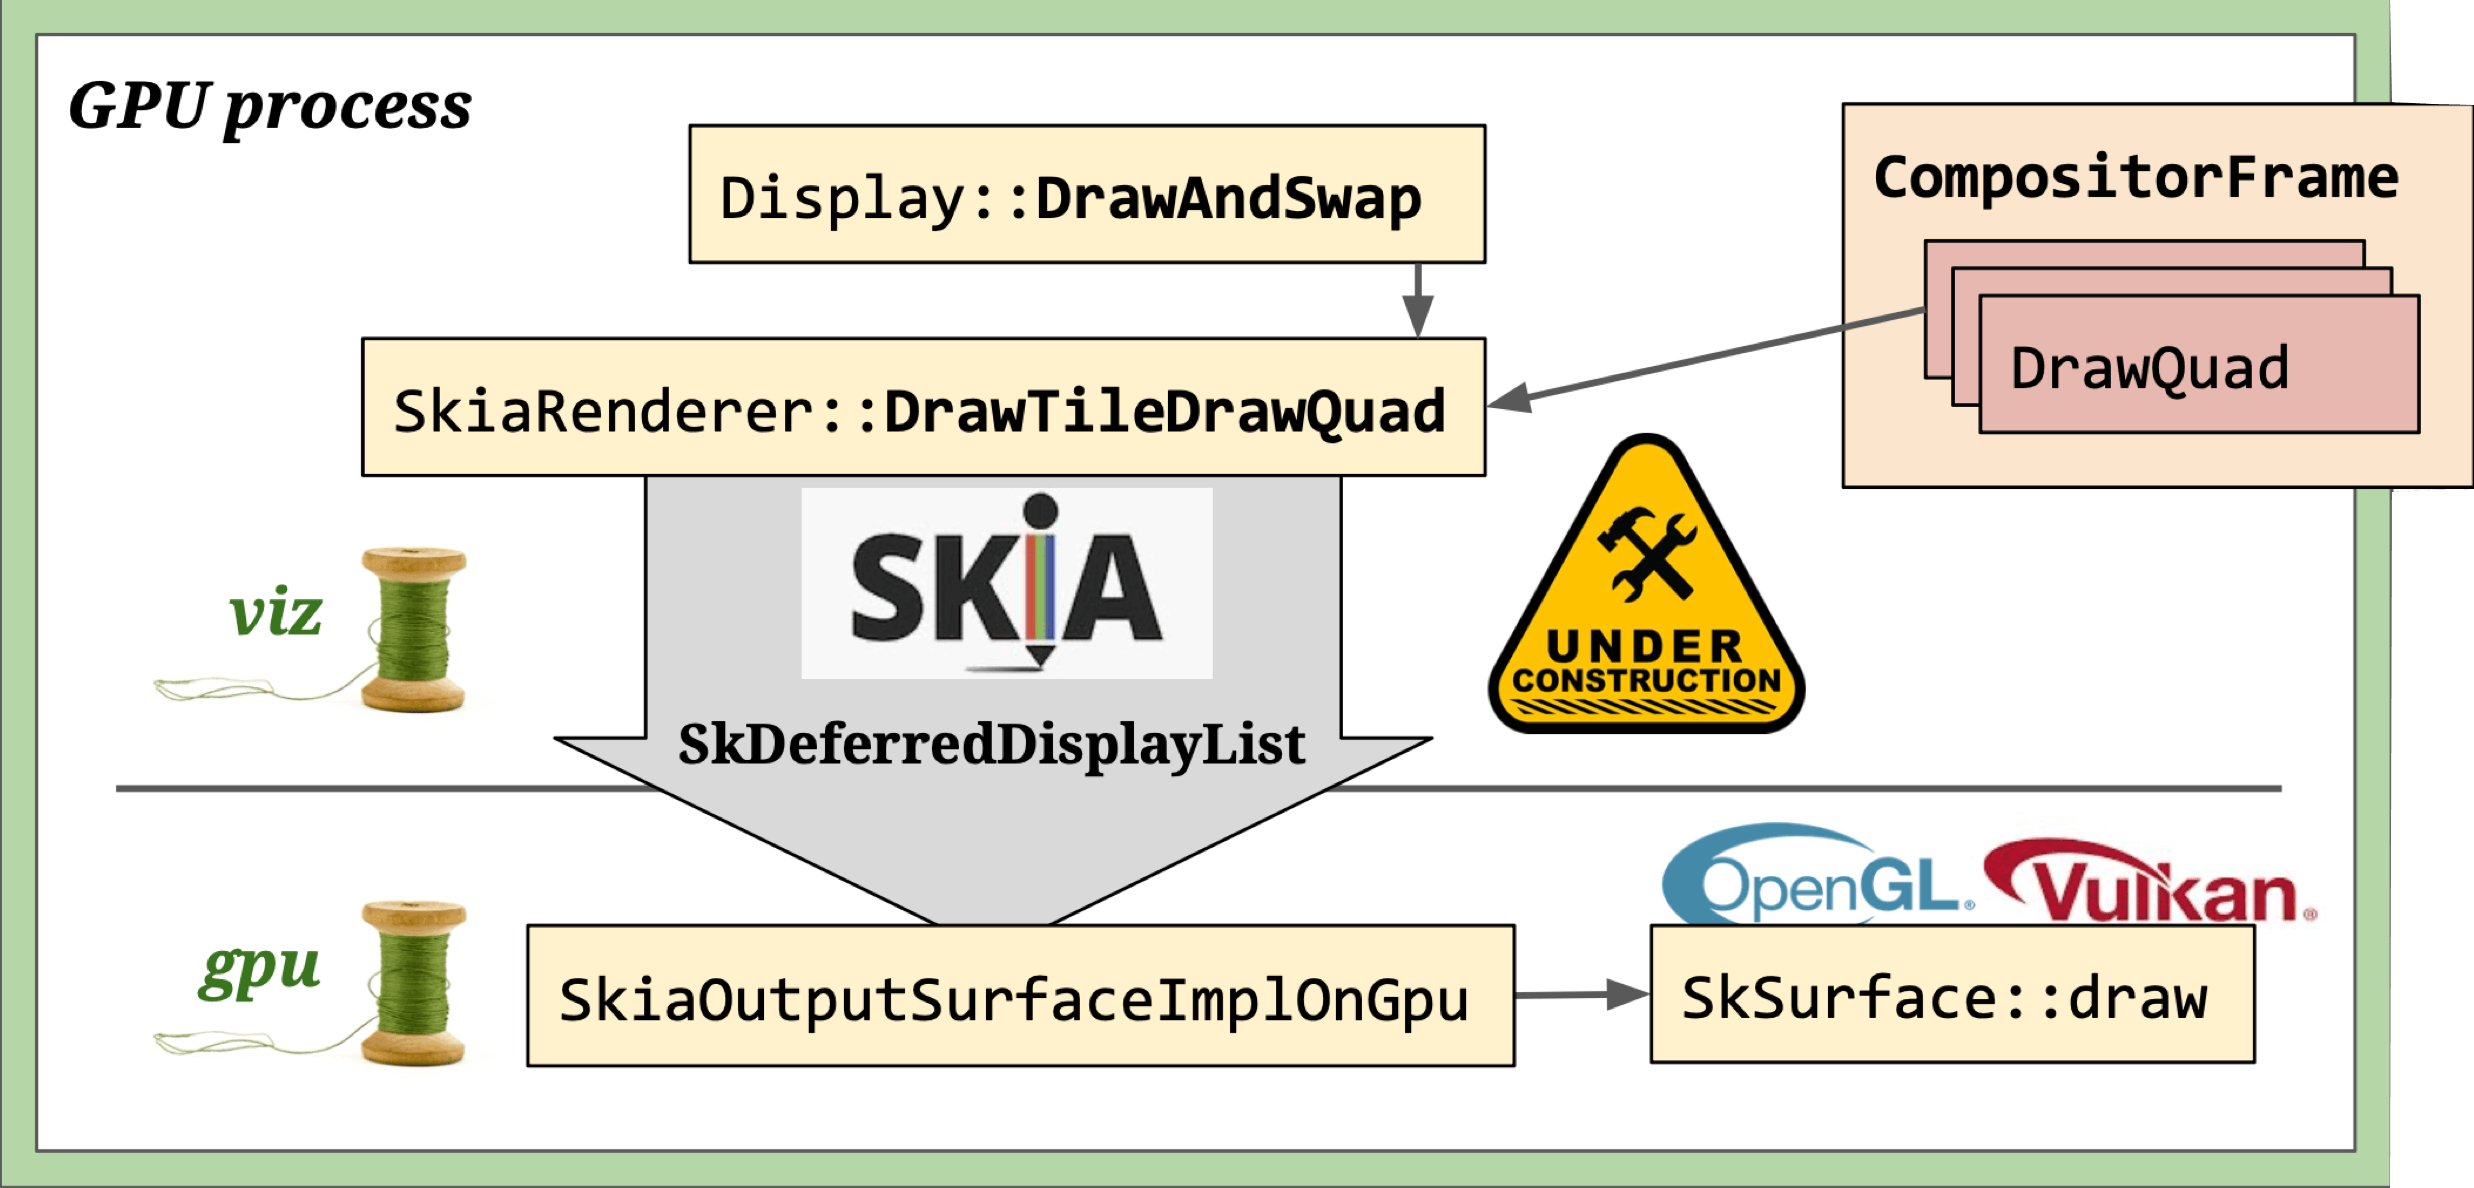
viz::SoftwareRenderer+viz::SoftwareOutputSurface+viz::SoftwareOutputDevice— used when hardware acceleration is disabled. - Skia rendering:
viz::SkiaRenderer+viz::SkiaOutputSurface+viz::SkiaOutputDevice— most flexible, supports GL, Vulkan, and offscreen rendering. - OpenGL rendering:
viz::GLRenderer+viz::GLOutputSurface— deprecated, being replaced by Skia renderer.
Skia rendering: SkiaRenderer draws DrawQuads to a canvas provided by SkiaOutputSurfaceImpl. The canvas doesn’t execute drawing immediately — instead it records operations via Skia’s DDL (SkDeferredDisplayListRecorder). Once all RenderPasses finish, the recorded operations are sent to SkiaOutputSurfaceImplOnGpu for actual rendering.
OpenGL rendering: GL calls (frame data) from the viz compositor thread are proxied through a command buffer and written into the main thread’s back buffer.
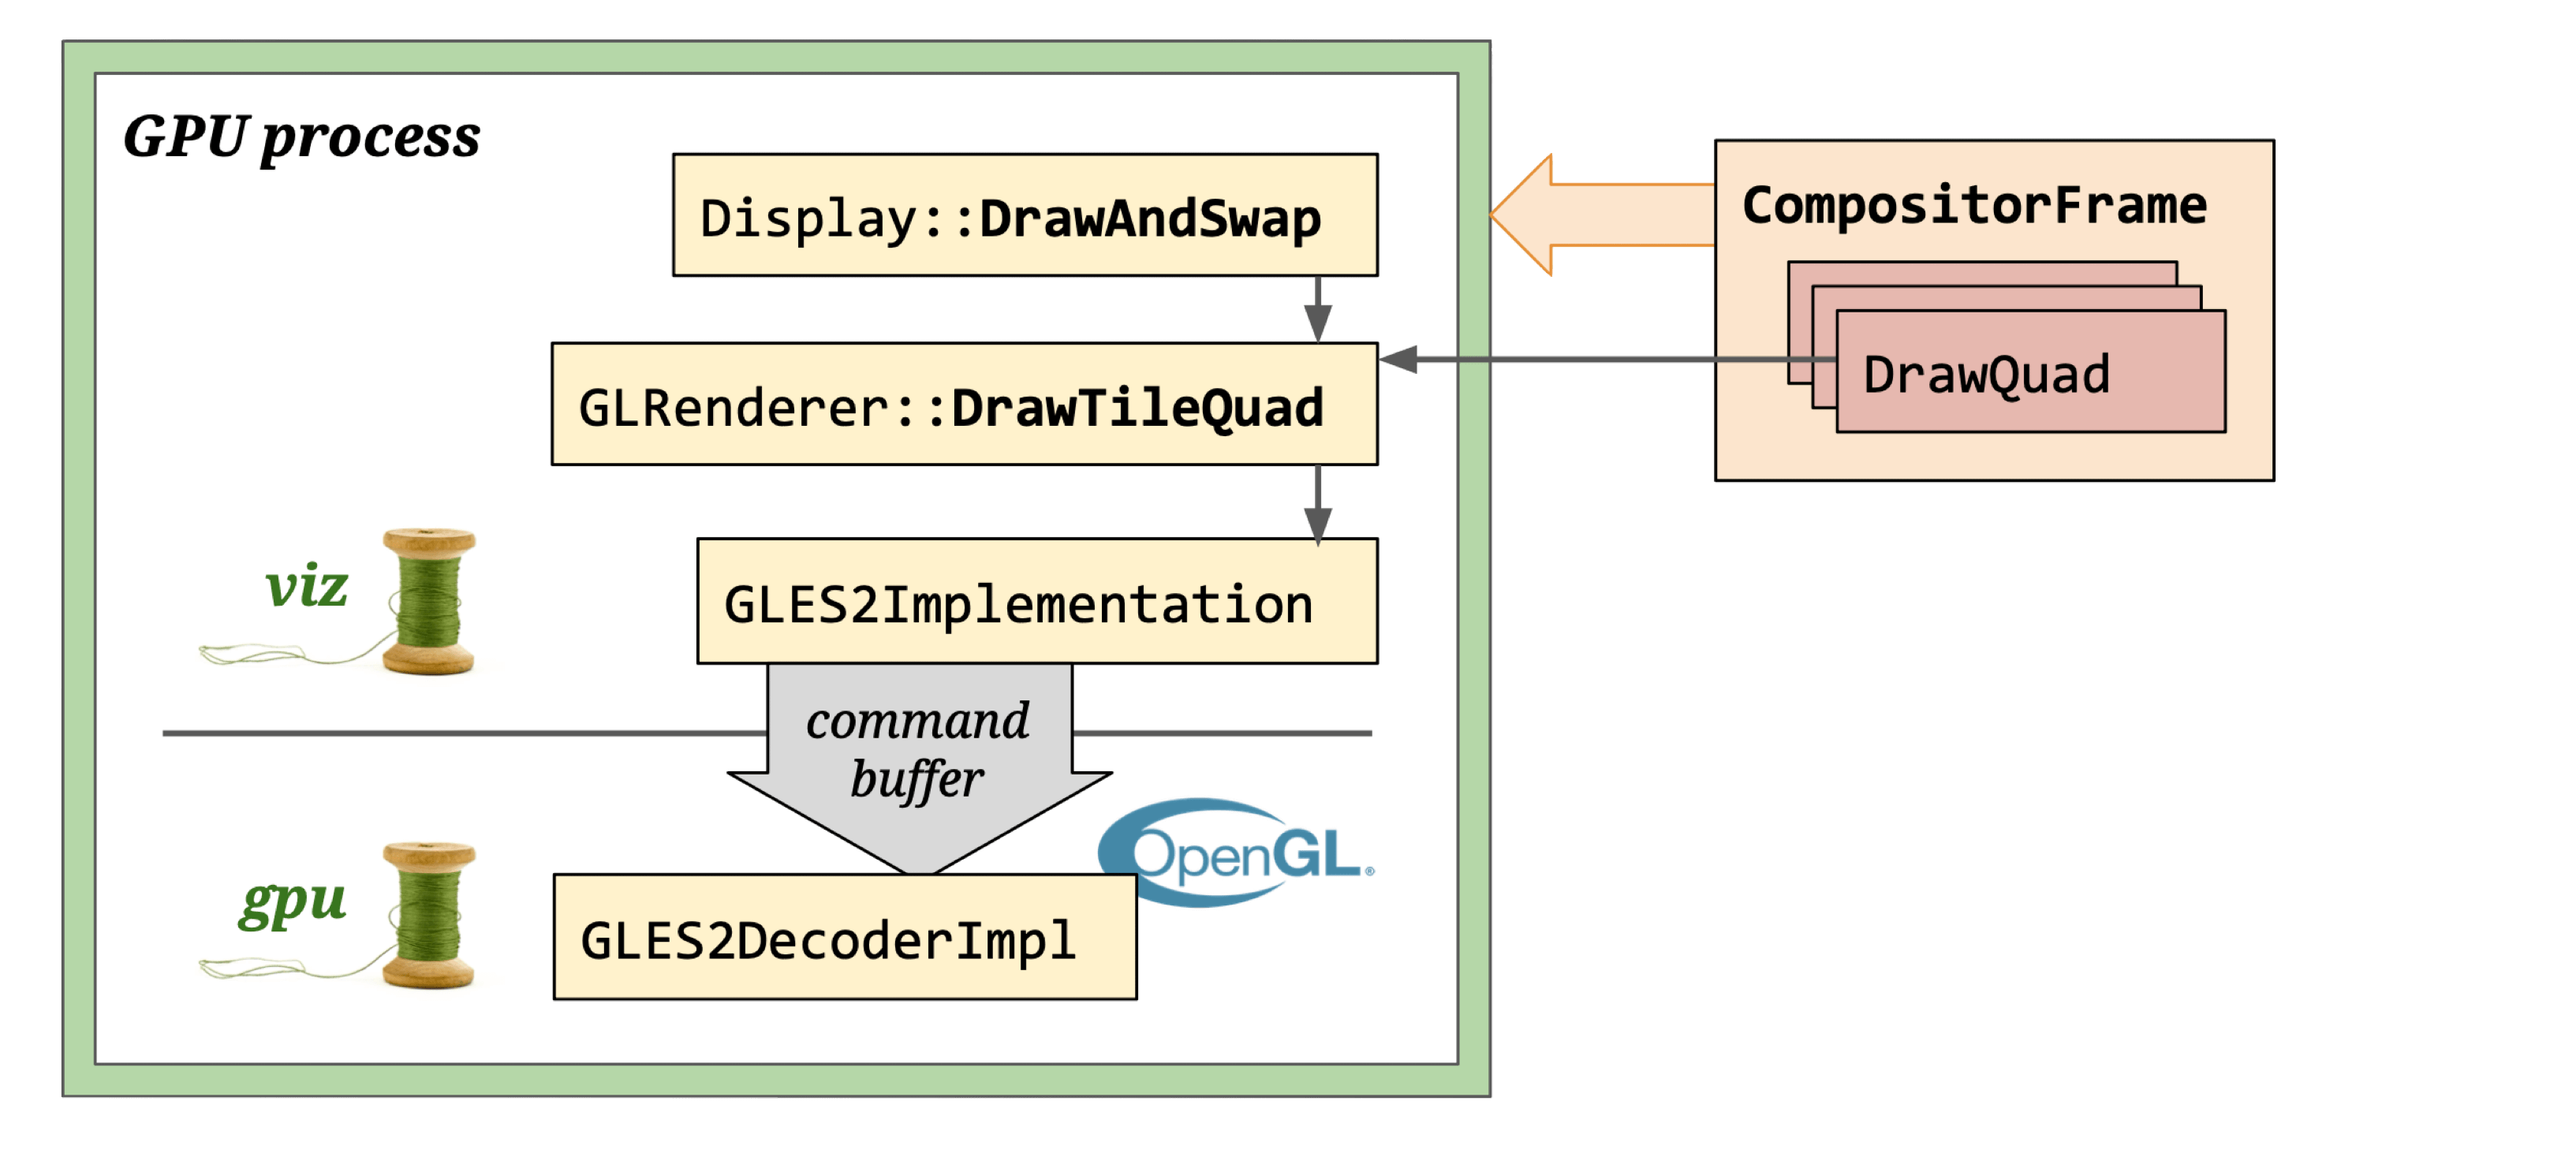
Note: GLRenderer is deprecated and will be replaced by SkiaRenderer.
It uses a CommandBuffer-based GL Context to render DrawQuads onto GLOutputSurface, which creates a Native GL Context using a window handle. GL calls originate in the Compositor thread and are ultimately executed in the CrGpuMain thread via InProcessCommandBuffer.
See GPU Command Buffer for details.
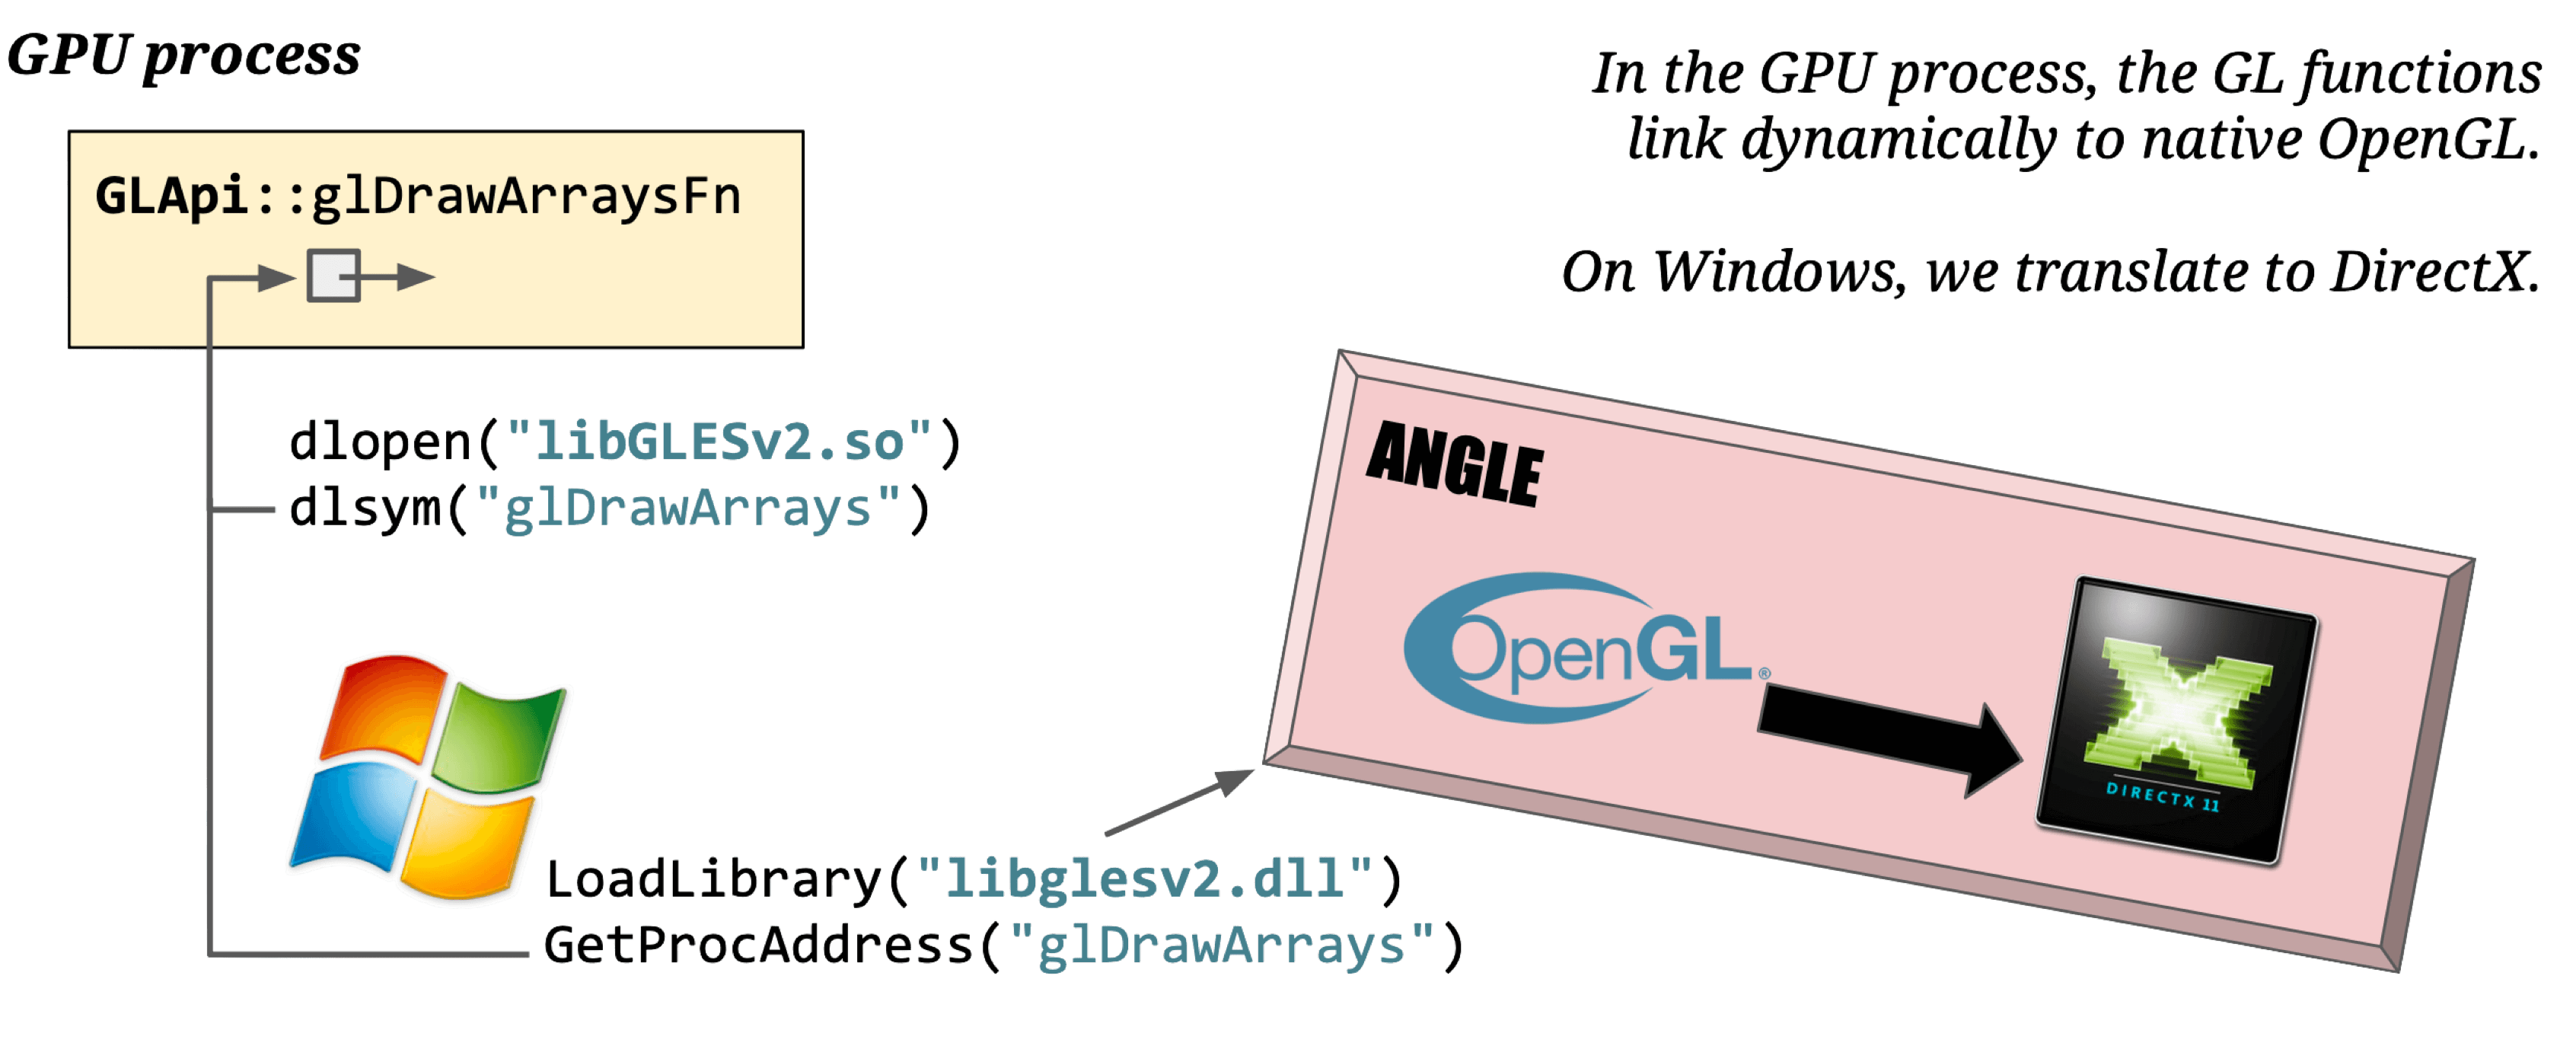
Final GL calls vary by OS and GPU driver:
Double buffering: Graphics engines use double buffering — drawing to a buffer first, then swapping to screen — to prevent screen tearing and optimize rendering performance.
Display uses Front Buffer (for screen output) and Back Buffer (for drawing). The screen reads from the Front Buffer. Viz calls Display::DrawAndSwap to swap pointers between them. When the vsync signal arrives, the GPU driver executes the drawing commands, and pixels appear on screen.

That’s the complete Chromium rendering pipeline. This post is an overview — for deeper dives, check out the companion articles listed in Further Reading, or explore the source code links throughout.
Further Reading
- Chromium Rendering Pipeline - Introduce
- Chromium Rendering Pipeline - Parsing
- Chromium Rendering Pipeline - Style
- Multi-process Architecture - The Chromium Projects
- Inside look at modern web browser (part 3)
- How cc Works
- Overview of the RenderingNG architecture - Chrome Developers
- RenderingNG - Chrome Developers
- Key data structures and their roles in RenderingNG
- Life of a pixel - Google Docs
- RenderingNG deep-dive: LayoutNG
- RenderingNG deep-dive: BlinkNG
- Chromium Code Search
- CSS Triggers
- Web Platform Tests