Google’s official Flutter hybrid development support is quite minimal — it only lets you open a single Flutter View, without route parameter passing, unified lifecycle management, or navigation stack control that real production work requires. Third-party hybrid frameworks like Flutter Boost, Thrio, and QFlutter fill this gap. This post explores the purpose, architecture, and source code of these frameworks.
1. Core Responsibilities and Goals
A proper hybrid development framework needs to support at minimum:
- Mixed navigation stack management: Open any Flutter or Native page at will.
- A complete notification mechanism: Unified lifecycle events, route event notifications.
Using iOS as our lens, let’s explore the best way to implement Flutter hybrid development.
Note: Android is not covered separately here. Starting from iOS is simply a perspective — the underlying principles are the same on both platforms, with mostly implementation-level differences. Communication layer internals are also not covered in detail here; the focus is on usage patterns. Note: Flutter Boost version used here is 1.12.13; Thrio version is 0.1.0.
2. Starting with FlutterViewController
In hybrid development, Flutter runs as a plugin. You start a FlutterViewController — a UIViewController implementation that connects to a FlutterEngine, passes UIKit input events to Flutter, and displays rendered Flutter frames. The FlutterEngine provides the Dart VM and Flutter runtime.
One important constraint: a single Flutter Engine can only have one active FlutterViewController at a time.
FlutterEngine: The FlutterEngine class coordinates a single instance of execution for a FlutterDartProject. It may have zero or one FlutterViewController at a time.
Starting the engine:
self.flutterEngine = [[FlutterEngine alloc] initWithName:@"my flutter engine"];
[self.flutterEngine run];
Creating and presenting a FlutterViewController:
FlutterViewController *flutterViewController =
        [[FlutterViewController alloc] initWithEngine:flutterEngine nibName:nil bundle:nil];
[self presentViewController:flutterViewController animated:YES completion:nil];
When creating a FlutterViewController, you can either use an already-running FlutterEngine (recommended) or implicitly start a new one during creation (not recommended — this introduces a noticeable delay before the first frame renders).
With the official approach, we’ve launched the Flutter Engine and displayed a Flutter page via FlutterViewController. Inside Flutter, you can use Navigator.push to open additional Flutter routes:
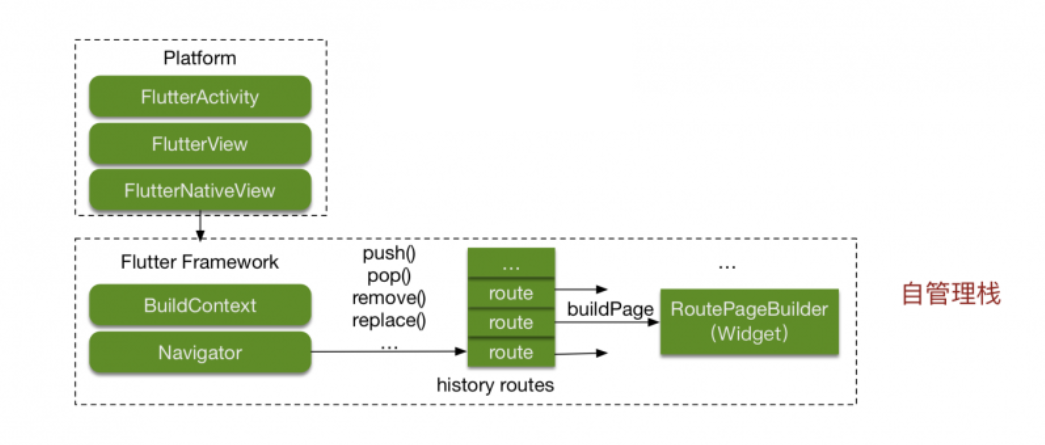
A pure Flutter-in-one-container stack is easy to manage:
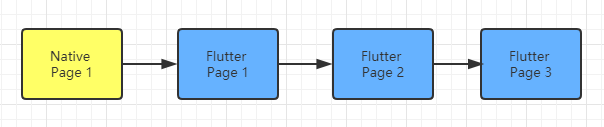
All Flutter pages live inside a single FlutterViewController container, managed internally. But what about a mixed navigation stack that alternates between Native and Flutter?

The basic idea is to let the FlutterViewController move freely within the iOS navigation stack:
This is complex. You need to track the exact position of every Flutter page and every Native container, knowing whether a pop should return to a Flutter route or switch to a different NativeViewController. That means maintaining a page index and hooking into both native pop events and Navigator.pop.
Let’s look at how the industry tackles this.
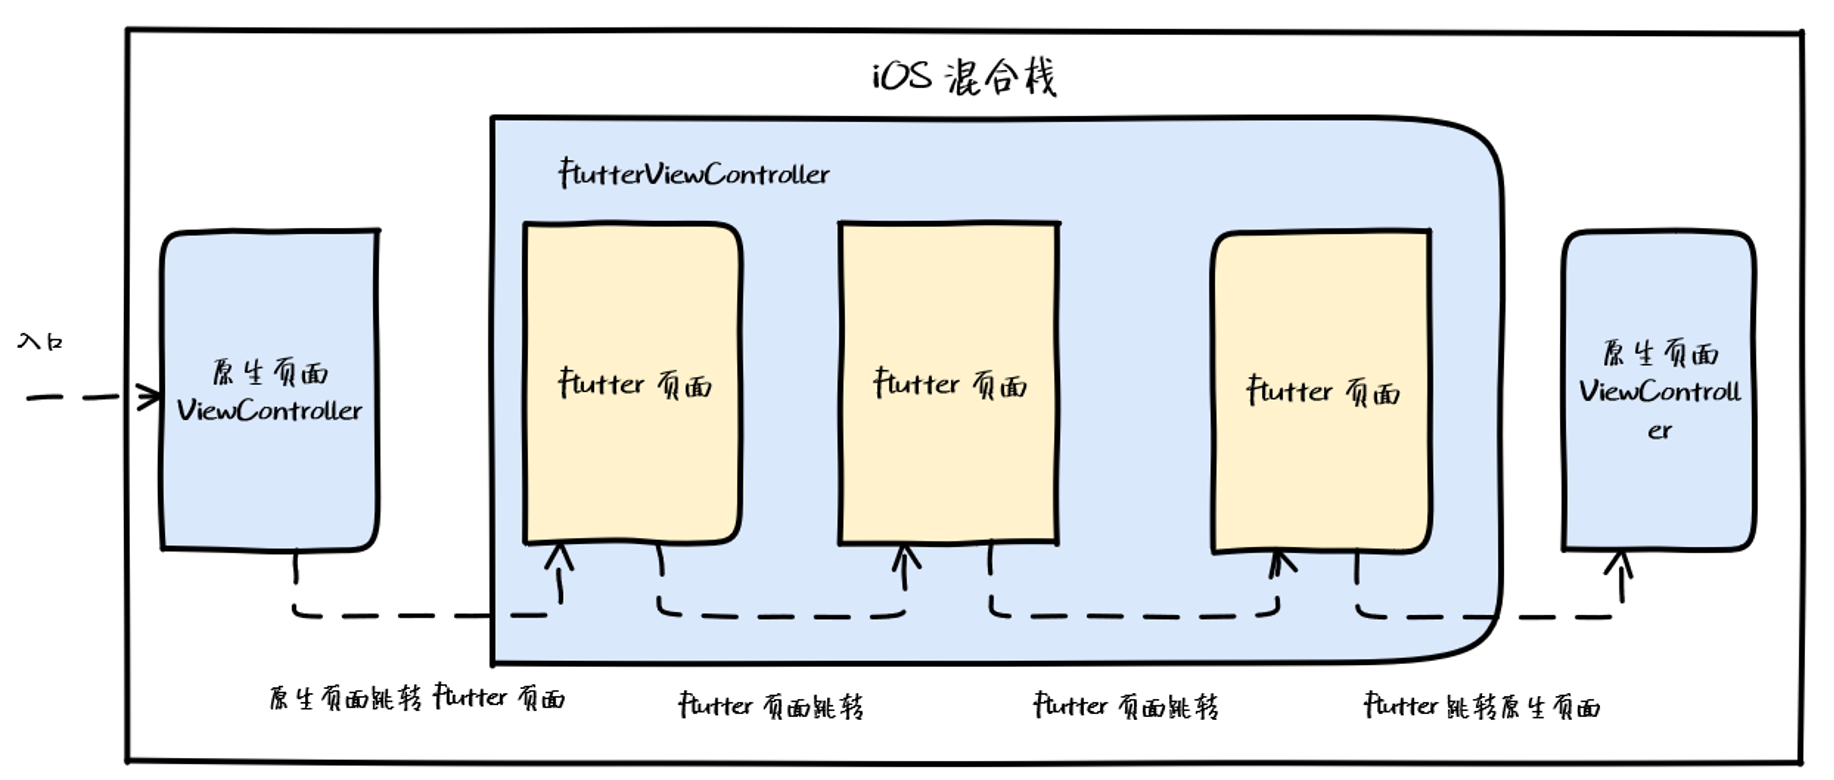
3. Flutter Boost
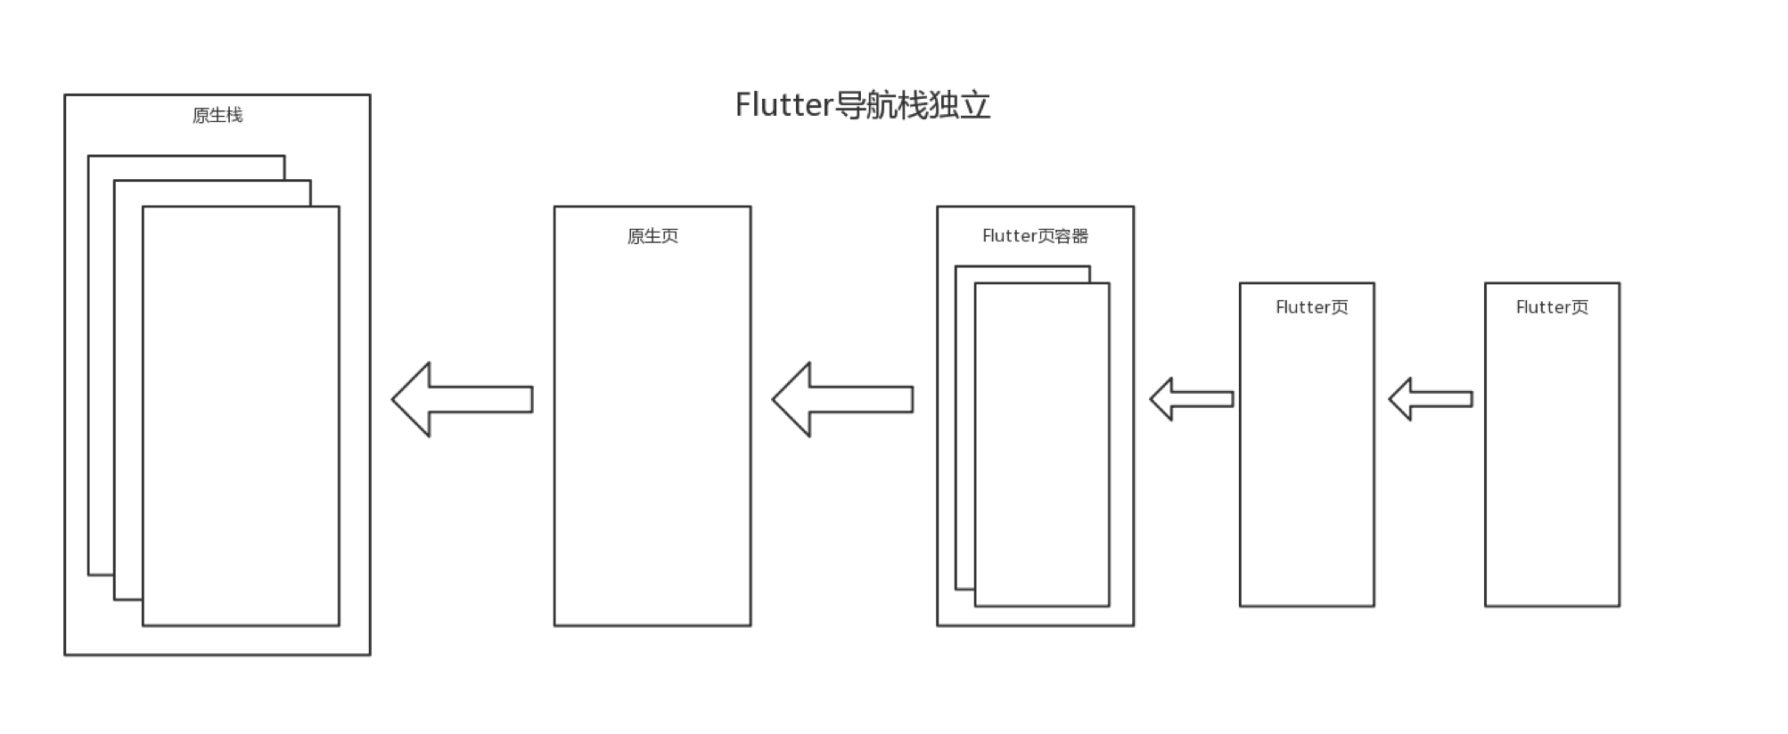
Flutter Boost’s approach: wrap each Flutter page in its own FlutterViewController, making each one a separate instance — similar to how a browser tab works:

I analyzed Flutter Boost’s Android source code in a previous post (Flutter Boost Hybrid Development: Practice and Source Code Walkthrough). This post focuses on the iOS side.
3.1 Opening Pages from Native
This covers:
- Native → Flutter
- Native → Native
To integrate Flutter Boost in the project:
// AppDelegate.m

- (BOOL)application:(UIApplication *)application didFinishLaunchingWithOptions:(NSDictionary *)launchOptions
{
    PlatformRouterImp *router = [PlatformRouterImp new];
    [FlutterBoostPlugin.sharedInstance startFlutterWithPlatform:router
                                                        onStart:^(FlutterEngine *engine) {
                                                        }];
    self.window = [[UIWindow alloc] initWithFrame: [UIScreen mainScreen].bounds];

    [self.window makeKeyAndVisible];

    UINavigationController *rvc = [[UINavigationController alloc] initWithRootViewController:tabVC];

    router.navigationController = rvc;
    self.window.rootViewController = rvc;

    return YES;
}


// PlatformRouterImp.m

- (void)open:(NSString *)name
   urlParams:(NSDictionary *)params
        exts:(NSDictionary *)exts
  completion:(void (^)(BOOL))completion
{
    if ([name isEqualToString:@"native"]) {
        [self openNativeVC:name urlParams:params exts:exts];
        return;
    }

    BOOL animated = [exts[@"animated"] boolValue];
    FLBFlutterViewContainer *vc = FLBFlutterViewContainer.new;
    [vc setName:name params:params];
    [self.navigationController pushViewController:vc animated:animated];
    if(completion) completion(YES);
}
Looking at what happens when the engine starts:
// FlutterBoostPlugin.m
- (void)startFlutterWithPlatform:(id<FLBPlatform>)platform
                          engine:(FlutterEngine *)engine
           pluginRegisterred:(BOOL)registerPlugin
                         onStart:(void (^)(FlutterEngine * _Nonnull))callback{
    static dispatch_once_t onceToken;
    dispatch_once(&onceToken, ^{
        FLBFactory *factory = FLBFactory.new;
        self.application = [factory createApplication:platform];
        [self.application startFlutterWithPlatform:platform
                                     withEngine:engine
                                      withPluginRegisterred:registerPlugin
                                       onStart:callback];
    });
}
startFlutterWithPlatform requires a router management class. In FLBPlatform.h, the open interface is implemented by the business side. After init, a UINavigationController is created, and the business router’s open implementation pushes a FLBFlutterViewContainer — which is actually a FlutterViewController — onto the nav stack.
When Native opens a Flutter page:
- (IBAction)pushFlutterPage:(id)sender {
    [FlutterBoostPlugin open:@"first" urlParams:@{kPageCallBackId:@"MycallbackId#1"} exts:@{@"animated":@(YES)} onPageFinished:^(NSDictionary *result) {
        NSLog(@"call me when page finished: %@", result);
    } completion:^(BOOL f) {
        NSLog(@"page is opened");
    }];
}
To summarize:
- Native → Native: Router intercepts the registered Native route, instantiates a ViewController, and pushes it.
- Native → Flutter: Instantiates
FLBFlutterViewContainer(essentially aFlutterViewController) and pushes it.
3.2 Opening Pages from Flutter
Both Flutter → Flutter and Flutter → Native cases:
FlutterBoost.singleton.open("native").then((Map value) {
    print("page finished: $value");
});

FlutterBoost.singleton.open("flutterPage").then((Map value) {
    print("page finished: $value");
});
open sends an openPage MethodChannel message to Native:
Future<Map<dynamic, dynamic>> open(String url,
  {Map<dynamic, dynamic> urlParams, Map<dynamic, dynamic> exts}) {
    Map<dynamic, dynamic> properties = new Map<dynamic, dynamic>();
    properties["url"] = url;
    properties["urlParams"] = urlParams;
    properties["exts"] = exts;
    return channel.invokeMethod<Map<dynamic, dynamic>>('openPage', properties);
}
iOS receives and handles openPage, ultimately calling the business router’s open method:
- (void)handleMethodCall:(FlutterMethodCall*)call result:(FlutterResult)result {
    if([@"openPage" isEqualToString:call.method]){
        NSString *url = args[@"url"];
        // ... extract params, exts
        [[FlutterBoostPlugin sharedInstance].application open:url
                                                    urlParams:urlParams
                                                         exts:exts
                                                onPageFinished:result
                                                   completion:^(BOOL r) {}];
    }
}
Summary:
- Flutter → Flutter: iOS receives
openPageand instantiatesFLBFlutterViewContainer— same as Native → Flutter. - Flutter → Native: iOS receives
openPageand routes to the native ViewController — same as Native → Native.
3.3 Container Switching
Since Flutter Engine can only mount one FlutterViewController at a time, what happens when multiple Flutter pages are opened?
Flutter Boost handles this by swapping the engine’s viewController each time a Flutter container appears:
// FLBFlutterViewContainer.m
- (void)viewWillAppear:(BOOL)animated
{
    [self attatchFlutterEngine];
    [BoostMessageChannel willShowPageContainer:^(NSNumber *result) {}
                                            pageName:_name
                                              params:_params
                                            uniqueId:self.uniqueIDString];
    [super bridge_viewWillAppear:animated];
    [self.view setNeedsLayout];
}

- (void)attatchFlutterEngine
{
    [FLUTTER_APP.flutterProvider atacheToViewController:self];
}
// FLBFlutterEngine.m
- (BOOL)atacheToViewController:(FlutterViewController *)vc
{
if(_engine.viewController != vc){
_engine.viewController = vc;
return YES;
}
return NO;
}Every time a Flutter container appears, it’s mounted onto the engine. Flutter Boost maintains the illusion of multiple containers by continuously swapping the engine’s active viewController.
3.4 Unified Lifecycle and Route Notifications
When viewWillAppear fires on a FLBFlutterViewContainer, willShowPageContainer is called, which sends a MethodChannel message to the Dart side:
// BoostMessageChannel.m
+ (void)willShowPageContainer:(void (^)(NSNumber *))result pageName:(NSString *)pageName params:(NSDictionary *)params uniqueId:(NSString *)uniqueId
{
    NSMutableDictionary *tmp = [NSMutableDictionary dictionary];
    if(pageName) tmp[@"pageName"] = pageName;
    if(params) tmp[@"params"] = params;
    if(uniqueId) tmp[@"uniqueId"] = uniqueId;
    [self.methodChannel invokeMethod:@"willShowPageContainer" arguments:tmp result:^(id result) {
        if (result) { result(result); }
    }];
}
This keeps Dart’s lifecycle in sync with the Native container — a key part of Flutter Boost’s design.
One known drawback: every Flutter → Flutter navigation creates a new FlutterViewController, causing extra memory overhead in sequences of Flutter-to-Flutter transitions. This is what Flutter Thrio was built to address.
3.3.2 Flutter Thrio
Thrio, open-sourced by Hellobike, makes one critical change from Flutter Boost: Flutter → Flutter navigation uses Flutter’s own Navigator stack rather than always creating a new container.
Memory benchmark for consecutive Flutter-to-Flutter navigation:
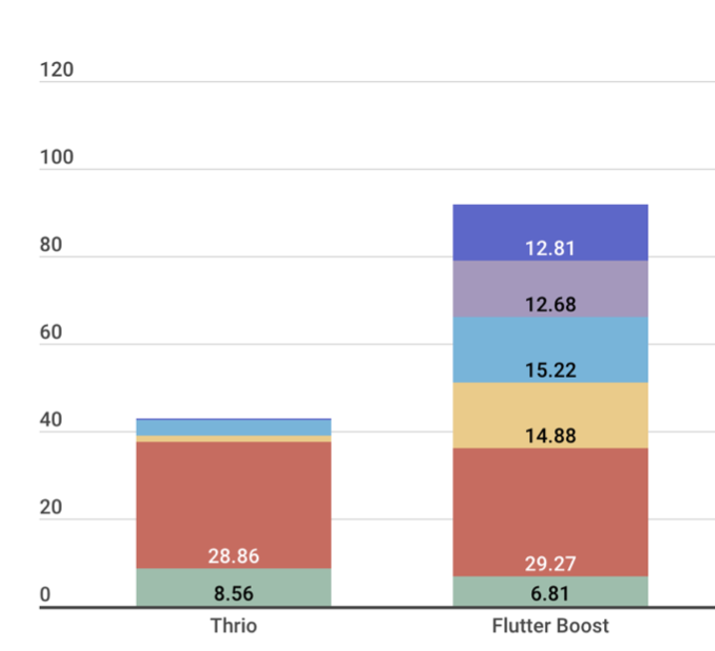
Key data points:
- Starting a Flutter Engine costs roughly 30 MB — it’s a heavy object.
- Each
FlutterViewControlleradds 12–15 MB.
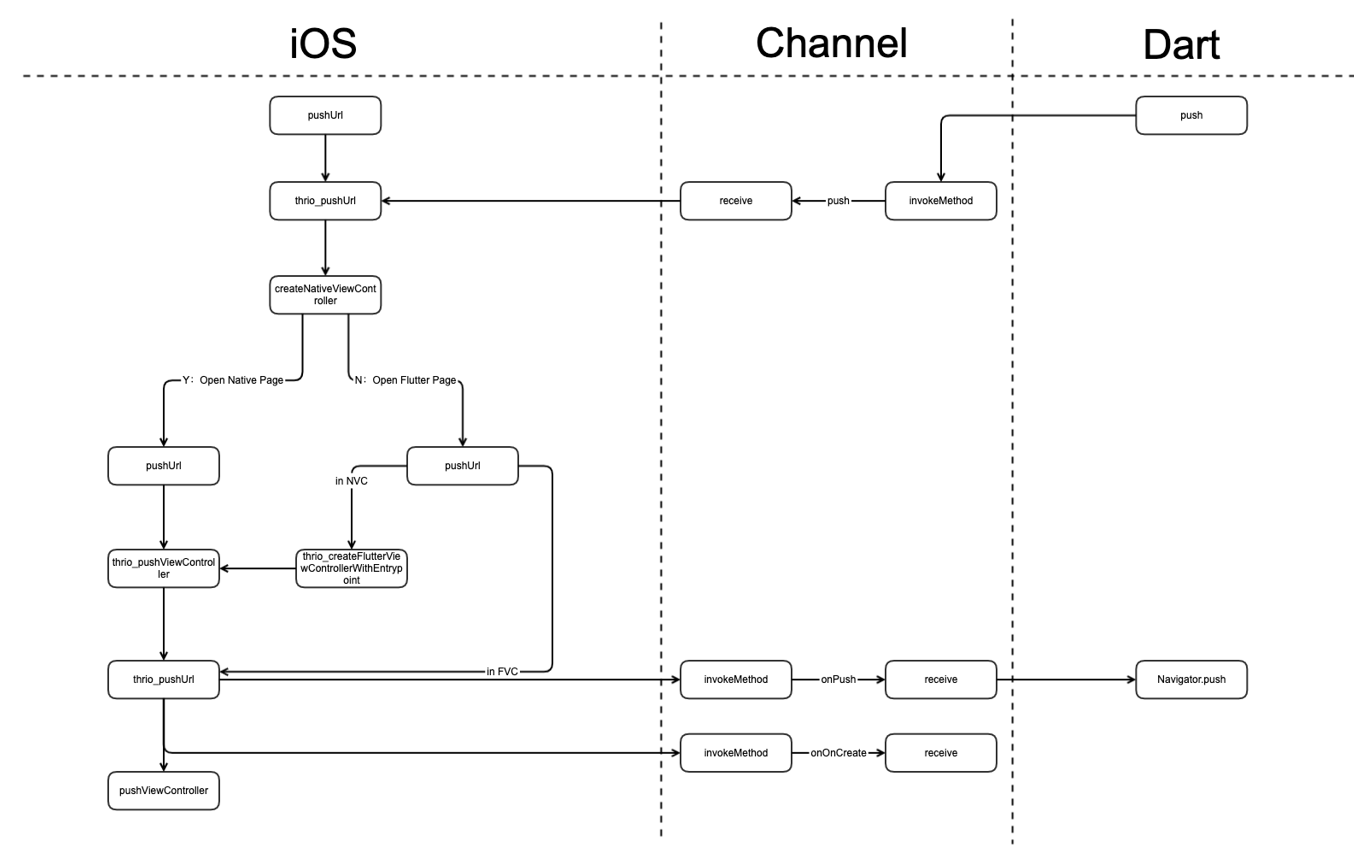
Thrio does meaningfully reduce memory usage here. The trade-off is implementation complexity. Flutter Boost’s strength is its simplicity — all routing goes through the native stack. Thrio mixes native and Flutter Navigator stacks, making implementation considerably more involved. Here’s the key function path for Thrio’s open:
3.3.3 Multi-Engine Mode
Both Flutter Boost and Thrio use a single engine. Some teams have also explored multi-engine approaches. Before discussing that, here’s some necessary background on Engine, Dart VM, and isolates.
Dart VM, Engine, and Isolates
(a) Once the Dart VM is created, a DartIsolate::CreateRootIsolate() call creates the isolate alongside an Engine object.
(b) Each Engine instance creates its own threads for UI, GPU, IO, and Platform runners.
(c) Isolates have logically isolated memory — no sharing across isolate boundaries.
(d) Code within an isolate runs sequentially; Dart concurrency means running multiple isolates. CPU-intensive tasks can be handled in additional isolates.
From these:
- Each Engine maps to one isolate (the Root Isolate).
- Engine is a heavy object (separate threads per instance).
- Engines are isolated from each other (no shared memory).
- No shared-memory concurrency between engines — no race conditions, no locks, no deadlocks.
Window
window is Flutter’s drawing surface — and the bridge connecting Flutter Framework (Dart) and Flutter Engine (C++).
In the Framework layer, window refers to the ui.window singleton (defined in window.dart). On the Engine side, it’s in window.cc. Their APIs are minimal but symmetrical:
.png)
.png)
From a rendering perspective, drawing operations output to a PictureRecorder, endRecording() returns a Picture, which gets added to a SceneBuilder, whose build() produces a Scene, which is finally passed to window.render().
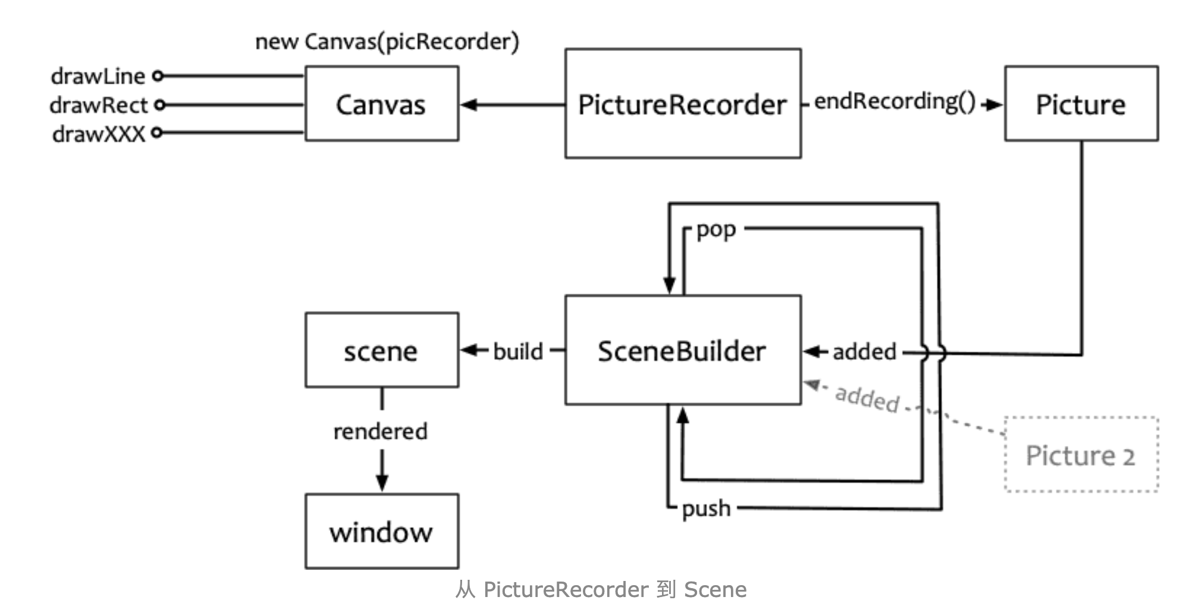
Diagram from: Flutter Framework Source Analysis (1) — Drawing Engine Basics
Multi-Engine Pattern
Combining conclusions (1), (3), and (5), the multi-engine model looks like this:
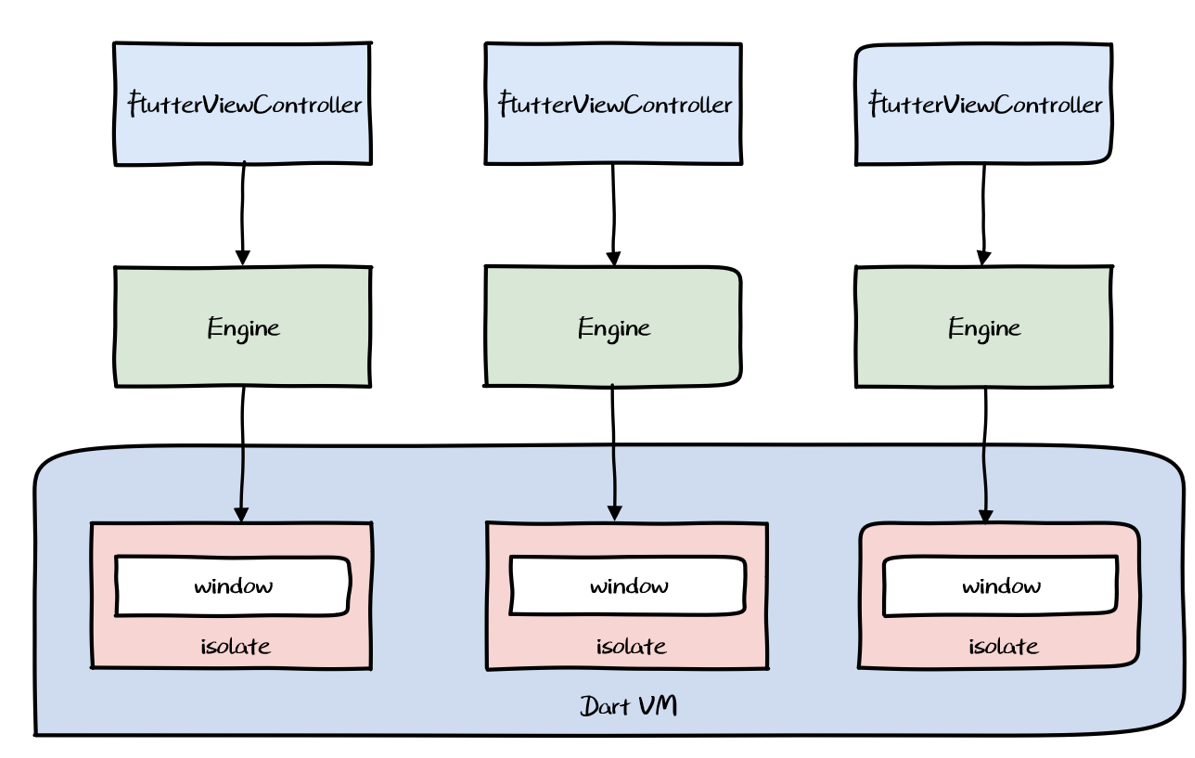
Characteristics:
- Multiple engines in the app
- Each engine hosts one or more FlutterVCs
- Engines are isolated from each other
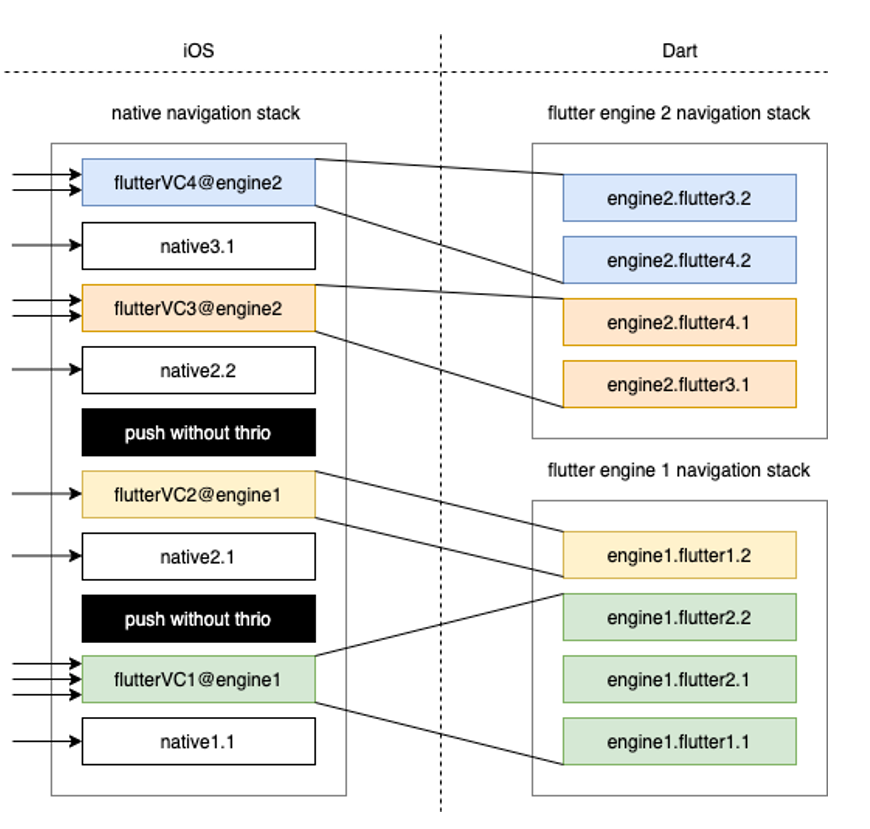
Communication between engines is necessarily complex. If two engines each contain two FlutterVCs, and each contains two Flutter pages, the routing logic becomes nightmarish (see Thrio’s README for an illustration):
The problems:
- Communication layer complexity: Cross-engine messaging still needs native coordination, partly undermining the cross-platform advantage.
- Resource overhead: Starting multiple Flutter Engines is expensive.
- Caching is fragmented: The app has a native cache pool and a Dart VM cache pool per engine — these don’t share resources, compounding memory pressure.
3.3.4 View-Level Hybrid Mode
To address multi-engine issues, a View-level approach was proposed. The key idea: add a windowId concept to each window so they can share a single Root Isolate. Since a single isolate has one ui.window singleton, you can extend the Engine to pass IDs to the Dart layer and support multiple windows — achieving multiple Flutter Engine instances that share one isolate.
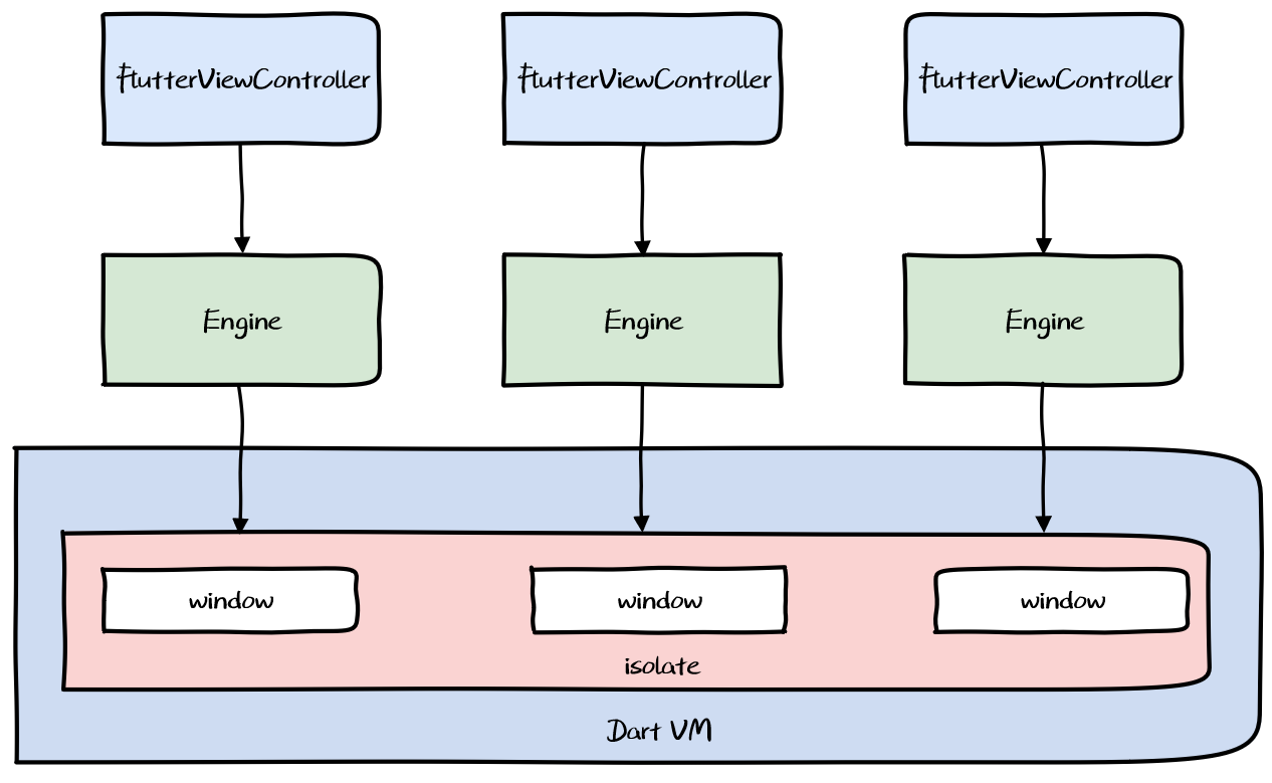
Benefits: Multiple FlutterViewControllers can coexist and share memory.
Drawbacks: Requires Engine modifications — high maintenance cost. The multi-engine memory overhead problem still needs addressing through ongoing Engine trimming.
4. Engineering Exploration
4.1 Compilation Modes
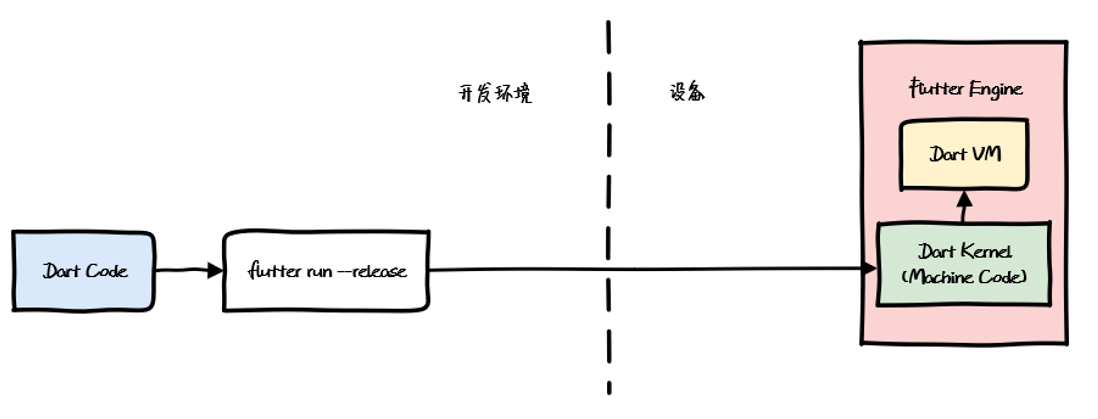
Dart natively supports two compilation modes: JIT and AOT.
JIT vs AOT
JIT (Just In Time): Runtime compilation used in Debug mode. Supports dynamic code delivery and execution, but performance is affected by the compilation overhead at runtime.

AOT (Ahead Of Time): Pre-compilation used in Release mode. Compiles to platform-specific binary before execution — high performance, but no dynamic updates, and slower development iteration.
Debug, Release, and Profile
Flutter apps run in three modes:

During development you want JIT-enabled Debug mode; for production you want AOT-compiled Release mode. This shapes how you set up integration and builds.
4.2 Integration and Build
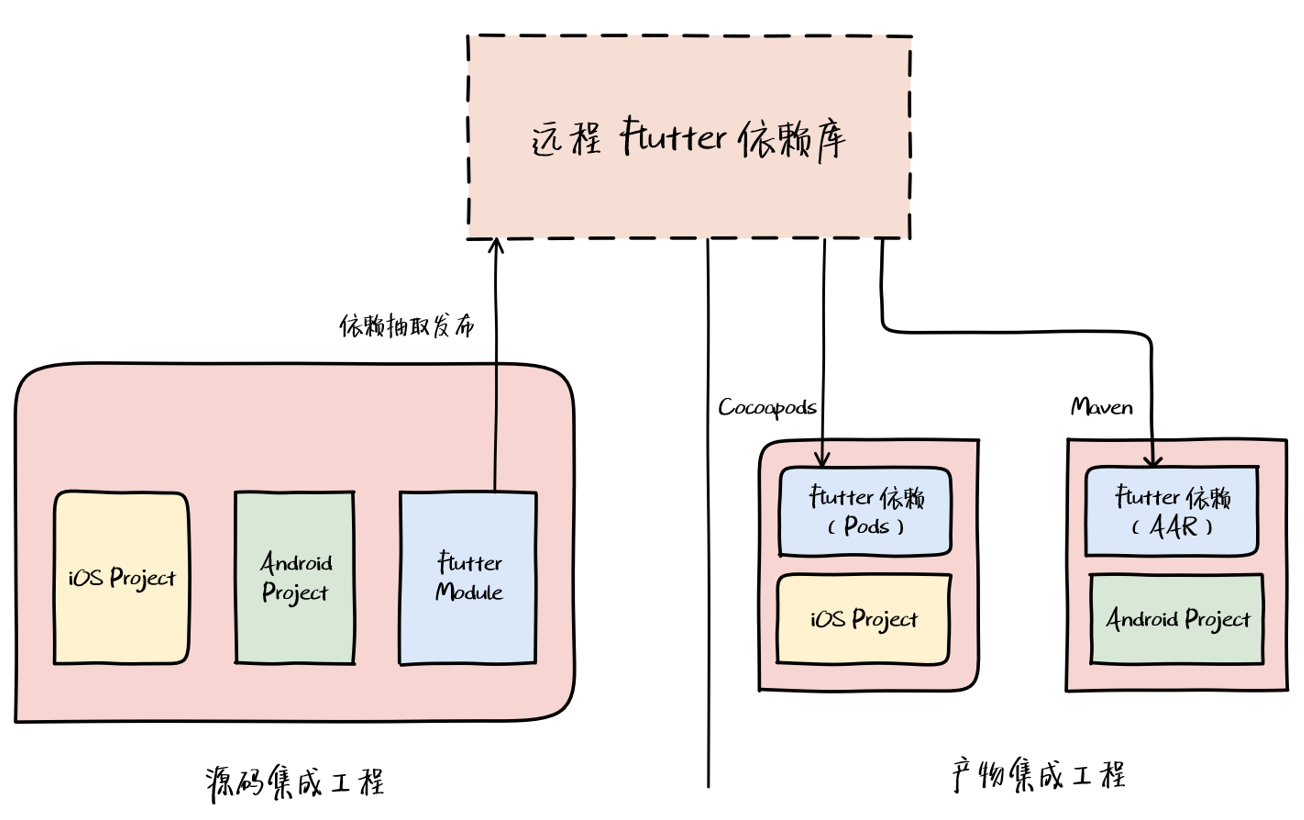
Two integration approaches:
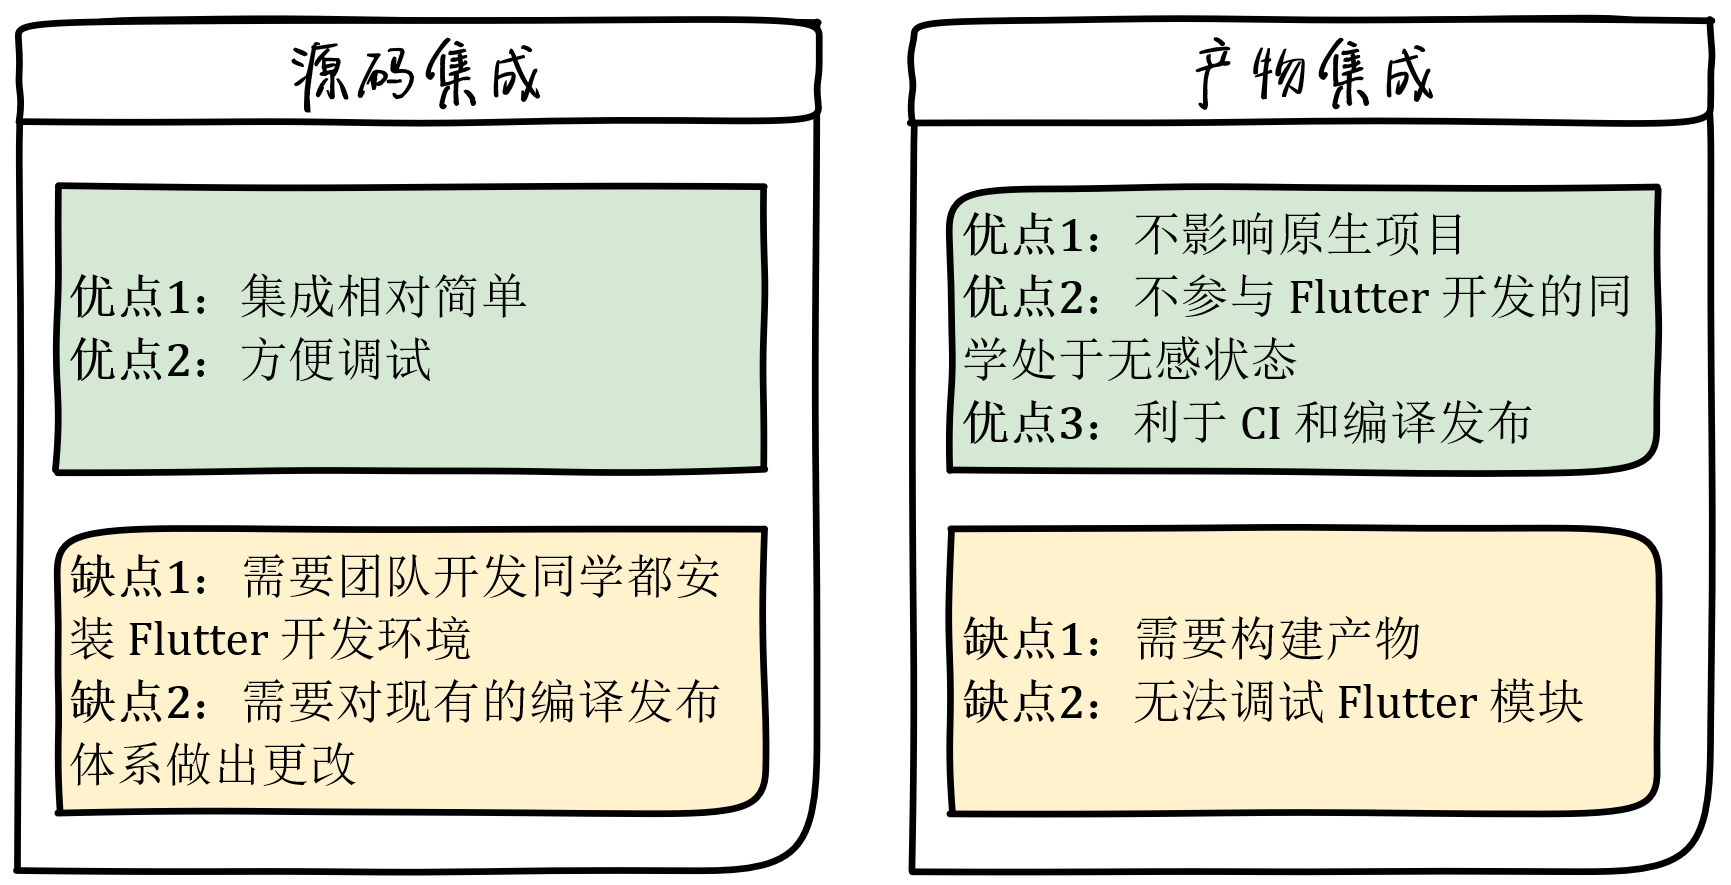
Source integration is needed for the Flutter dev branch; artifact integration is for everything else. Our hybrid project supports both: source integration on the Flutter dev branch for active development, then artifact extraction and publishing (iOS → Pods → CocoaPods; Android → AAR → Maven). Other branches just pod install or gradle sync to pick up the latest Flutter module.
Since artifact integration doesn’t support debugging, only Release artifacts need to be published — Debug and Profile versions serve no purpose in this context.
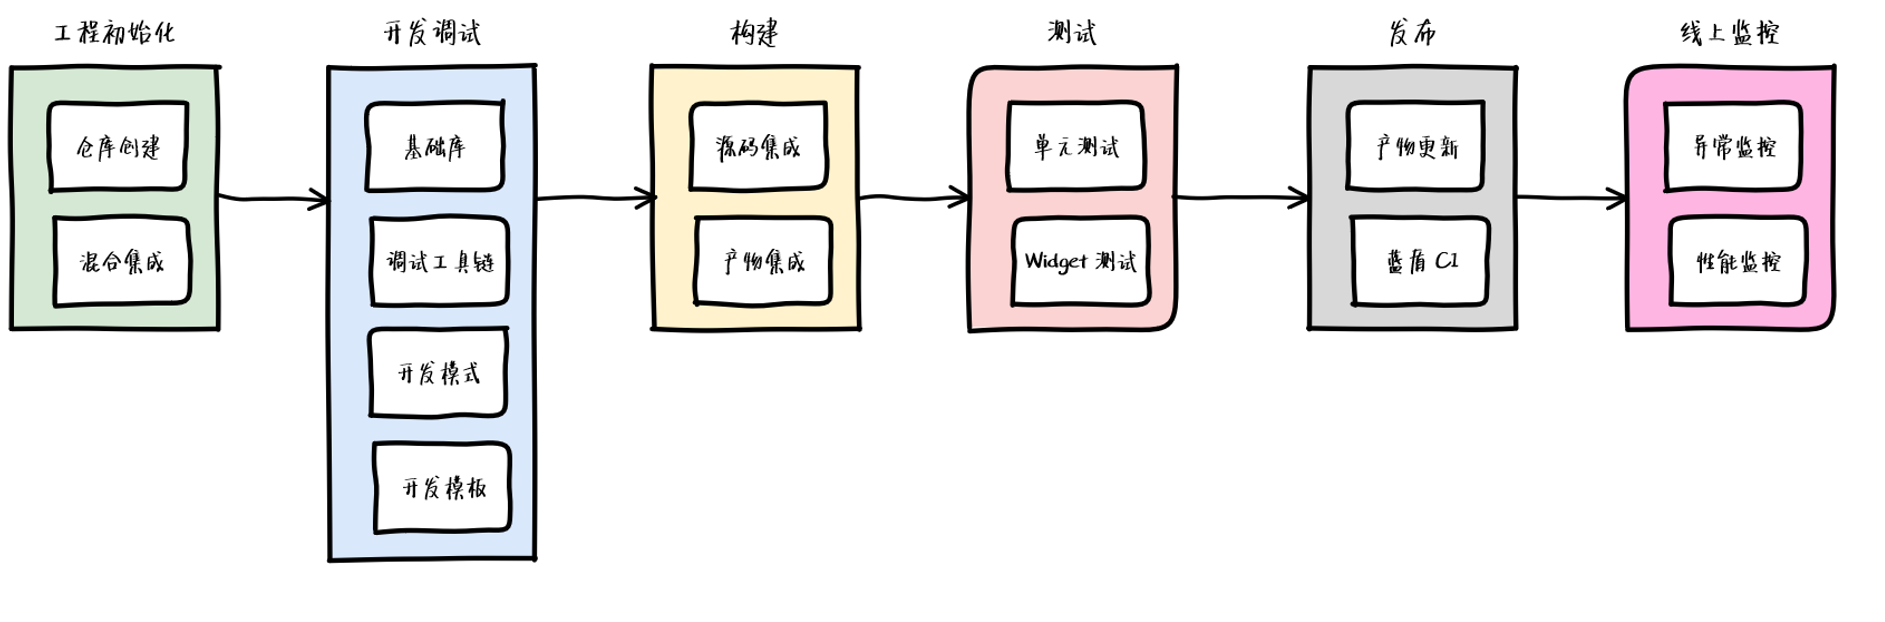
4.3 Workflow
After setting up the full hybrid project, we established an initial Flutter workflow. We’ll continue refining it as the hybrid development model matures.
Further reading: Exploring Flutter Hybrid Development Patterns Flutter Boost Hybrid Development: Practice and Source Code Walkthrough