In building the Flutter hybrid integration for “Fan Live,” we accumulated a fair amount of hard-won experience — worth sharing properly. This post starts from Flutter’s core principles and rendering pipeline, uses that to compare three cross-platform approaches, then dives into an analysis of four different Flutter hybrid development modes, and closes with some thoughts on engineering tooling for hybrid projects.
“Only by going deep can you speak simply.” I’ve written about Flutter before, but those posts leaned toward learning notes and source code annotations — scattered and a bit dense. This one is a more cohesive synthesis. I’ll aim to be clear and progressive, with source code references for key points but no wall-to-wall code dumps. The real learning from source code happens when you read it yourself — check out Flutter’s Framework and Engine source directly, or dig into my earlier posts.
Alright, let’s get into it.
1. Flutter Core Principles
1.1 Flutter Architecture
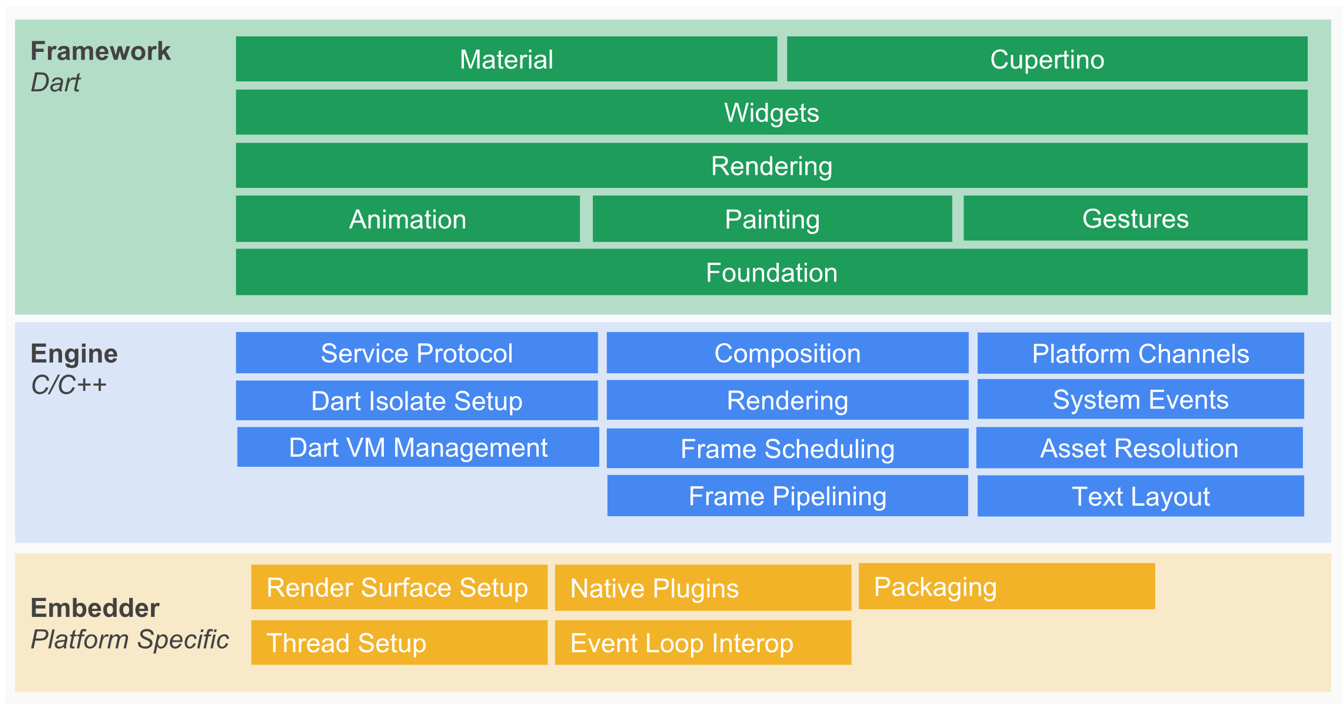
Note: This diagram is from Flutter System Overview
Every Flutter internals post starts with this diagram. And rightly so — it’s genuinely useful for building an overall mental model before getting lost in the details.
Flutter’s architecture is layered, with three tiers from bottom to top: Embedder, Engine, and Framework.
- Embedder: The OS adaptation layer — handles rendering surface setup, thread configuration, etc.
- Engine: Implements the Flutter rendering engine, text layout, event handling, and the Dart runtime. Includes the Skia graphics library, Dart VM, and Text engine. Skia and Text provide the lower-level rendering and layout capabilities that the upper layers call into.
- Framework: A Dart-implemented UI SDK. From top to bottom it includes Material/Cupertino component libraries, base widget library, graphics, gesture recognition, and animation.
The diagram rewards study alongside the source code. But since this isn’t a source code walkthrough, let’s focus on understanding how Flutter works — starting with the rendering pipeline.
1.2 Flutter Rendering Overview
Here’s a high-level summary of the Flutter rendering flow:
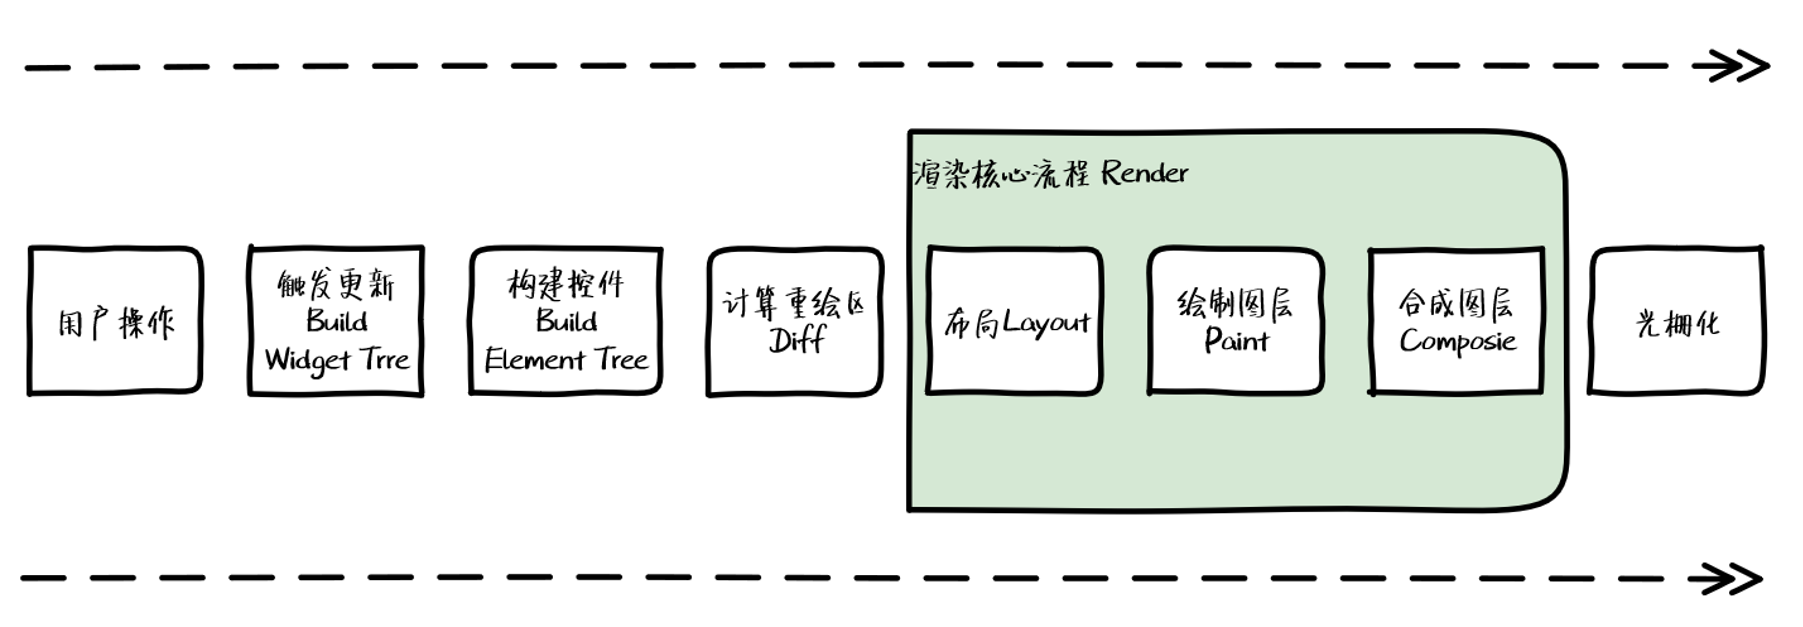
User interaction triggers a Widget Tree update. An Element Tree is built, the repaint region is calculated, and that information is propagated to the RenderObject Tree. From there: layout, painting, compositing, and engine rendering.
Before diving into each stage, let’s look at the key data structures involved.
1.3 Data Structures in Flutter Rendering

The key data structures are three trees and a Layer. RenderObject holds Layer. Let’s look at the tree relationships first.
Consider this simple layout:
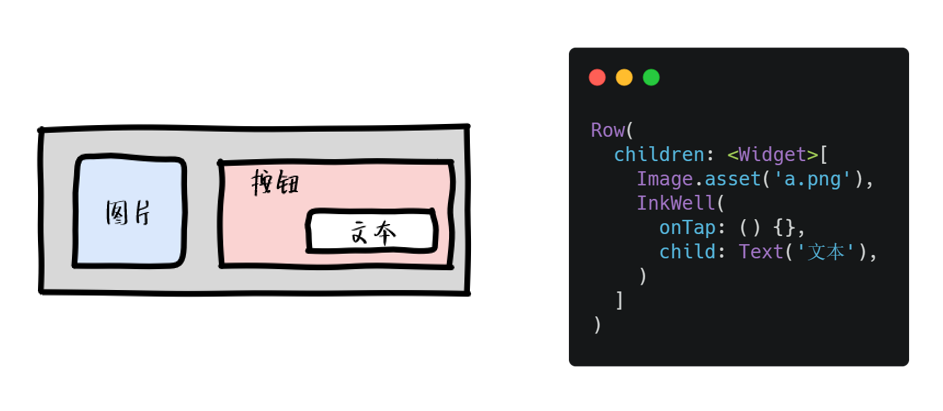
The three-tree relationship looks like this:
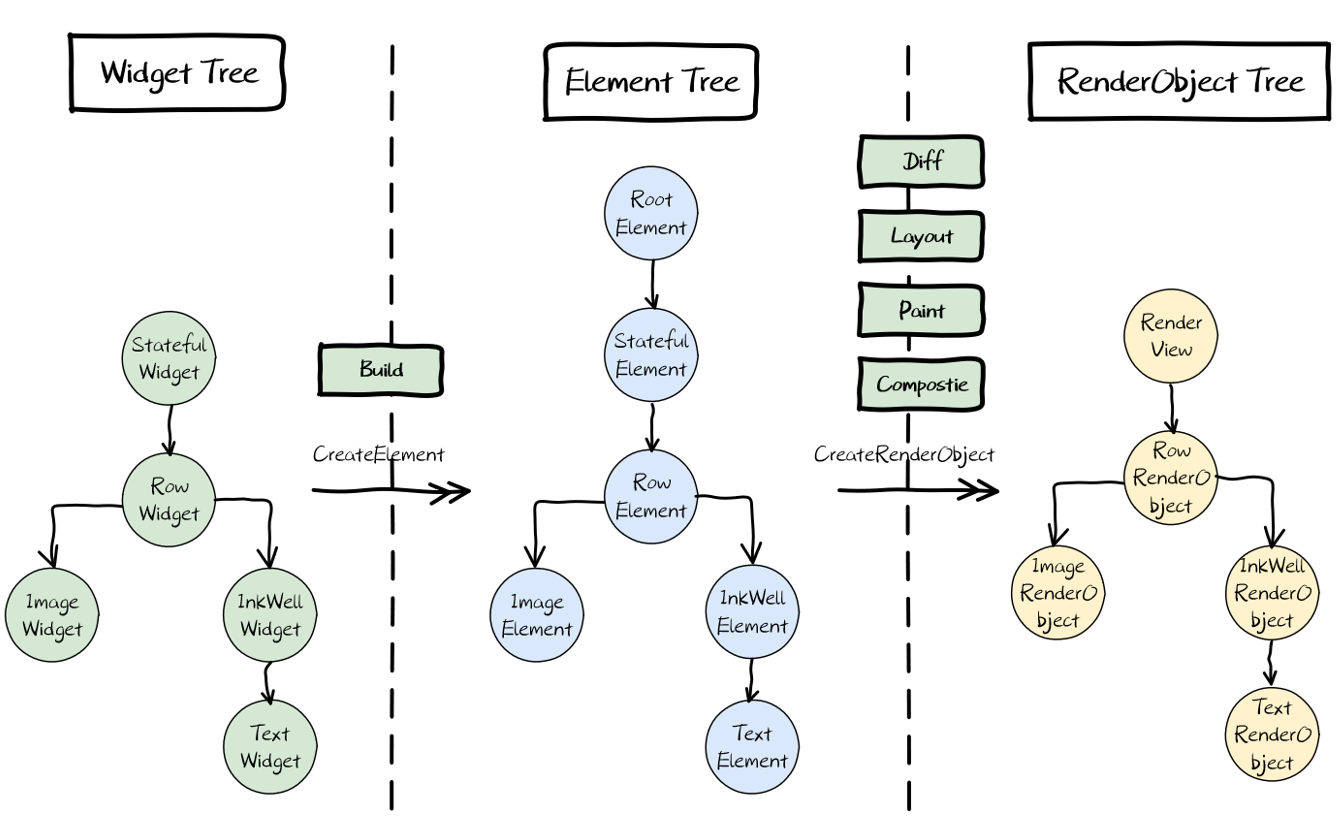
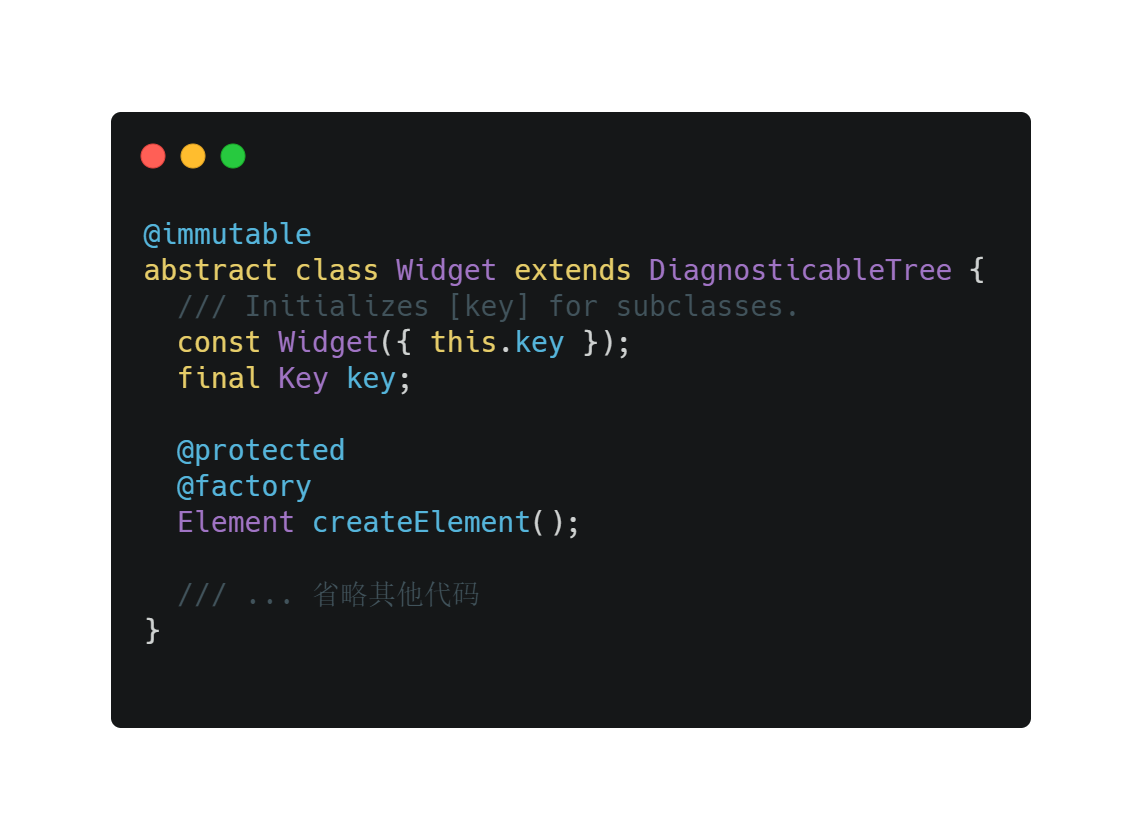
1.3.1 Widget Tree

The Widget Tree is the fundamental unit of UI description — the developer’s way of expressing what the interface should look like.
Key point: Widgets are immutable. When view configuration changes, Flutter rebuilds Widgets to trigger updates. This data-driven UI model is both simple and efficient.
Why make Widget Tree immutable? Flutter’s UI development is reactive, championing “simple is fast.” Rebuilding the Widget Tree top-to-bottom on changes is conceptually simple — you don’t need to track which nodes are affected by a given data change. And since a Widget is just a lightweight configuration data structure, creating and destroying them is cheap.
1.3.2 Element Tree

The Element Tree is the instantiation of Widgets — created via Widget’s createElement factory method, and it persists in the Dart runtime context. It carries the build context and bridges the structured configuration information through to the final render.
Elements persist — they’re not rebuilt like Widgets — because rebuilding and re-rendering the Element Tree would be enormously expensive. The transition from Element Tree to RenderObject Tree therefore includes a Diff step that computes the minimal repaint region.
Important: Elements hold references to both Widgets and RenderObjects. But neither Widget nor Element actually handles rendering — they’re commanders. The RenderObject is what actually renders the configuration.
1.3.3 RenderObject Tree

RenderObjects are created by Elements and associated via Element.renderObject. They receive information updates from Elements and, like Elements, persist in the Dart runtime context — they’re the primary objects responsible for rendering.
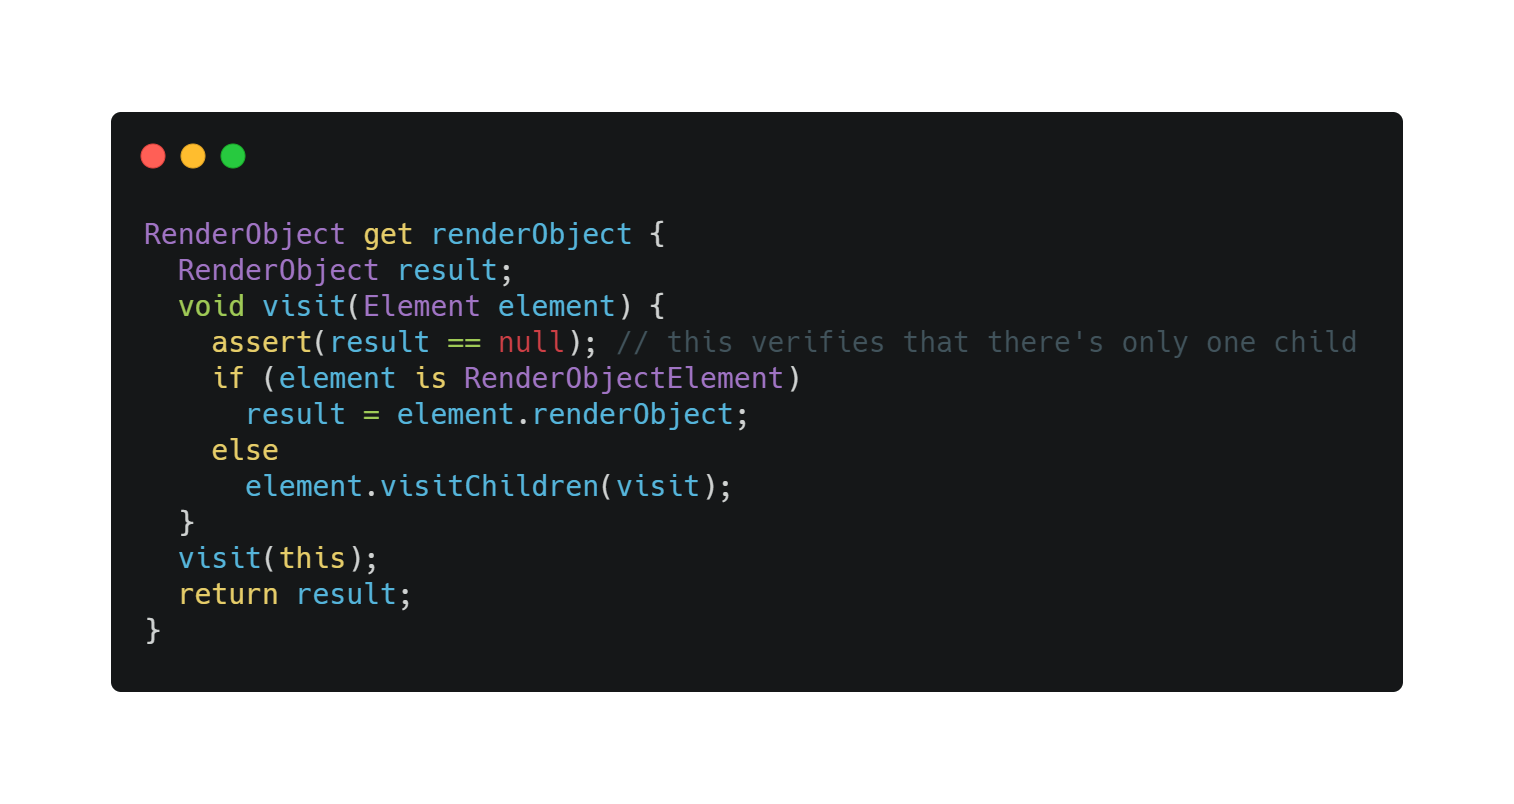
The RenderObject Tree goes through four stages during rendering:
- Layout
- Paint
- Composite
- Render
Layout and Paint happen within RenderObjects. Flutter traverses the tree depth-first to determine each object’s position and size, then paints them onto separate layers. Compositing and rendering are then handled by Skia.
Why three trees instead of two? Can we skip Element and build RenderObjects directly from Widgets?
Technically yes, practically no. Going directly from Widget to RenderObject would cause severe performance issues. Widgets are immutable; Elements are mutable. Element acts as an abstraction layer over Widget tree changes (like React/Vue’s VDOM Diff), propagating only the genuinely changed parts to the RenderObject Tree — minimizing repaints and maximizing rendering efficiency. Flutter borrowed heavily from React/Vue’s reactive programming ideas.
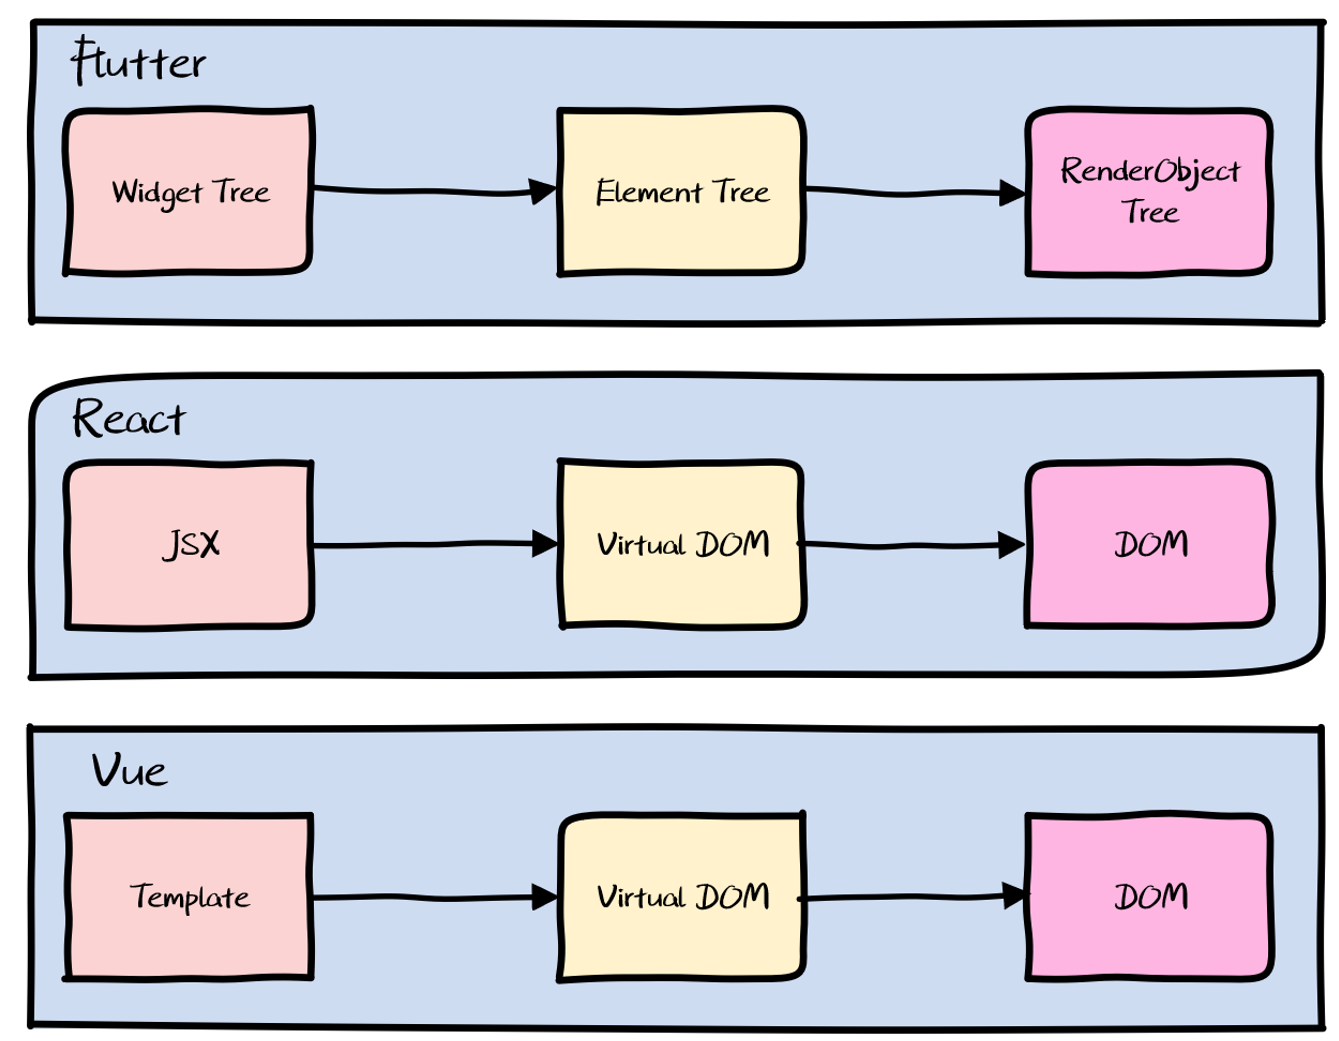
A quick word on Virtual DOM’s well-known advantages:
- Diff algorithm minimizes actual DOM updates. In Flutter this is the Element Tree.
- Declarative UI makes code more maintainable. Dart’s declarative widget syntax reflects this.
- Abstracting real nodes enables cross-platform. Flutter doesn’t need this — it’s already a cross-platform self-drawing engine. But flip the thought: what if the Widget Tree were built not in Dart but in a runtime-interpreted language like JavaScript? You’d have dynamic updates. This is exactly the approach taken by MXFlutter.
1.3.4 Layers

Layers attach to RenderObjects (via RenderObject.layer) and serve as the carrier for painting operations, also caching their results. Flutter paints onto separate layers, then composites those cached layers according to rules to produce the final rendered image.
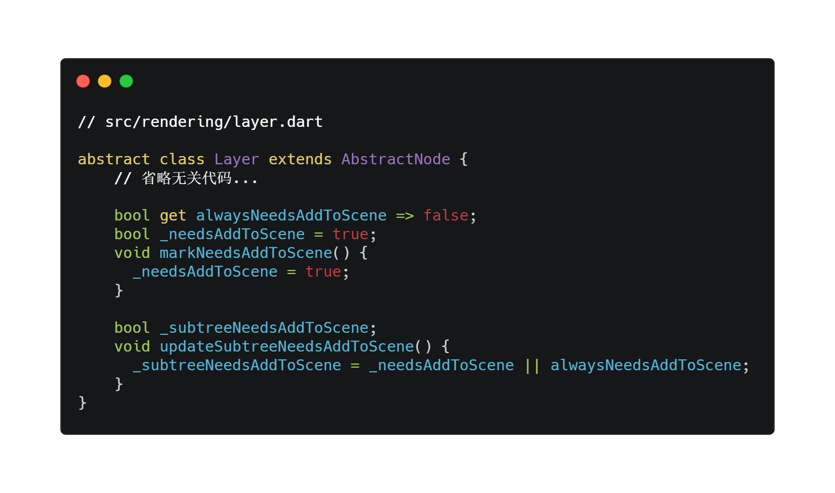
The Layer base class has two properties: _needsAddToScene (“this layer needs updating”) and _subtreeNeedsAddToScene (“something in this subtree needs updating”). Layers call markNeedsAddToScene() when their state changes — for example, when children are added/removed from a ContainerLayer, when opacity changes in an OpacityLayer, or when the picture changes in a PictureLayer.
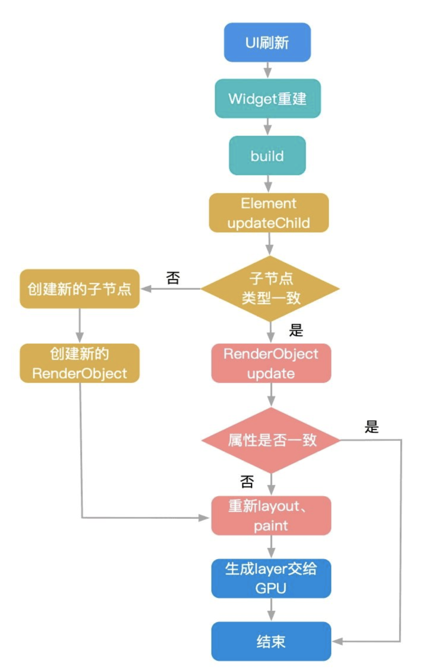
1.4 The Rendering Pipeline
Six stages:
- Build
- Diff
- Layout
- Paint
- Composite
- Render
I’ll skip Diff and Render (they’re involved) and focus on the remaining four.
Note: This diagram is from How Xianyu Ensures Flutter Performance | Xianyu Tech
1.4.1 Build
Two different build paths depending on widget type.
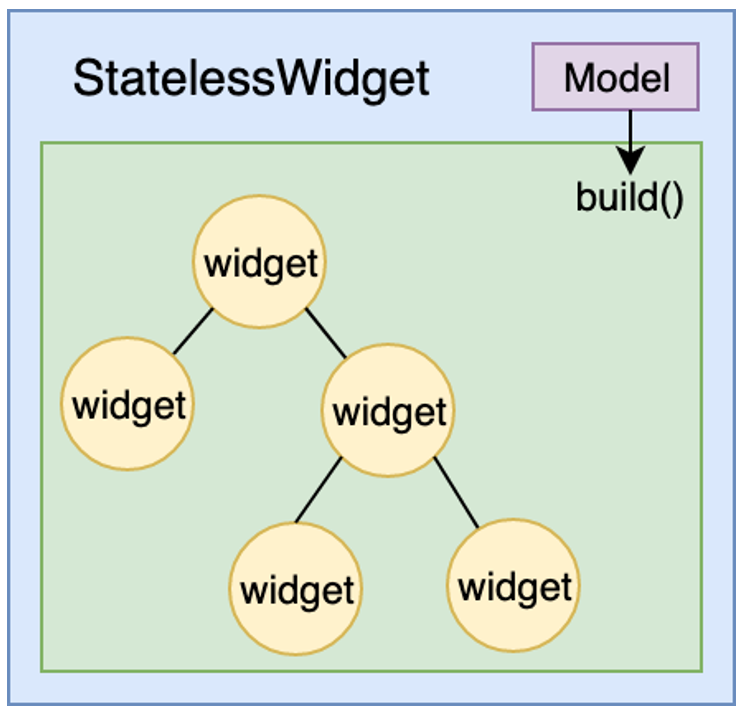
StatelessWidget: Everything it builds is determined by its configuration parameters (props). Once created, it doesn’t care about and doesn’t respond to data changes.
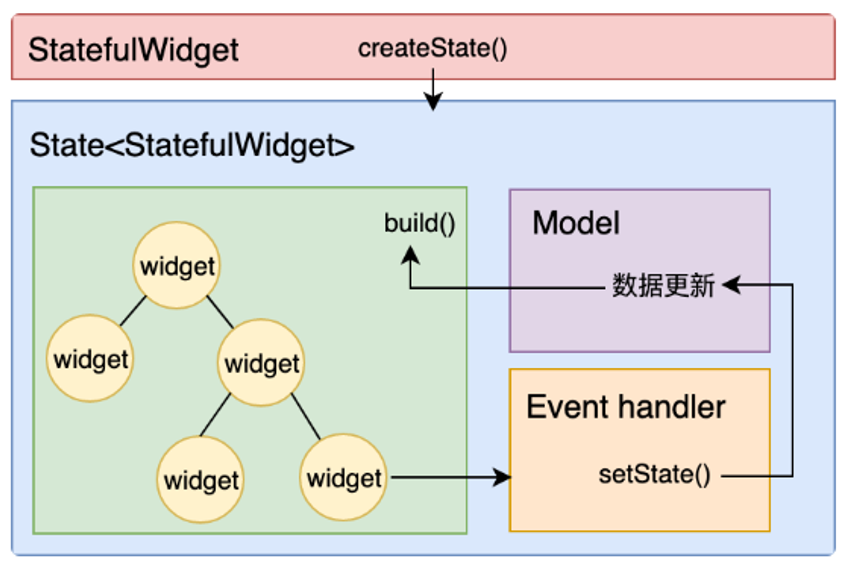
StatefulWidget: Beyond the static configuration from its parent, it also needs to respond to user interaction and internal data changes (like network responses) in the UI. These widgets use a State class for UI construction. The State’s build method builds the UI; ultimately buildScope is called, which traverses _dirtyElements and calls rebuild/build on each.
Note: Both diagrams are from Flutter Core Technology and Practice | Chen Hang
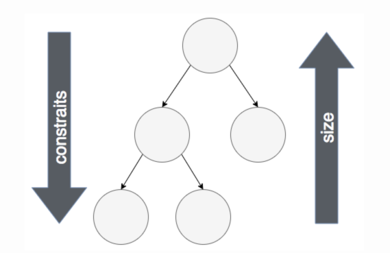
1.4.2 Layout
Only layout widgets (Container, Padding, Align, etc.) trigger layout. Each RenderObject node does two things:
- Call its own
performLayoutto compute layout - Call its child’s
layout, passing down parent constraints
.png)
This recurses through the tree — each node is constrained by its parent and computes its own size. The parent can then position its children according to its own logic, completing the Layout phase.
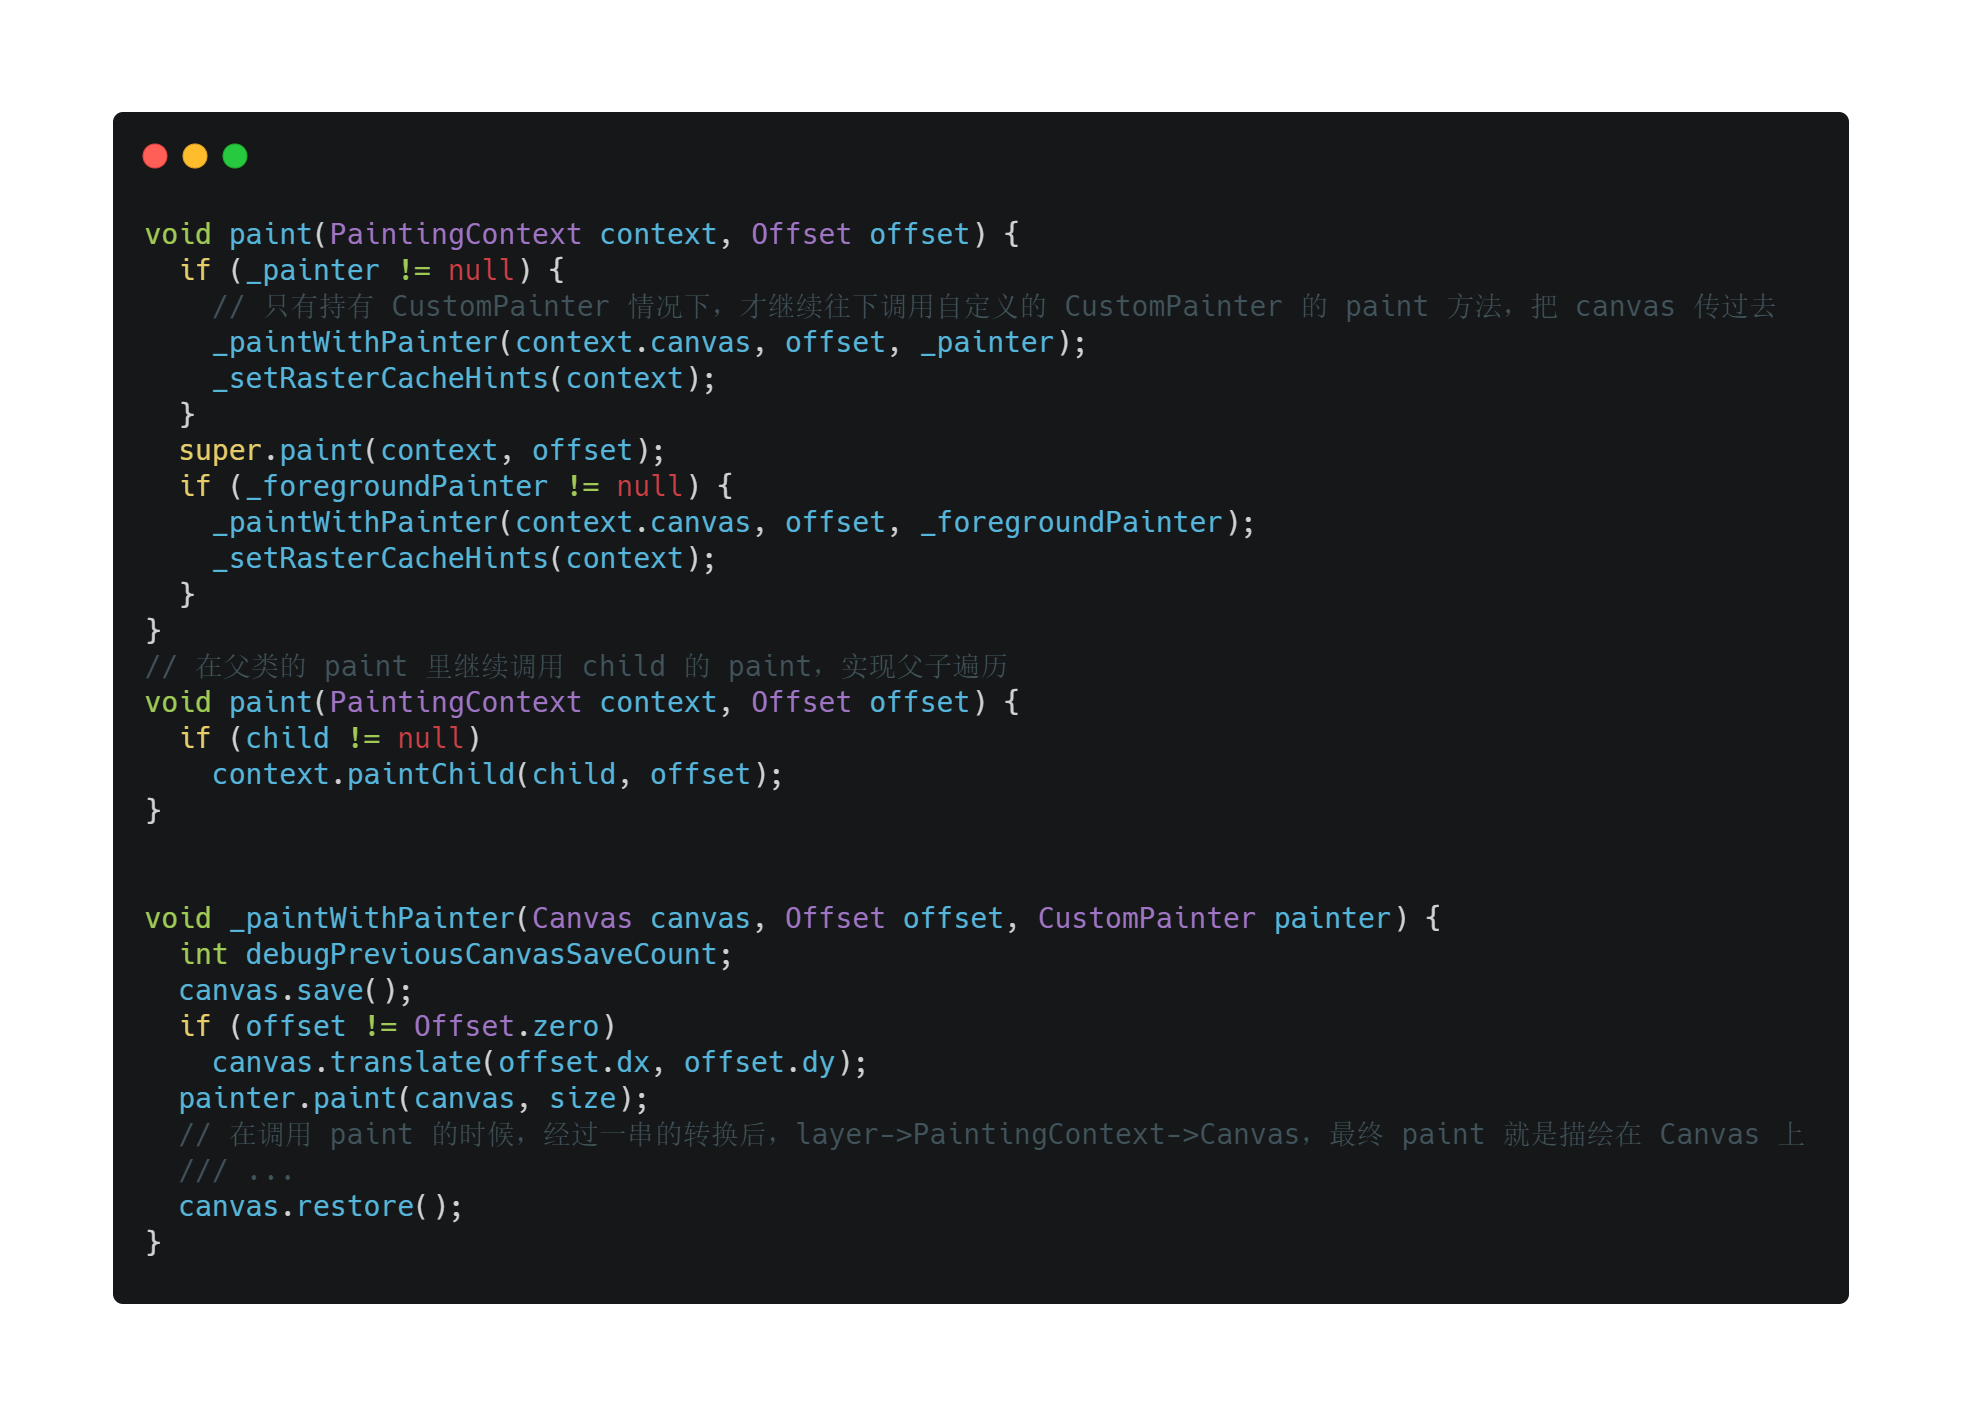
1.4.3 Paint
The rendering pipeline identifies which RenderObjects need repainting. If a CustomPainter is implemented, it’s called; then the child’s paint is called. Without CustomPainter, the child’s paint is called directly.
Through a chain of conversions (layer → PaintingContext → Canvas), painting ultimately draws onto a Canvas.
1.4.4 Composite
Compositing does three things:
- Combine all Layers into a Scene
- Submit the Scene to the Engine via
ui.window.render - Engine computes the final display result for all Layers and renders to screen
.png)
2. Cross-Platform Approach Comparison
Cross-platform development is inevitable — it increases code reuse, reduces platform-specific work, and lowers overall cost. The industry broadly recognizes three approaches:
- Web container
- Generic web container
- Self-rendering engine
2.1 Web Container
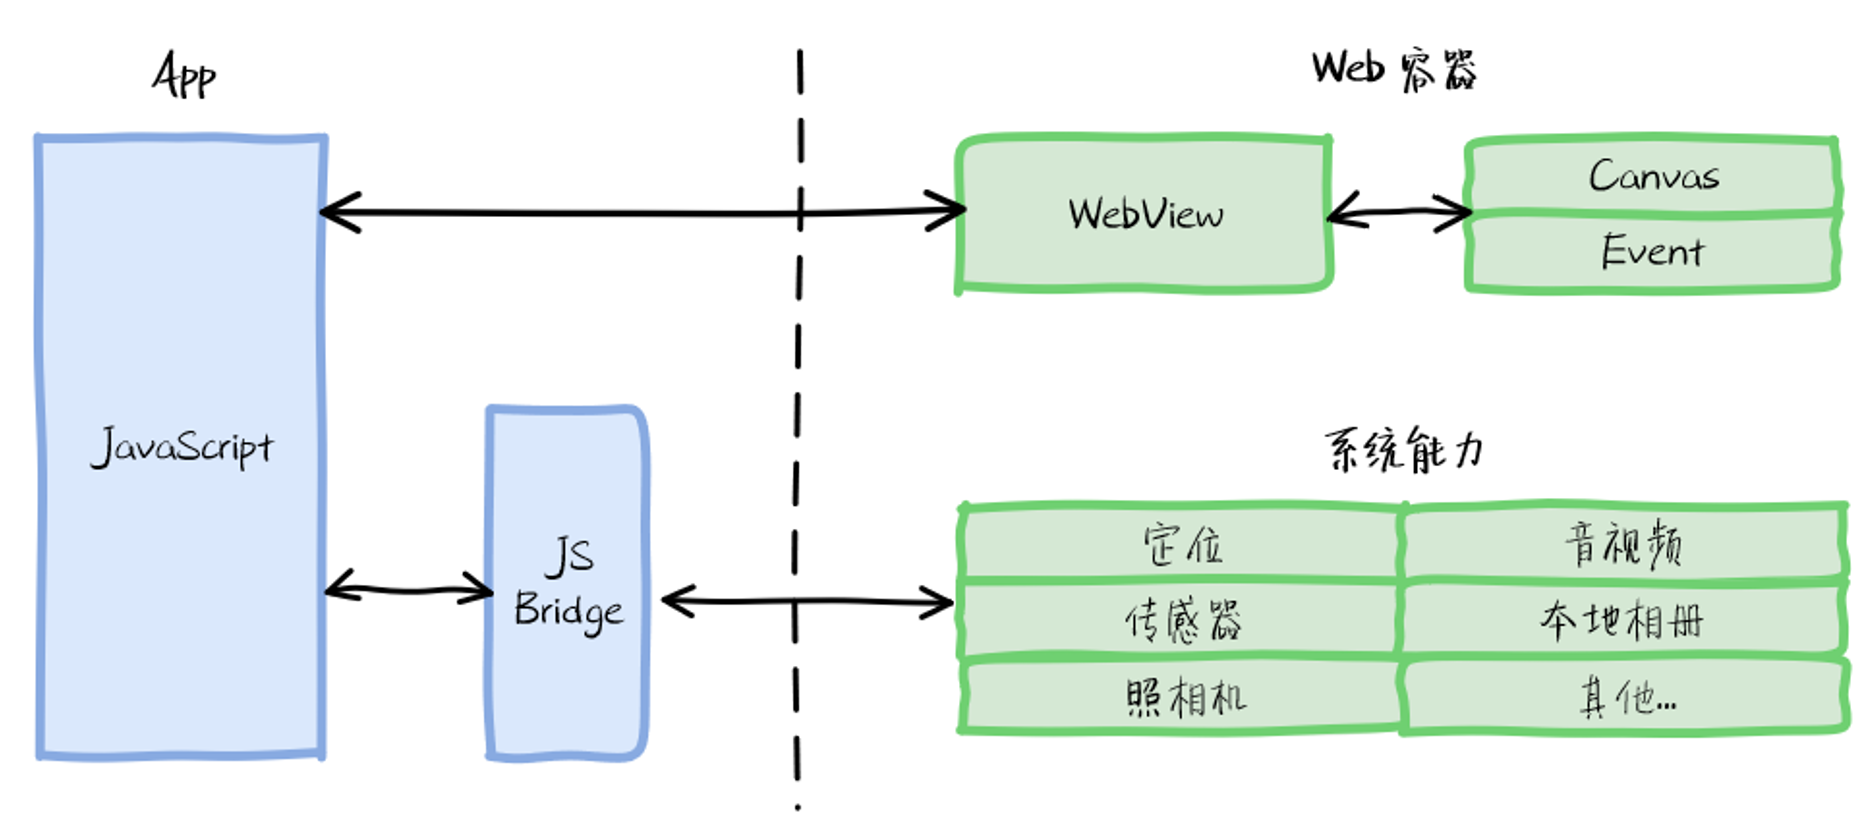
Web container solutions — H5, Cordova, Ionic, WeChat mini-programs — use web technologies delivered through a browser component (WebView). Write once, run in any browser. Native-to-web communication goes through JSBridge, which exposes native capabilities to JavaScript. Page rendering follows the standard browser rendering pipeline.
Pros: Simple, built-in hot updates, rich ecosystem, strong compatibility, great developer experience.
Cons (otherwise there’d be no market for the other two approaches):
- Complex browser rendering pipeline, pages need online loading — performance is network-dependent. Expect white screen time (PWA aside), and a very obvious gap from native interaction quality.
- JSBridge requires separate implementation for each platform, and communication efficiency is mediocre.
2.2 Generic Web Container

Enter the generic web container, represented by React Native, Weex, and Hippy.
- Abandons browser rendering in favor of native controls — better interaction quality.
- Supports offline packages — eliminates long white screens.
- Keeps JavaScript — developer-friendly.
Cross-platform communication still goes through a Bridge to call native methods.
The vision is appealing, but practice reveals problems:
- Native controls improve experience and performance, but the same native control renders differently on different platforms — closing that gap requires substantial work.
- Bridge communication efficiency is mediocre — high-frequency communication scenarios cause frame drops.
2.3 Self-Rendering Engine
Can we have both — eliminate platform differences and maintain high performance?
Yes. The self-rendering engine approach doesn’t call native controls at all. Flutter draws everything itself.
Here’s an analogy: if you’re trying to sketch a suspect’s face, React Native can describe it in words — then someone else draws the picture, and React Native has to review whether it looks right. Flutter is the sketch artist itself; it draws the face directly and hands it over. The difference in efficiency and accuracy is obvious.
- Uses Skia to call OpenGL directly for rendering — high-performance rendering with no platform differences.
- Uses Dart, which supports both JIT and AOT — keeps developer efficiency high while executing dozens of times faster than JavaScript.
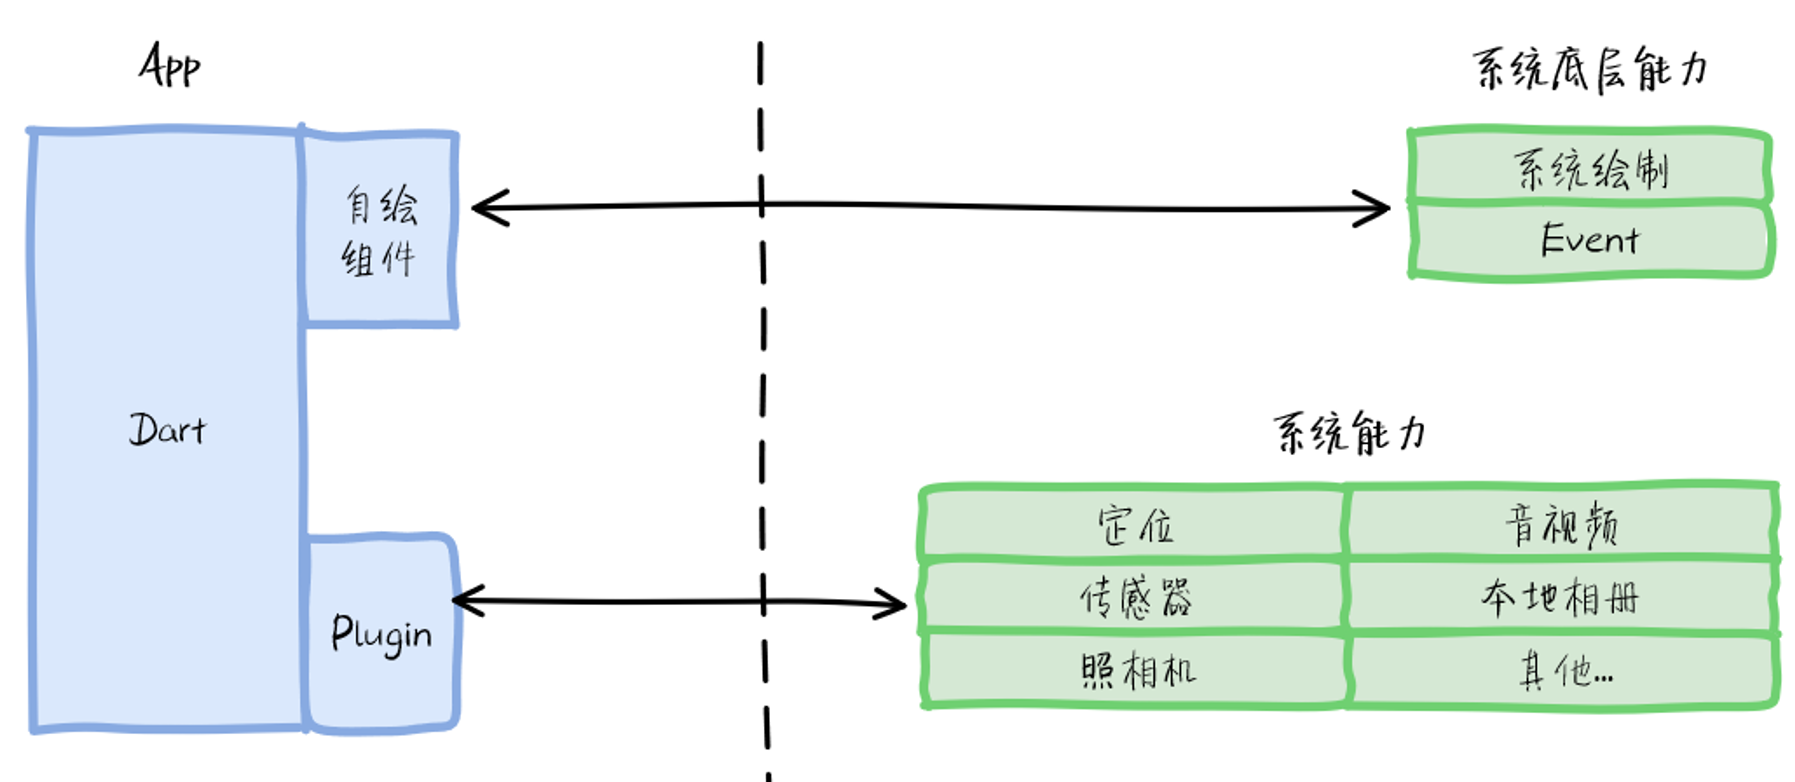
This approach lets Flutter minimize platform differences while matching native performance. Native system capabilities are exposed via Plugins that can be reused across Flutter projects. Flutter has become the most flexible of the three cross-platform approaches, and the most attention-grabbing one in the industry.
On communication efficiency: Flutter’s Channel approach far outperforms JSBridge. Flutter offers three channel types:
- BasicMessageChannel: For strings and semi-structured data, full-duplex, bidirectional.
- MethodChannel: For method calls — Dart calls native methods and receives results via Result callbacks.
- EventChannel: For data streams — Dart listens for real-time messages from native; native pushes data as it becomes available.
MethodChannel is the most commonly used. Here’s how it works:
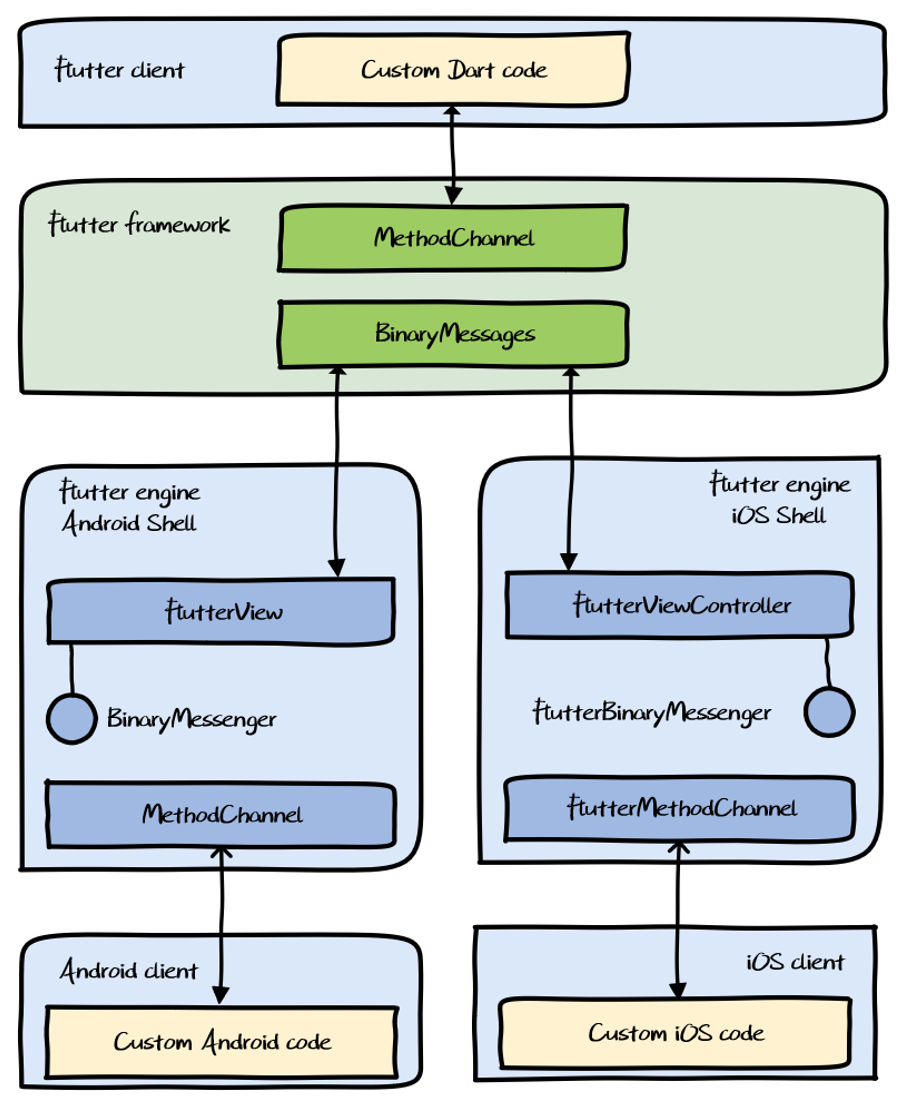
Why is Channel performance better? The entire call stack uses machine code. JNI communication runs at the same efficiency as JavaVM internal communication — the full round-trip is equivalent to native internal communication. There is, however, a bottleneck: methodCall requires encoding/decoding, and that’s where most of the overhead is. So MethodChannel is not suitable for large data payloads.
For example, if you want to display a camera preview in Flutter UI, streaming every captured frame through MethodChannel from native to Dart would be enormously expensive — image and video data transmitted through message channels causes serious memory and CPU pressure. Flutter provides a Texture-based image data sharing mechanism for cases like this.
Texture and PlatformView are outside this post’s scope — interested readers can explore further on their own.
3. Flutter Hybrid Development Modes
3.1 Hybrid Structures
Flutter hybrid projects have two main structural approaches:
- Unified management mode
- Three-way separation mode
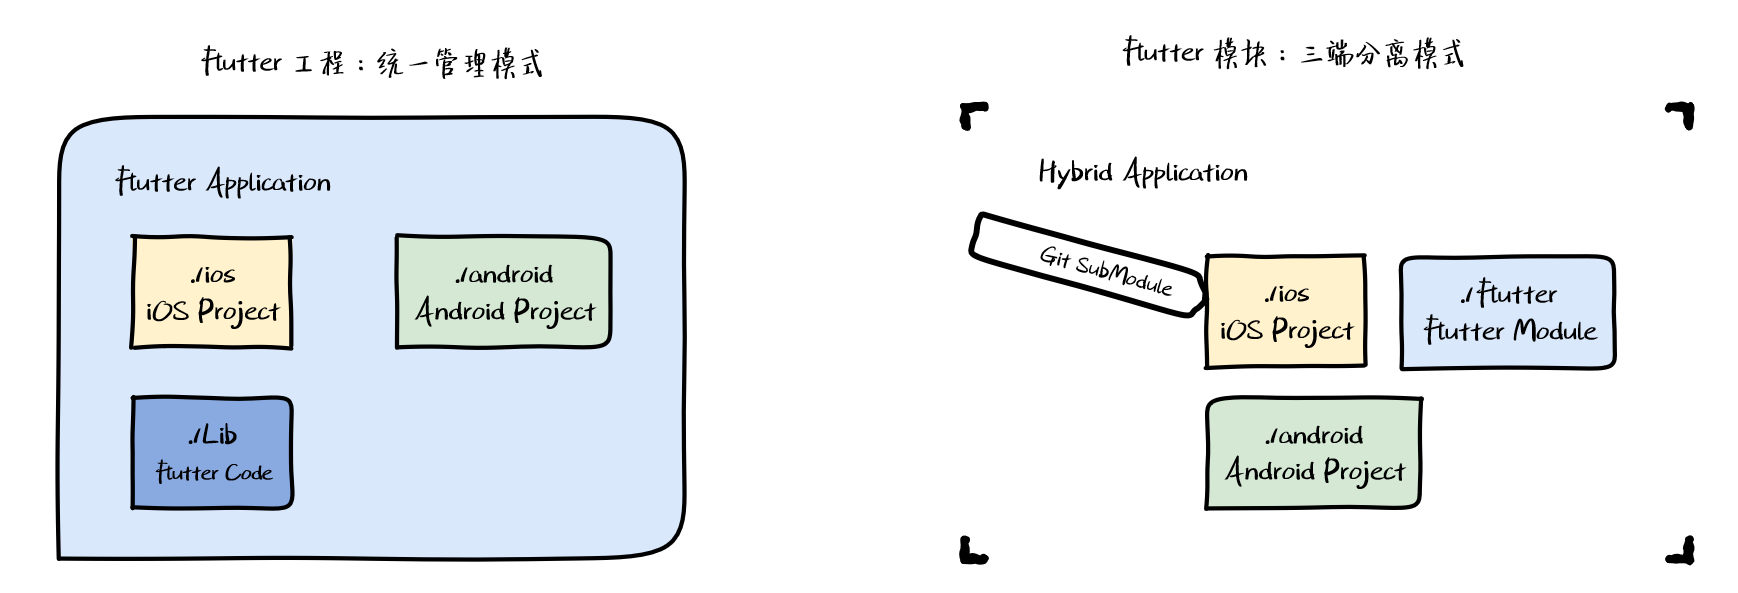
Unified management mode is a standard Flutter Application project where the ios/ and android/ directories in the Flutter output are natively mixed — similar to React Native’s hybrid approach. The downside is that as the native project grows, coupling with the Flutter project becomes severe and upgrades get complicated. This mode only makes sense when Flutter is the primary layer and native is supplementary. It was also the only option before Google added Flutter Module support.
Three-way separation mode is enabled by Flutter Module. A Flutter Module produces a Framework/Pods for iOS and an AAR for Android. Native projects consume it like any other third-party SDK via CocoaPods or Maven. This enables true three-way separation — Flutter, iOS, and Android each in their own repository.
3.2 Hybrid Navigation Stack
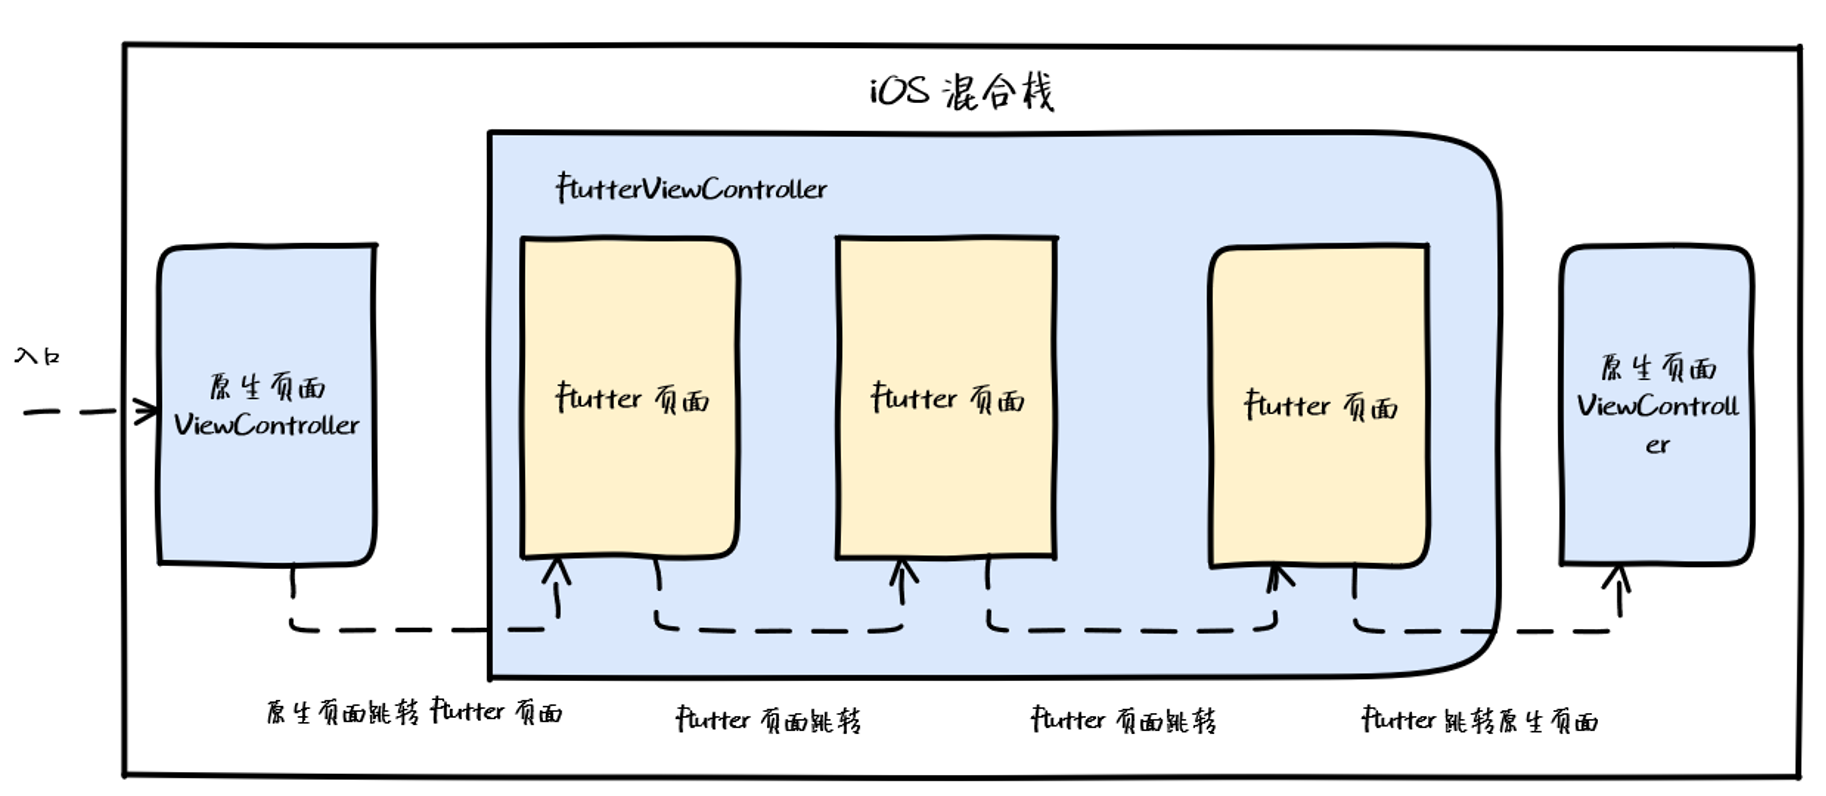
Setting aside lifecycle and communication layer concerns, the hybrid navigation stack needs to handle four core scenarios:
- Native → Flutter
- Flutter → Flutter
- Flutter → Native
- Native → Native
3.2.1 Native → Flutter
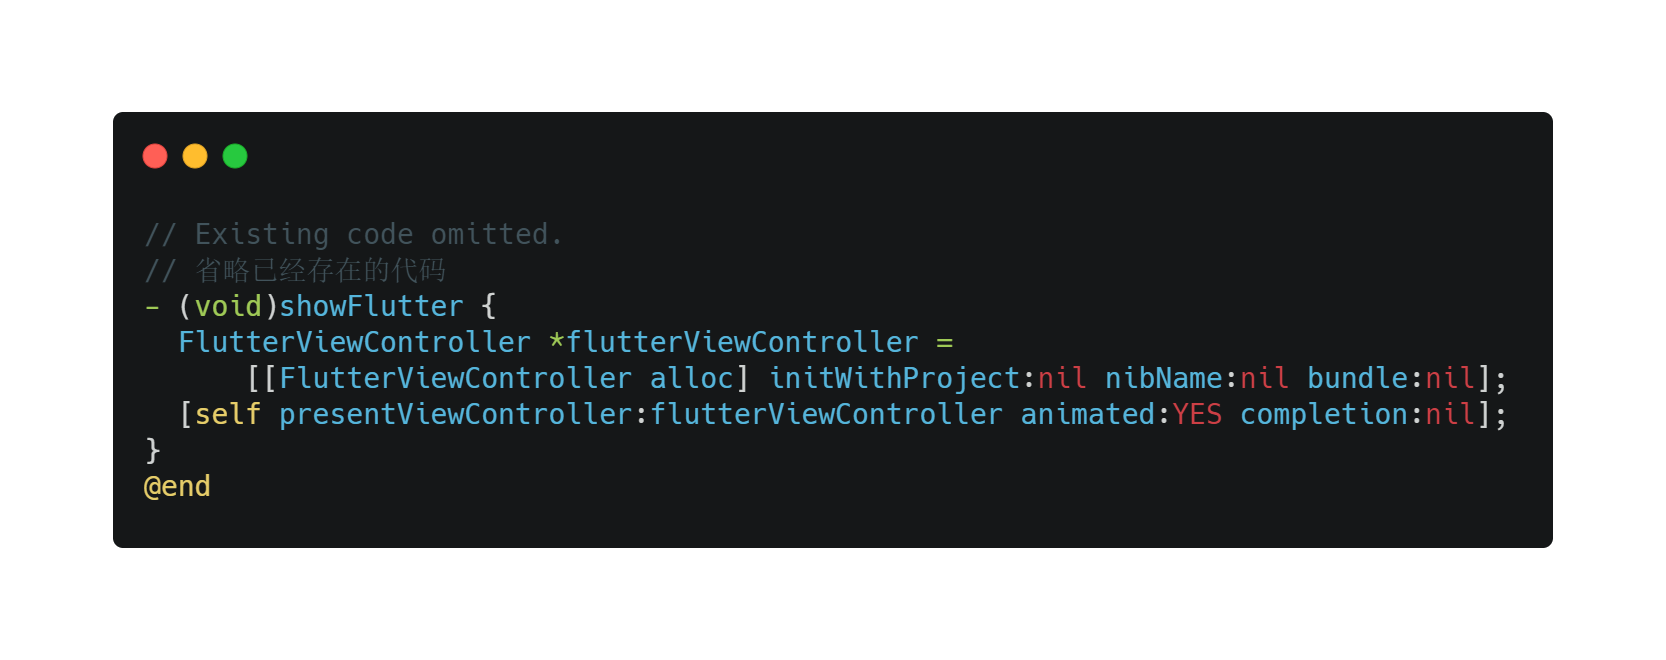
This is the simplest case. Flutter Engine already provides what you need: FlutterViewController on iOS and FlutterView on Android (wrap it yourself to get a FlutterActivity). Initialize the Flutter container using the running engine, set the initial route, and navigate to it natively.
3.2.2 Flutter → Flutter
Two approaches (covered in detail later):
- Use Flutter’s own Navigator stack
- Create a new Flutter container and use the native navigation stack
3.2.3 Flutter → Native
There are actually two sub-cases: opening a native page (open, which includes but isn’t limited to push) and returning to a native page (close, which includes but isn’t limited to pop).
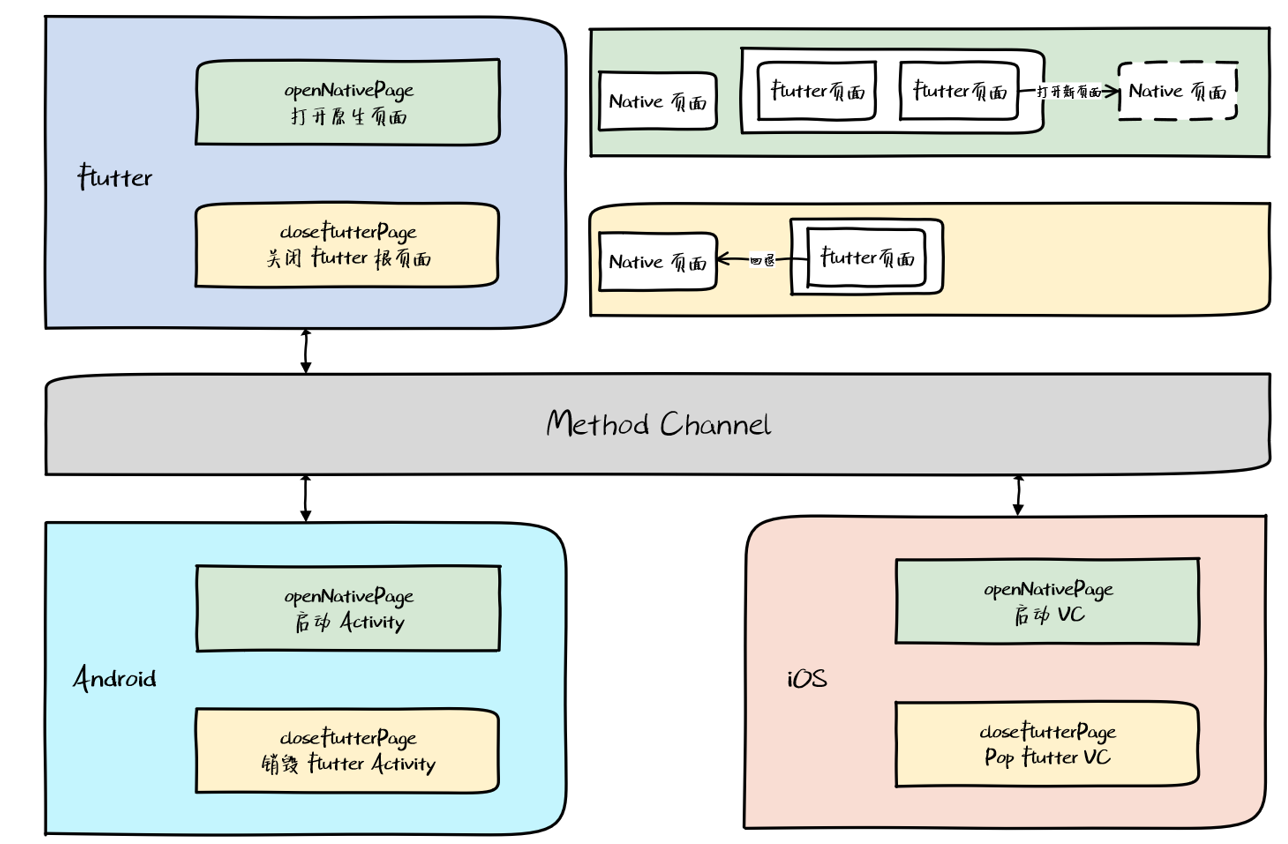
This is more complex. It requires using MethodChannel for Dart-to-platform communication. Dart sends open or close instructions; native executes the appropriate logic.
3.2.4 Native → Native
Nothing special here — just use the native navigation stack.
3.3 Hybrid Modes
To solve the hybrid stack problem and fill gaps in Flutter’s built-in hybrid support, the industry has proposed several frameworks. They fall into four patterns:
- WebView-style navigation stack (Flutter Boost)
- Navigator-based navigation stack (Flutter Thrio)
- Multi-engine mode
- View-level hybrid mode
3.3.1 Flutter Boost
Flutter Boost (open-sourced by Xianyu team) is mature, stable, and widely adopted. Its navigation stack approach matches what we described in section 3.2. For Flutter → Flutter navigation, it creates a new FlutterViewController and uses the native stack:
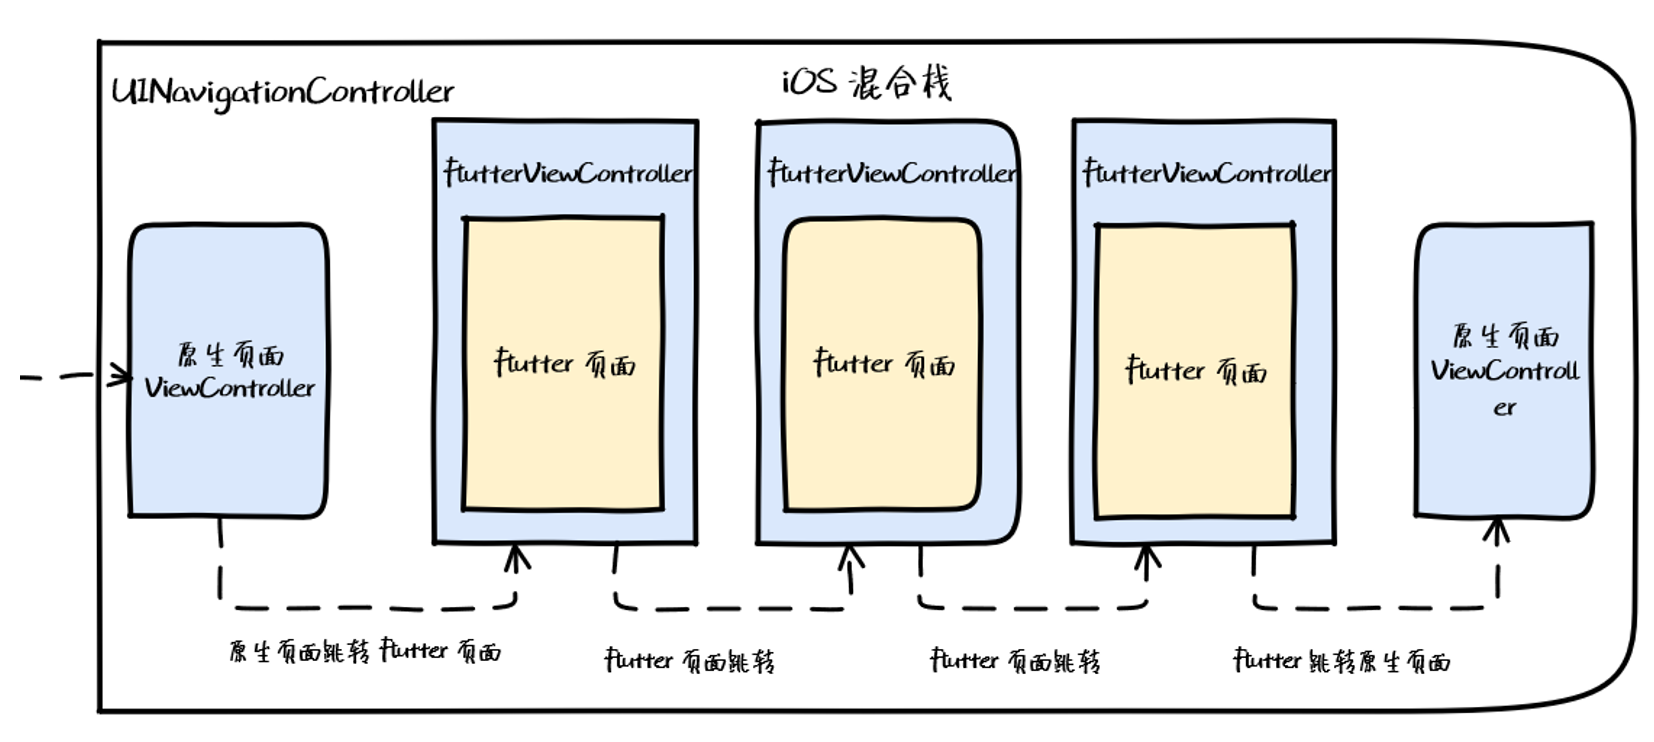
Benefit: Business developers work with Flutter containers like they work with WebViews — Flutter pages are like web pages. Simple, clean, with all routing logic centralized in native. Here’s the sequence diagram for open:
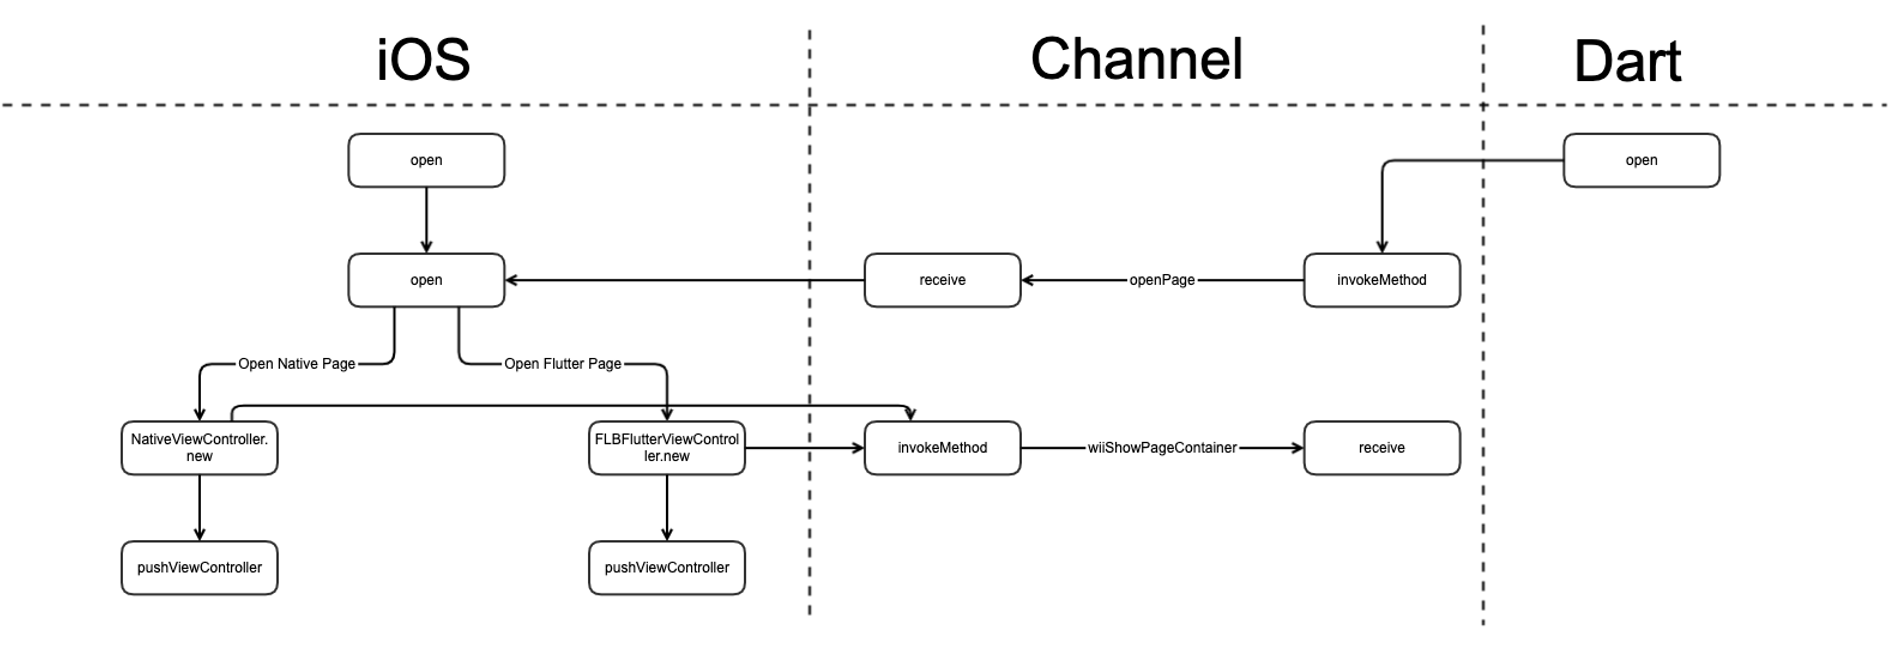
Two observations:
- The hybrid stack logic spans three layers: native, communication, and Dart.
- Flutter Boost’s
openimplementation is relatively simple.
Drawback: Every Flutter → Flutter navigation creates a new FlutterViewController, causing extra memory overhead for consecutive Flutter-to-Flutter transitions.
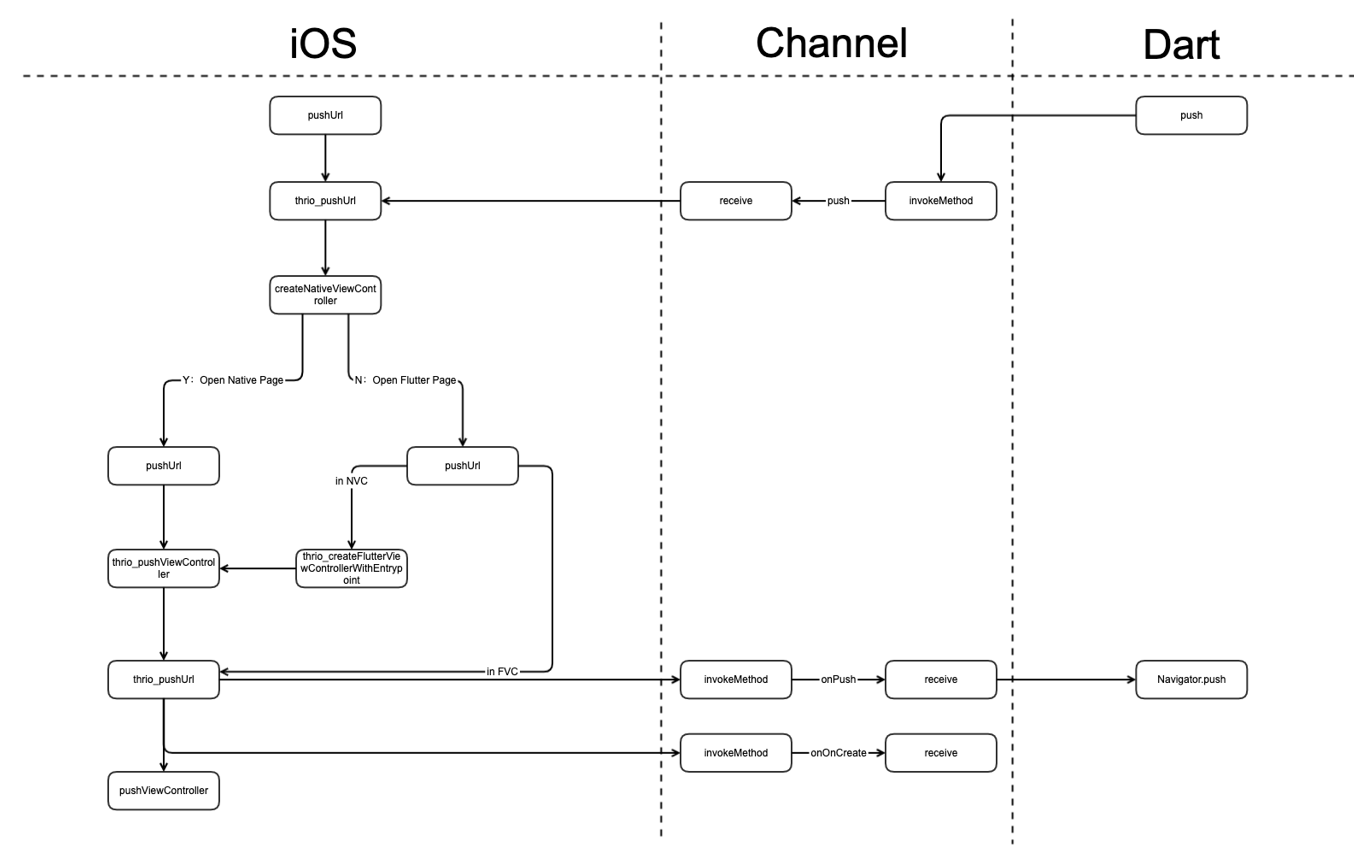
3.3.2 Flutter Thrio
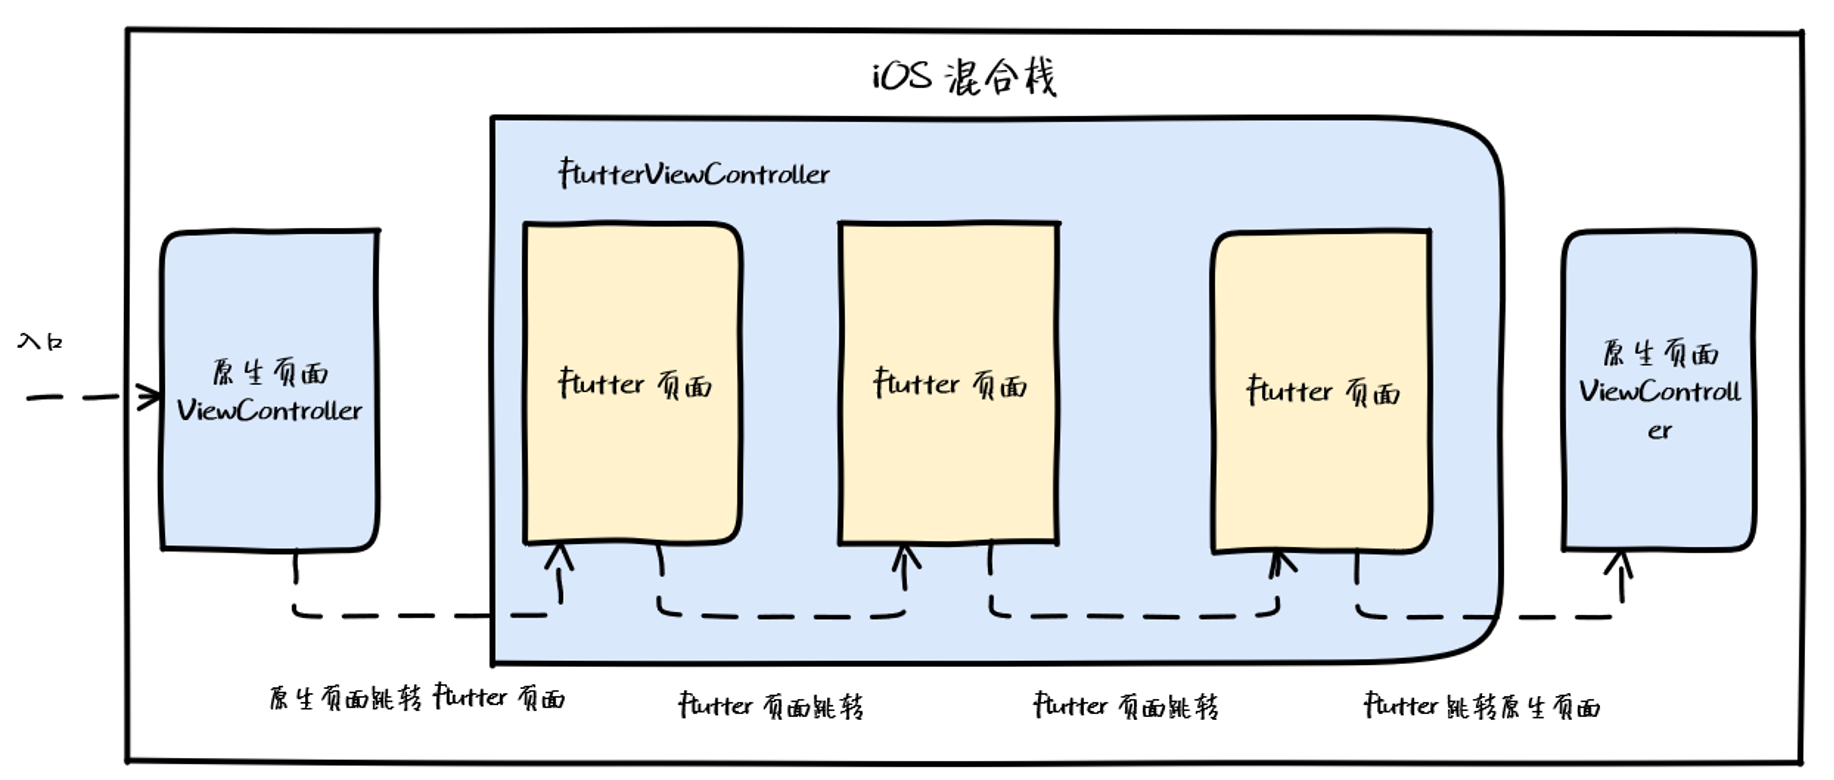
Hellobike developed Flutter Thrio specifically to address this. The key change: Flutter → Flutter navigation uses Flutter’s native Navigator stack.
Memory delta for consecutive Flutter-to-Flutter navigation:
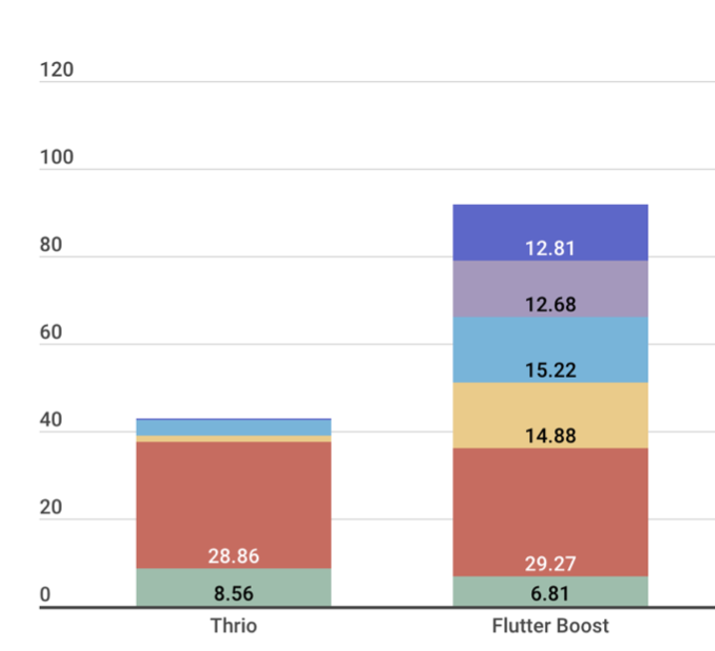
Key data:
- Starting a Flutter Engine costs ~30 MB.
- Each
FlutterViewControlleradds 12–15 MB.
Thrio meaningfully reduces memory usage here. The trade-off is complexity — by mixing native and Flutter Navigator stacks, the implementation is substantially more involved:
3.3.3 Multi-Engine Mode
Both Boost and Thrio are single-engine. Some teams use multi-engine. Before discussing that, here’s some background on Engine, Dart VM, and isolates.
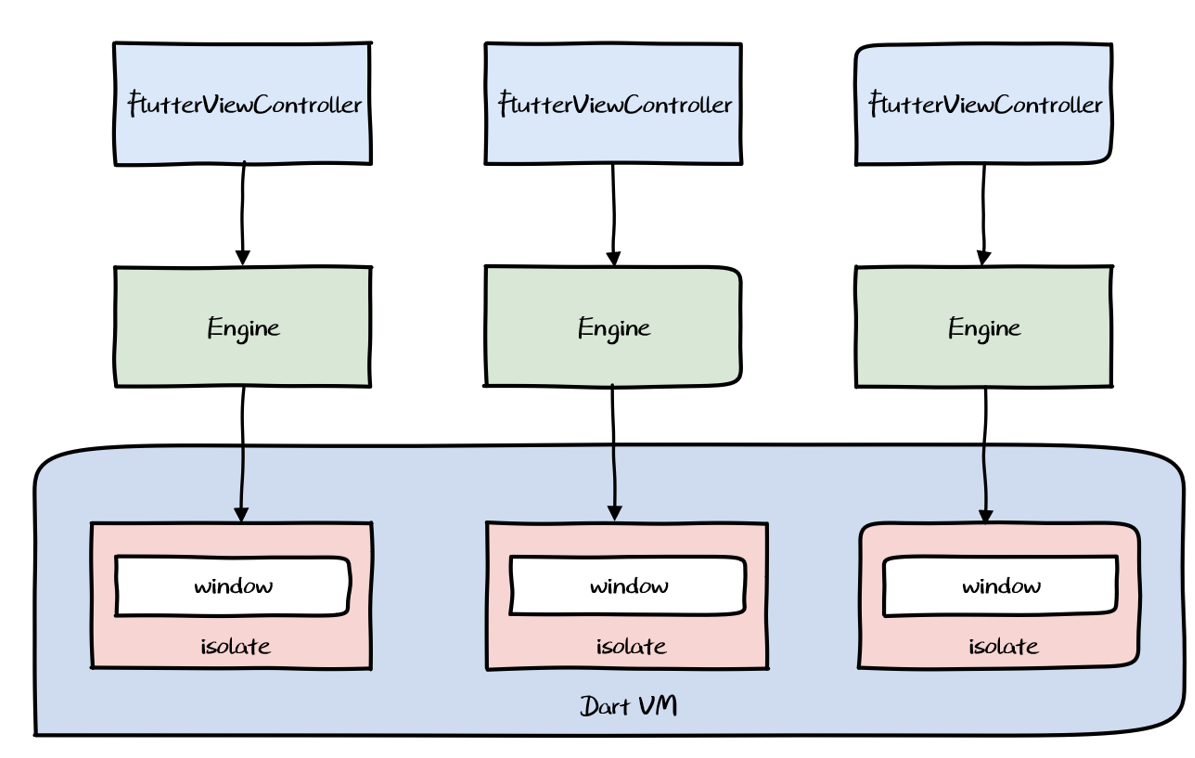
Key conclusions:
(a) Each Engine object creates a Root Isolate via DartIsolate::CreateRootIsolate().
(b) Each Engine creates separate threads for UI, GPU, IO, and Platform runners.
(c) Isolate memory is logically isolated — no sharing.
(d) Dart concurrency means running multiple isolates; each isolate runs code sequentially.
Therefore:
- Each Engine corresponds to one isolate (Root Isolate).
- Engine is a heavy object (separate threads per instance).
- Engines are isolated from each other.
- No shared-memory concurrency between engines — no races, no locks, no deadlocks.
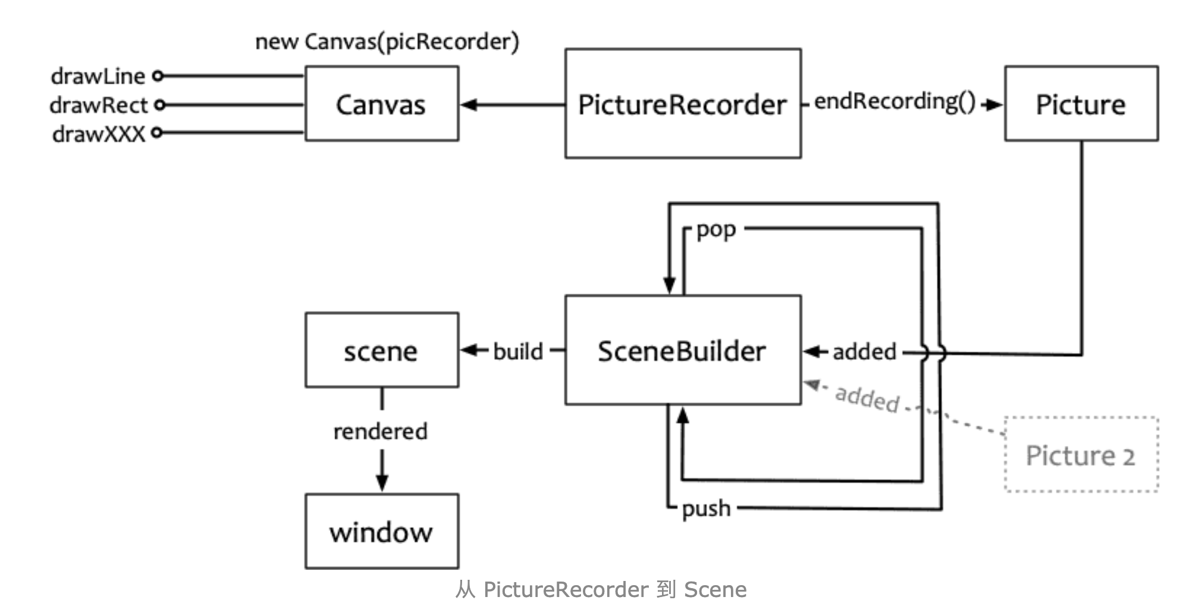
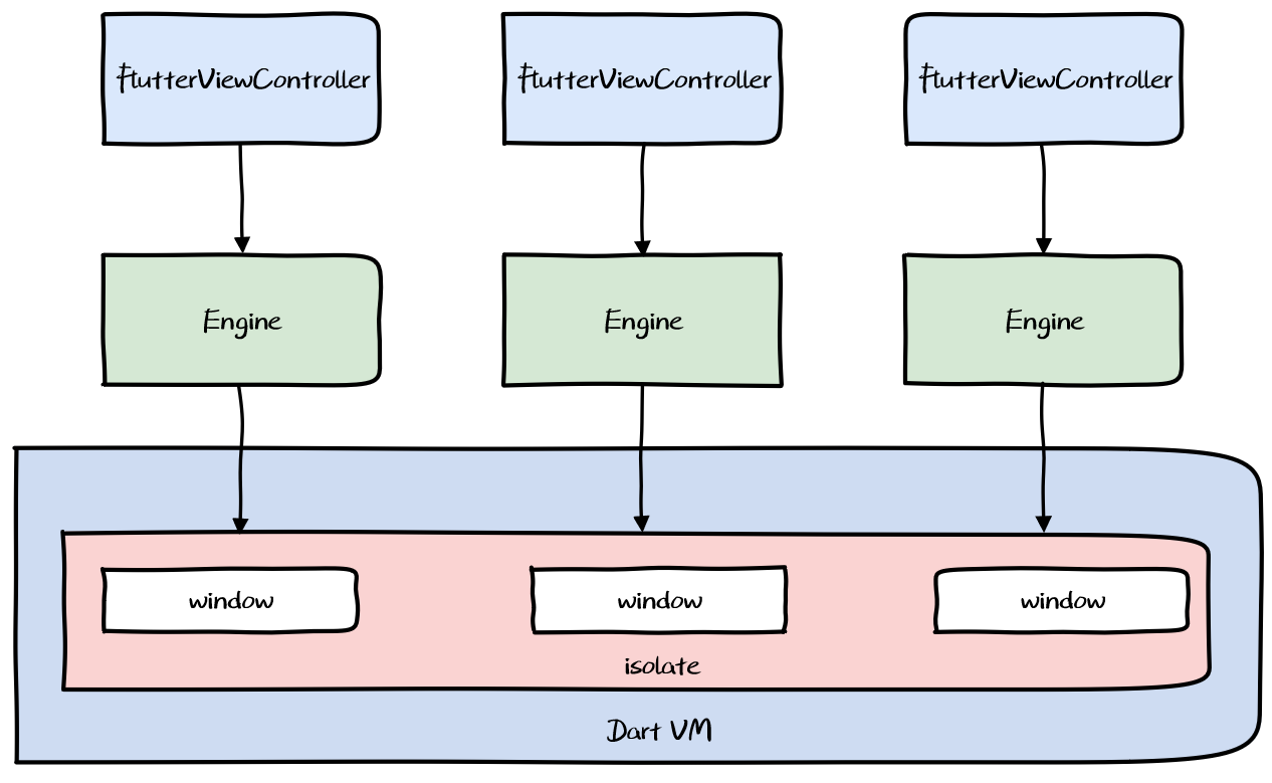
window is Flutter’s drawing surface — and the bridge between Flutter Framework (Dart) and Flutter Engine (C++). In the Framework layer, window is the ui.window singleton. In the Engine, it’s window.cc. Their APIs are minimal but symmetrical.
From a rendering perspective: drawing operations go to a PictureRecorder, endRecording() produces a Picture, added to a SceneBuilder, whose build() produces a Scene, which is passed to window.render().
Combining conclusions (1), (3), and (5 — window as the Engine-Framework bridge), the multi-engine model looks like this:
Characteristics:
- Multiple engines coexist in the app
- Each engine hosts one or more
FlutterVCs - Engines are isolated from each other
With two engines, each hosting two FlutterVCs with two Flutter pages each, the routing becomes very complex (see Thrio’s README):
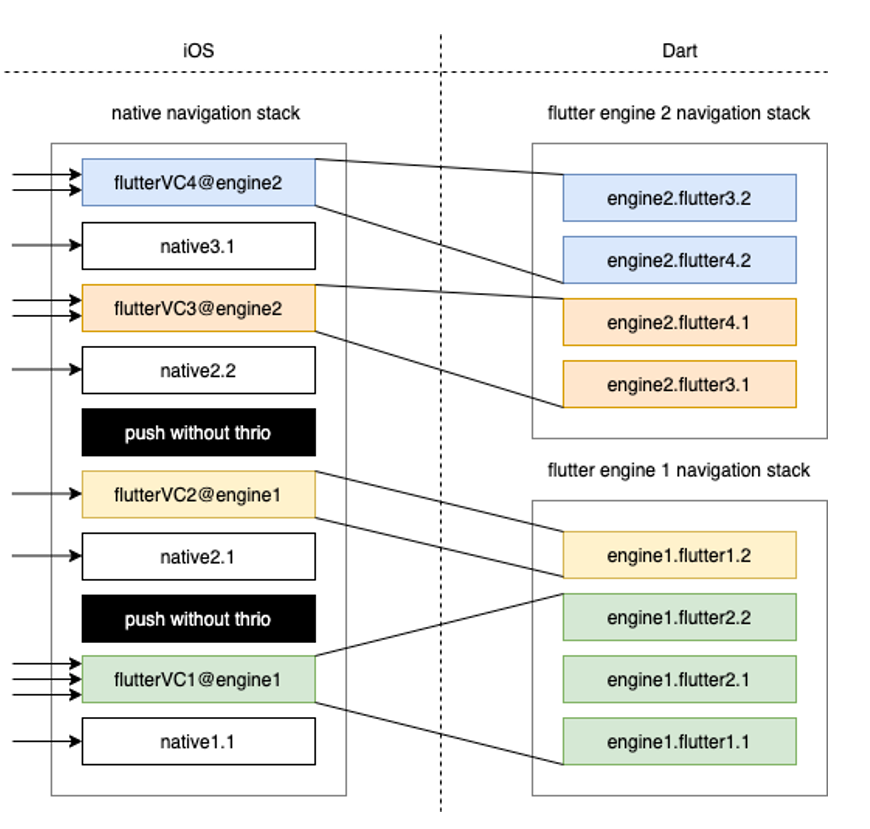
Problems:
- Communication layer is nightmarishly complex — core logic must live in native, partially defeating the purpose of cross-platform.
- Resource overhead — each Engine is expensive.
- Fragmented caching — the app has a native cache pool and one Dart VM cache pool per engine, with no sharing between them.
3.3.4 View-Level Hybrid Mode
To solve multi-engine issues, some teams introduced a windowId concept — allowing multiple windows to share a single Root Isolate. Since one isolate has one ui.window singleton, adding ID-based window management lets you have multiple windows per isolate.
Benefits: Multiple FlutterViewControllers can coexist and share memory.
Drawbacks: Requires Engine modifications — high ongoing maintenance cost. Multi-engine resource overhead still needs to be addressed through continuous Engine trimming.
4. Engineering Tooling
4.1 Compilation Modes
Dart natively supports JIT and AOT.
JIT and AOT
JIT (Just In Time): Runtime compilation, used in Debug mode. Supports dynamic code delivery but adds compilation overhead.

AOT (Ahead Of Time): Pre-compiled to platform binary, used in Release mode. High performance, but no dynamic updates — slower development iteration.
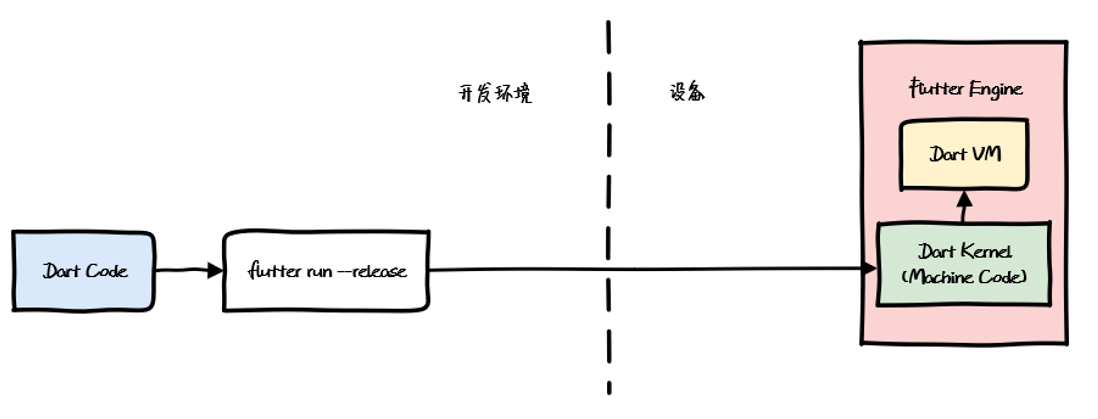
Debug, Release, Profile
Three run modes:

Debug for development (JIT), Release for production (AOT). This shapes integration and build requirements.
4.2 Integration and Build
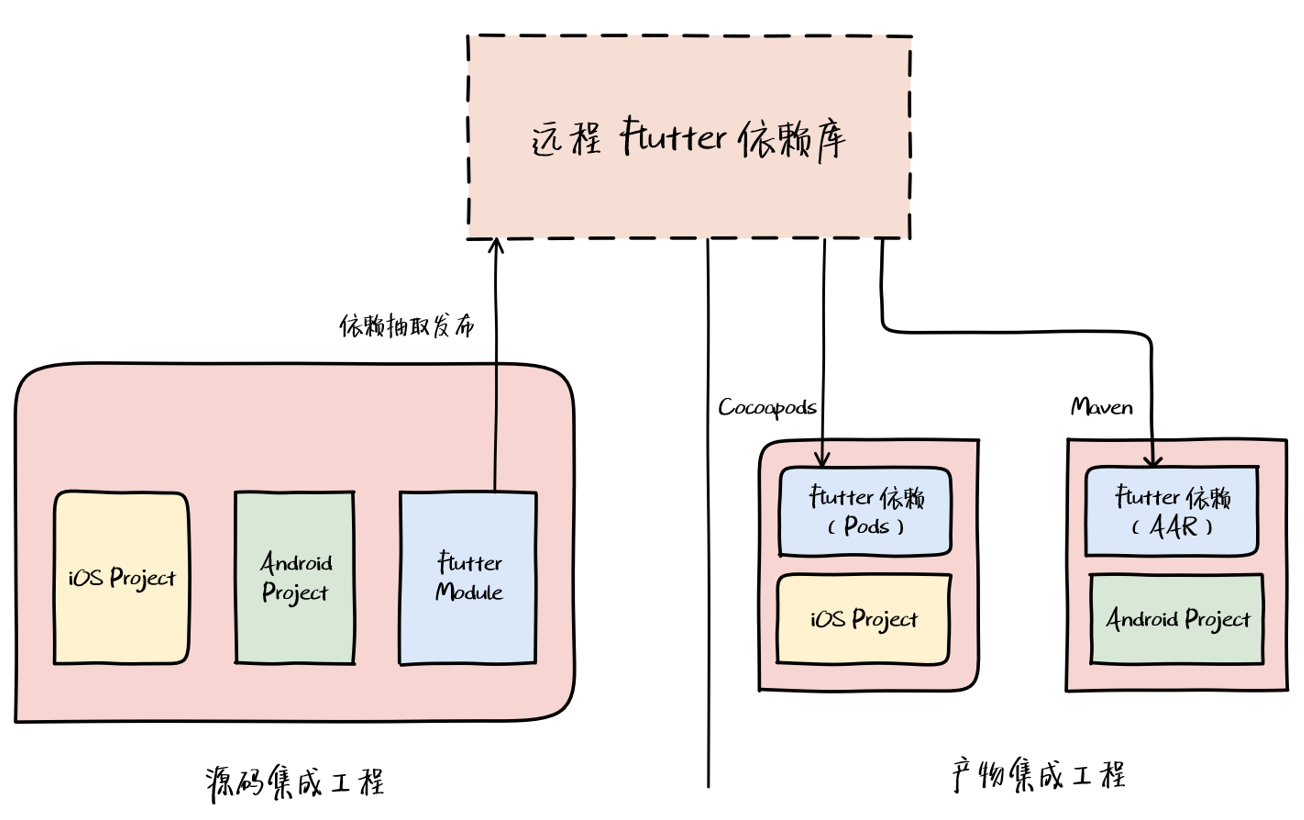
Two integration approaches:
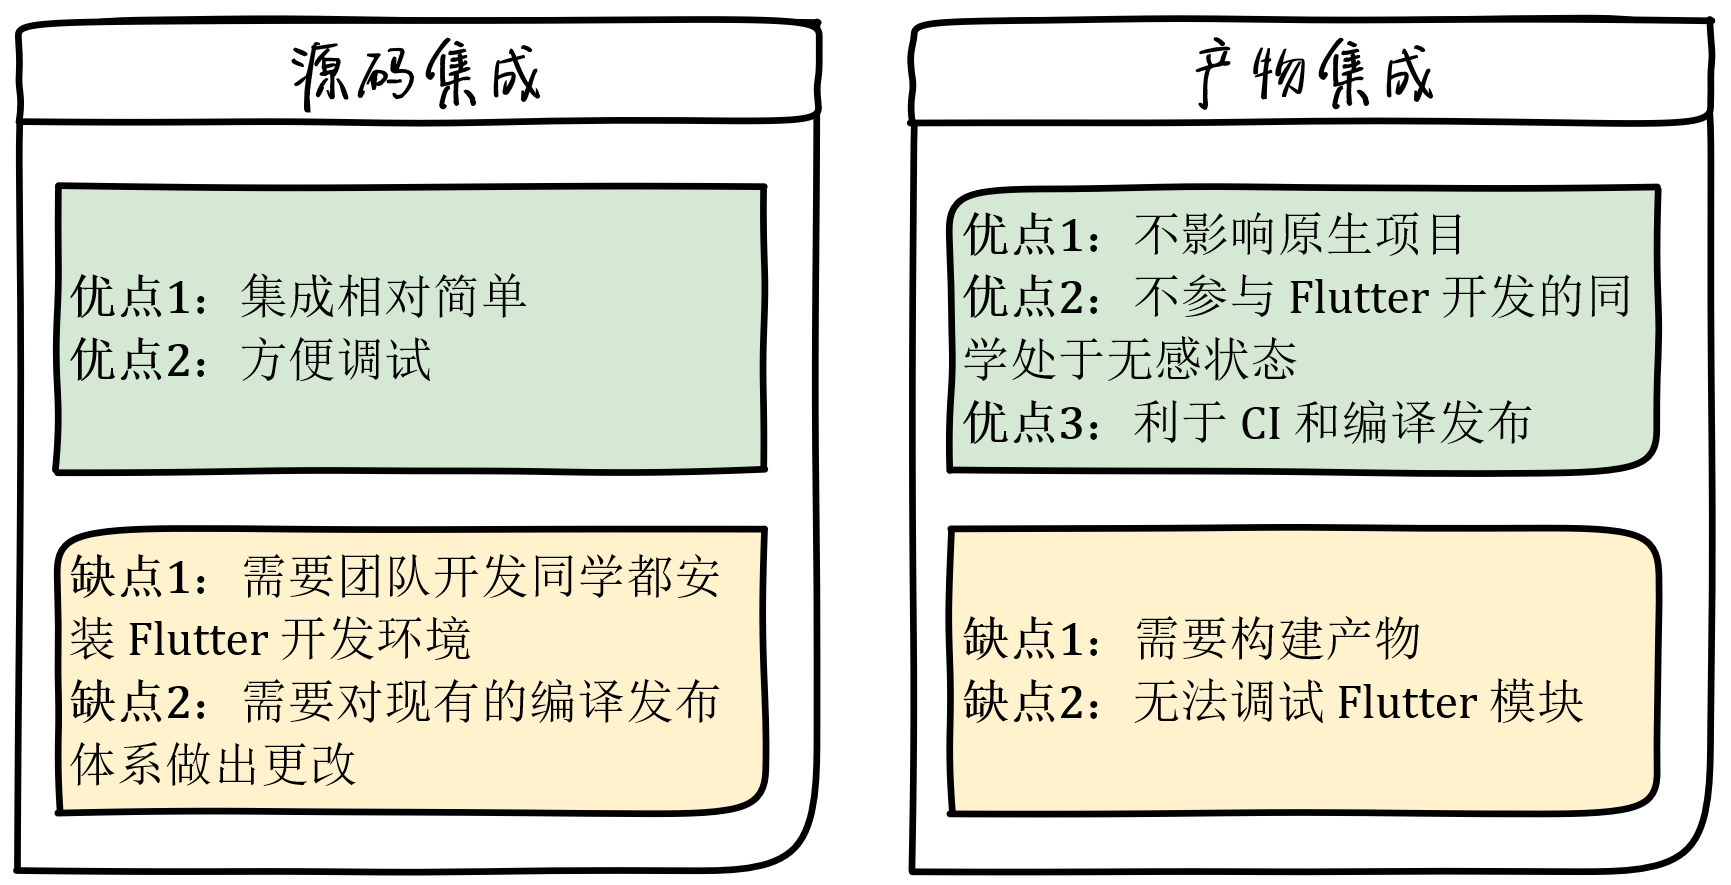
Source integration for the Flutter dev branch; artifact integration for everything else. Our hybrid project supports both: source integration on the Flutter dev branch for active development, then artifact extraction — iOS → Pods → CocoaPods, Android → AAR → Maven. Other branches just pod install or gradle sync to pick up updates.
Since artifact integration doesn’t support debugging, only Release artifacts need publishing.
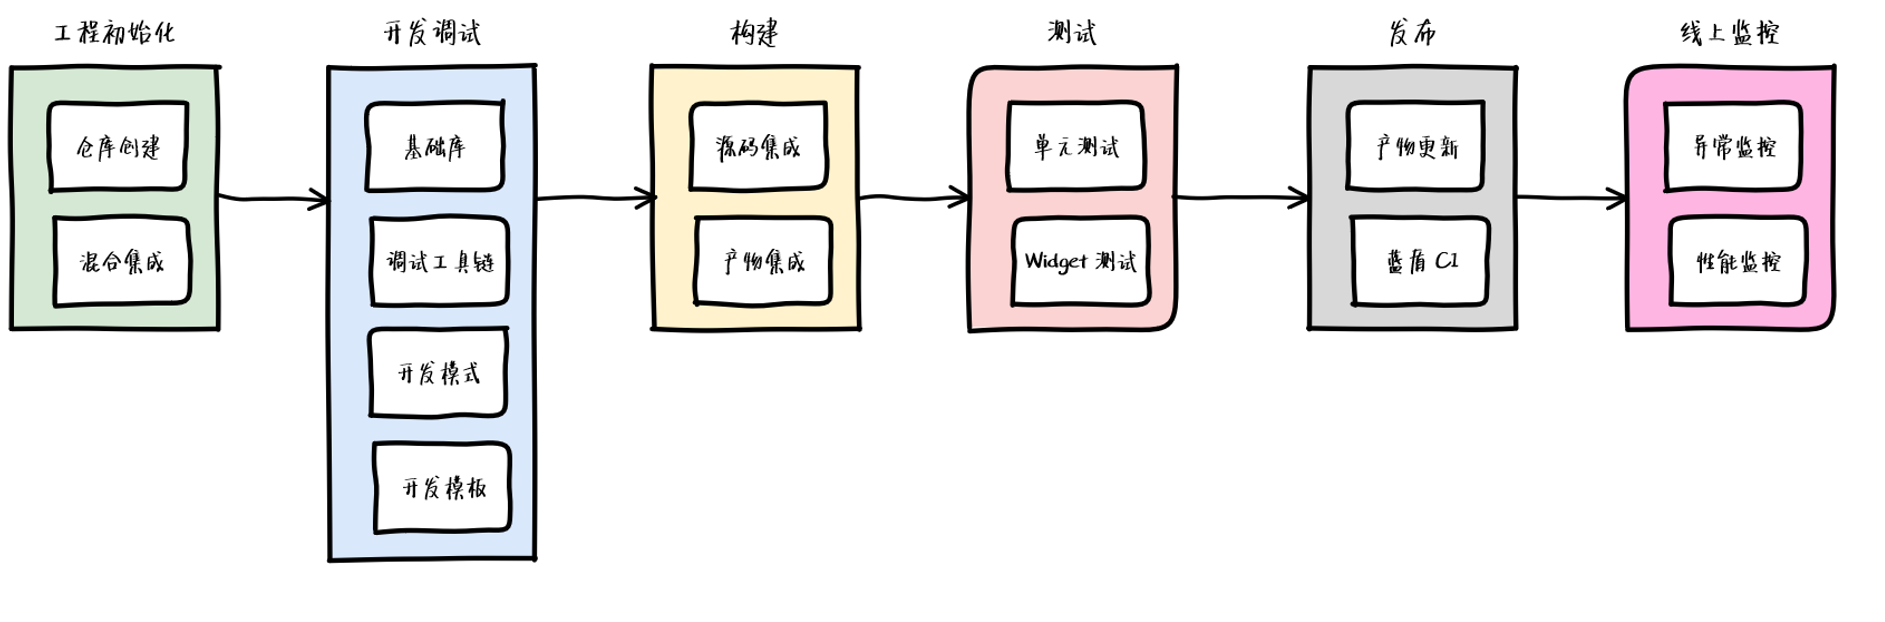
4.3 Workflow
After establishing the full hybrid project structure, we settled on this initial Flutter workflow. We’ll keep iterating on it.
Further reading: Exploring Flutter Hybrid Development Patterns Flutter Boost Hybrid Development: Practice and Source Code Walkthrough